How to Update Mac [Detailed Written and Video Tutorials]
How to update MacTo update your Mac, you can skip to the following methods to learn the detailed tutorials on updating your device.
| Workable Solutions | Step-by-step Troubleshooting |
|---|---|
| Fix 1. How to Update Mac with Software Update |
|
| Fix 2. How to Update Mac Manually in App Store |
|
Keeping your Mac up-Updating your Mac is essential for its continued security and optimal performance, as Apple regularly adds new functionality and resolves security flaws with each update. If you're new to updating your Mac, it can be intimidating, but this post aims to simplify and streamline the process with a comprehensive written and video explanation.
Updating your Mac to the latest version of macOS is a straightforward process that involves checking for updates, backing up your data, and resolving any issues that may arise during the update. By doing so, you'll ensure your Mac runs at maximum performance and security, with access to new features, bug fixes, and security updates.
Updating your Mac is essential to improve security, access new features, and boost productivity and user experience. It also ensures compatibility with the latest software and hardware, making your Mac ready for newer technologies. By upgrading, you'll be able to take advantage of these benefits and keep your device running smoothly.
Preparing Your Mac for an Update
To prepare your macOS for an update, it's best to take precautions by following these steps:
📑Backing up important files and data. Before updating your system, it's essential to backup crucial files and data to prevent loss in case the upgrade fails or you need to revert. You can use Time Machine, iCloud, or an external hard drive as a backup option, selecting the best method to safeguard your important data.
🛠️Checking system requirements. To ensure a smooth update, check if your Mac meets the latest macOS system requirements. You can check Apple's website or the Mac Software Update window to see if your model is compatible and meets the minimum hardware requirements. This will prevent potential compatibility and performance issues after updating.
💽Ensuring enough storage space. To download and install macOS Ventura or other versions, your Mac must have enough free space, with 15 GB of free space suggested, and you can check your Apple Storage space to delete unnecessary and extra files if needed.
To free up space on your Macintosh HD, check out the article for more information on how to do so.
To free up space on your Macintosh HD, try these 8 methods: delete unnecessary files and documents, empty the Trash, remove unused apps and their associated files, manage email attachments and downloads, and consider upgrading to a cloud storage service like iCloud or Google Drive. Additionally, you can use the Storage tab in About This Mac to see which files and folders are taking up the most space, and then delete or move them to a different drive.
To free up space on Macintosh HD, you can start by deleting unnecessary files and documents, emptying the Trash, and uninstalling unused apps. You can also consider using the Storage tab in About This Mac to see which files and folders are taking up the most space and delete them accordingly. Additionally, you can use the Disk Cleanup feature to remove temporary files and system logs. If you're still struggling to free up space, you may want to consider upgrading your storage or using an external hard drive to store your files.
How to Update Mac [Update and Install macOS]
Once all requirements have been met, you can start the update process.
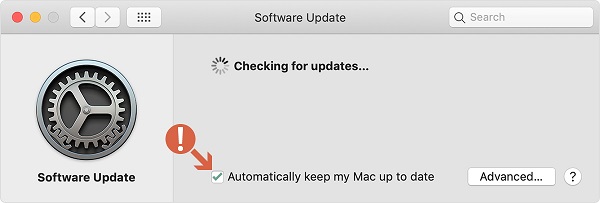
How to Update Mac with Software Update
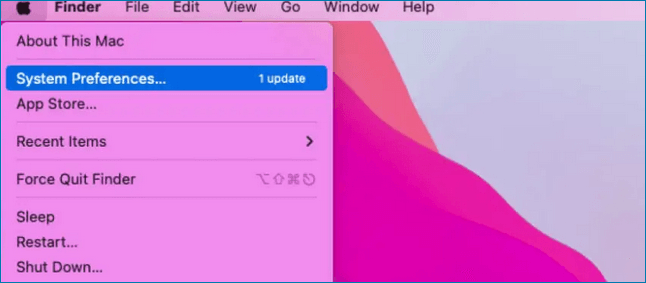
To update your Mac via Software Update, click the Apple logo in the top left corner, then select System Preferences, followed by Software Update. This will check for any available updates and prompt you to download and install them if necessary. Alternatively, you can also click the Apple logo, select About This Mac, then click Software Update.
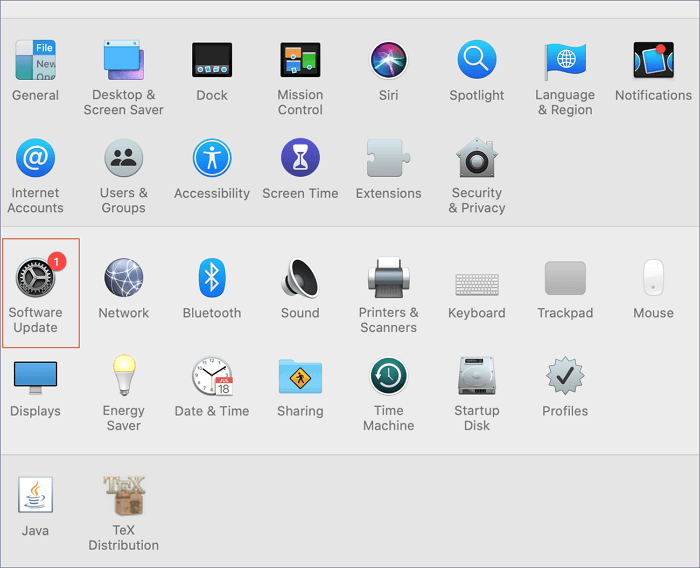
Step 1. Open System Settings and navigate to Software Update.
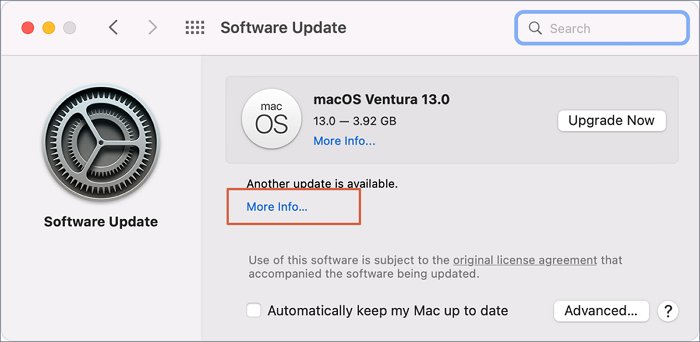
Step 2. Click on the Check for Updates button.
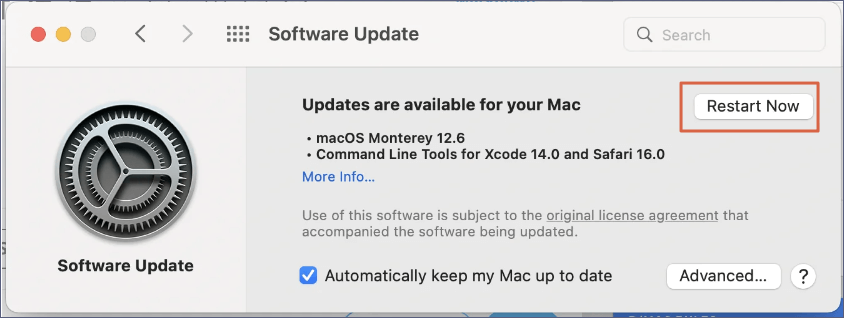
Step 3. If any updates are available, click Upgrade Now. You can also choose to enable "Automatically keep my Mac up to date" to ensure your device stays current.
If your Mac isn't showing any updates, you can force it to check for updates by going to System Preferences > Software Update. If you're still not seeing any updates, try restarting your Mac and then check for updates again. If you're running macOS High Sierra or earlier, you can also try using the Terminal command `softwareupdate -all` to force your Mac to check for updates.
How to Update macOS on Mac Manually
To manually update your macOS, here's what you should do:
Step 1. Open the App Store on your Mac, then search for the latest version of macOS.
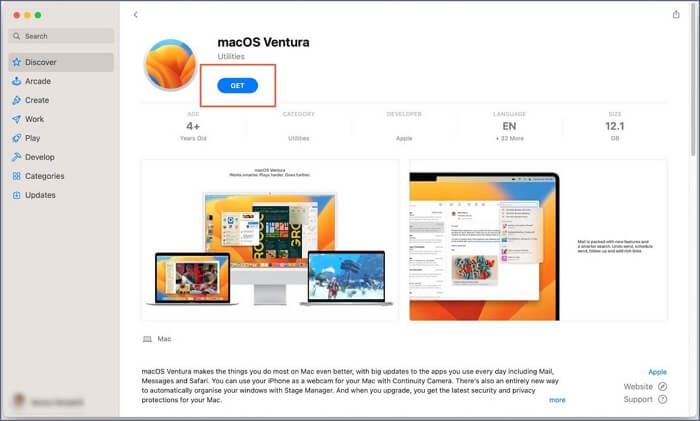
Step 2. To start installing the macOS installer, click Download. The installation file will be stored in the Applications subdirectory.
Step 3. Once the download process is complete, launch the MacOS Installer and follow the on-screen instructions.
How to Troubleshoot macOS Update Problems on Mac
Updating macOS on your Mac can sometimes go awry, leading to issues like error messages, poor performance, app incompatibility, battery drain, Wi-Fi connectivity problems, or even a frozen Mac. These problems can cause the macOS Ventura upgrade to fail or lead to other update issues. Fortunately, we've identified two solutions that can quickly get your Mac up and running again.
1. Start your Mac in Safe Mode
Mac Safe Mode is used to troubleshoot hardware and software issues that prevent updates from being installed, allowing for a clean and stable environment to run the update.
Step 1. To start your Mac in Safe Mode, first, power it off completely. Then, press the power button to turn it back on.

Step 2. To boot a Mac in safe mode, turn it on and hold down the Shift key immediately after the startup chime, continuing to hold it down until the login window appears.
Step 3. To resolve the issue where a Mac won't start in Safe Mode, follow these steps: Launch Software Update on your Mac after logging in, and then check the tutorial to fix the problem.
2. Reinstall macOS from Recovery Mode
Reinstalling macOS can repair some system files that have been corrupted, returning your Mac to a fully functional condition.
Step 1. To start reinstalling macOS from Recovery Mode, power down your Mac.
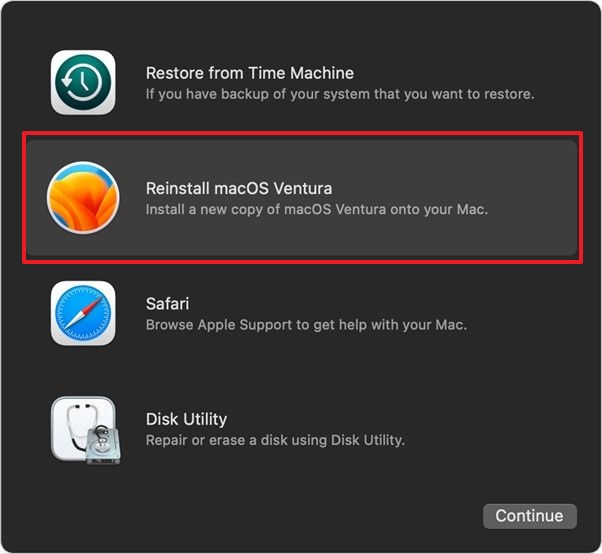
Step 2. Once your Mac has started up, press and hold the Command and R keys until the Apple logo appears.
Step 3. To reinstall macOS, click on the "Reinstall macOS" option in the Utilities box, and then follow the on-screen instructions to complete the process.
Have you fixed the update issues with the two methods? If you think this guide is helpful, share it on social media now!
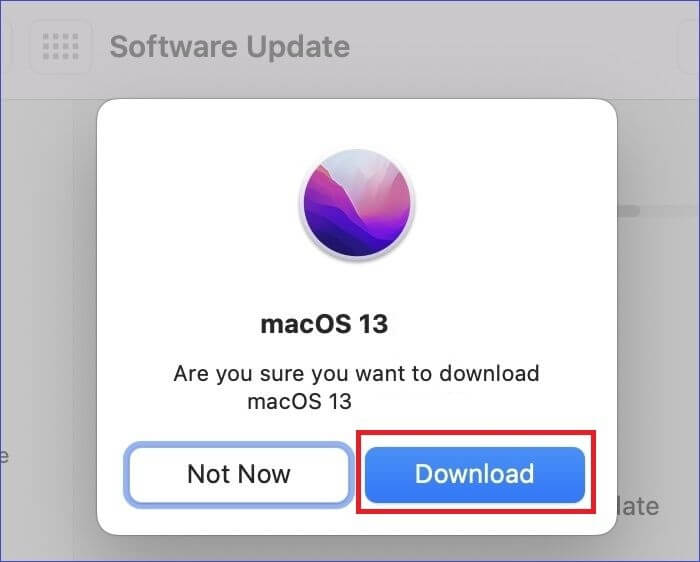
How to Update Mac Software and Applications
Updates to Mac software improve compatibility, performance, stability, and security, and can be applied according to where the software was purchased. To update the OS on your Mac, follow these steps:
Step 1. Click the Apple icon in the upper-left quadrant of the display.
Step 2. To check for system updates, click the System Preferences icon, which may prompt a notification if an update is available.
Step 3. Select the "Software Update" option, which is represented by a gear icon in the menu. If a software update is available, a red icon may appear at the top-right of the gear indicator.
Step 4. Wait for your Mac to search for updated availability. It may take a while for the progress wheel to stop rotating as your computer searches for an update.
Step 5. Click Update Now. A countdown clock will display the estimated time required to obtain the update in the window.
Step 6. If you want future updates to be installed automatically, select the box next to Keep my Mac up to date automatically.
Step 7. Select the Restart Now button. Your computer's reset could take a lengthy time.
To learn more about uninstalling applications on a Mac, check out this tutorial.
To partition a Windows 10 hard drive using the Disk Management tool, open the Disk Management tool by searching for it in the Start menu, or by typing "diskmgmt.msc" in the Run dialog box (Windows key + R). In the Disk Management tool, select the disk you want to partition and click on the "Shrink" button to create a new partition.
Uninstalling applications on Mac can save your Mac storage, and if you're looking for a guide on how to do it, this article will provide you with the necessary steps.
Recover Lost Data with Software After Updating Mac
Deep Data Recovery for Mac is a powerful tool that helps recover lost files after various incidents, including macOS updates, formatting, malware, and system failures, from various storage devices.
Deep Data Recovery for Mac can be useful in scenarios such as recovering files or folders accidentally erased during updates, recovering data lost due to system failures or other difficulties during updates, and retrieving data if Mac updates deleted everything.
Key Features of Deep Data Recovery for Mac
- Powerful data recovery algorithms.
- User-friendly interface.
- Supports various storage devices.
- Reliable and efficient data recovery.
If you're looking to recover deleted files on your macOS, check out the tutorial on recovering deleted files on macOS Ventura or older versions. This will guide you through the process of retrieving your lost files.
Note: To create a backup, click on "Disk Backup" on the left first. This will allow you to recover data from a backup image in case the disk is damaged, or data is accidentally deleted or lost.
Step 1. Select the location
After updating to macOS Sonoma/Ventura/Monterey/Big Sur, go to Disk Utility, select the disk where you lost data, click "Search for lost files", and follow the on-screen instructions to recover your lost data.

Step 2. Find lost data after the scan
Deep Data Recovery for Mac scans the selected disk volume, displaying the results on the left pane, allowing users to find wanted data by file type and file path.

Step 3. Recover data after macOS update
Select the target files that were unknowingly lost during or after the update and click the "Recover" button to restore them.

Summary
Updating your Mac is crucial for keeping your system safe, reliable, and current, which can be achieved by following the methods explained in this article to run the most up-to-date software and programs without encountering typical update difficulties.
Deep Data Recovery for Mac is a reliable application that can quickly and effectively recover lost data, making it a must-have for anyone who wants to ensure their data is always safe and secure on their Mac. Whether you've lost data due to updating your Mac or face other data recovery circumstances, this robust tool can help you retrieve your lost files with ease.
How to Update Mac FAQs
To update your Mac, you can check for software updates in the System Preferences, click on the Apple logo, and select "System Preferences" followed by "Software Update." Alternatively, you can use the App Store to update your Mac, which can be found in the Dock or Applications folder.
1. Why can't I update my Mac?
You can't update your Mac because of storage space restrictions, outdated software, or connectivity problems. Make sure your Mac has enough storage, bandwidth, and the latest software before trying to update again.
2. How do I update my Mac when it says no updates are available?
There's only one option if your Mac displays the message that no updates are available: manually updating the software from the Software Update menu.
3. Why doesn't my Mac have a Software Update button?
If your Mac is running an outdated MacOS, the Software Update button may not be displayed in the System Preferences menu, as the latest macOS has this feature available.
4. How can I manually update my Mac?
If the software update option is unavailable on your Mac, you can manually update it by finding the latest macOS from the Mac Store and installing it, but this process can be difficult and requires certain technical abilities.
Related Articles
- How to Fix Mac Update Taking Forever [2023 Guideline]
- How to Fix Hogwarts Legacy Not Saving [For Steam/PS5/Xbox Players]
- What Is Hard Disk Partition? Everything You Need to Know in 2023
- What Is the Best LG TV USB Format & How to Set It? [Step-by-Step Guide]
- Steam Deck Format SD Card Grayed Out? How to Fix
Fix Steam Deck format SD card grayed out. Learn why formatting is unavailable and how to prepare or repair the SD card. - Steam Deck Save File Location(All You Should Know)
Many users get confused when trying to find the Steam Deck save file location. However, accessing and transferring game saves between the Steam Deck and PC is a relatively straightforward process, and this post will provide a detailed guide on how to do so.