How Do I Update My Mac When It Says No Update | 8 Tested Methods for Mac
How do I update my Mac when it says no update? Here are possible solutions that can help you solve this issue and update your Mac or MacBook Pro.
| Workable Solutions | Step-by-step Troubleshooting |
|---|---|
| 1. Check If Your Mac Device Support the macOS Version | Select the Apple icon. Choose About This Mac from the drop-down menu. Check the detailed...Full steps |
| 2. Check Apple's Software Update Servers Condition | Sometimes, the issue may not be something to do with the system. The Apple servers may crash when to...Full steps |
| 3. Shut Down and Restart Your Mac or MacBook | Go to the Apple icon. Click on Restart. Wait for the device to turn off and turn it on again...Full steps |
| 4. Search for macOS Version in Apple App Store | Open the App Store on your Mac. Type in macOS Ventura/macOS Monterey or other versions...Full steps |
| Other Solutions | Go to the Apple menu. Choose System Settings from the drop-down. Select Network from the sidebar...Full steps |
Why Does My Mac Say No Update Available
Ensure your macOS is up to date by upgrading to the latest version, which helps get rid of bugs and glitches, and takes only a few seconds to do.
There are instances where Mac users report that their system says there are no updates available, despite updates being present. This issue can be caused by various reasons, and before troubleshooting, it's essential to understand that there are several factors that can lead to this problem. To resolve the issue, you can try troubleshooting steps to update your Mac when it says no update is available.
Reason 1. Compatibility Issues
An update might come out, but it may not be compatible with your model, causing your Mac to not show the update as it cannot download and install the latest macOS Ventura version.
Reason 2. Unstable Internet
Mac may not update due to a weak or unstable internet connection, which can prevent the system from displaying available updates.
Reason 3. Issues with Apple's Servers
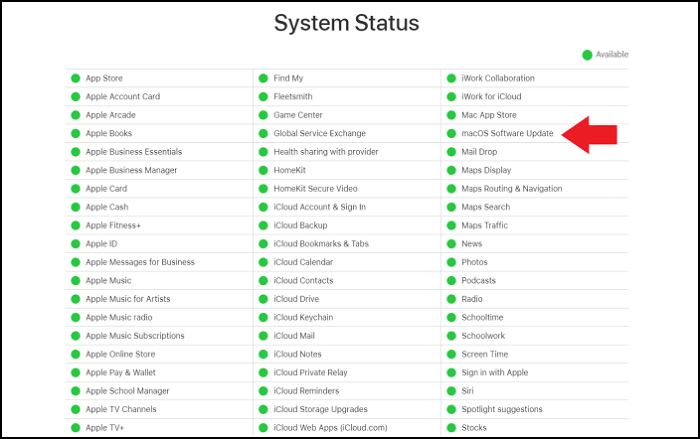
If you're experiencing issues with your Apple device, check the system status page to see if the servers are functioning properly. If you see red signals, it indicates that the server is down, and the issue may not be on your end. This can be a simple solution to resolve the problem.
How Do I Update My Mac When It Says No Update [8 Solutions]
If your Mac is showing "no update is available" or "update not found", don't worry! To resolve the issue, back up your important files using Deep Data Recovery first, and then try installing or updating macOS.
Back Up Your Mac and Never Lose Data
You can back up and restore your MacBook or iMac without relying on Time Machine, iCloud, or external hard drives. Instead, use the built-in "Backup" feature in System Preferences to create a bootable clone of your startup disk, which can be used to restore your Mac in case of a problem.
Let's take a look:
1. Check If Your Mac Device Support the macOS Version
To check if your system can support the latest OS version, you can check the minimum system requirements for the desired OS version. If your system meets the requirements, you can proceed with the update. If not, you may need to consider upgrading your hardware or using an older version of the OS that is compatible with your system.
Step 1. Select the Apple icon.
Step 2. Choose About This Mac from the drop-down menu.
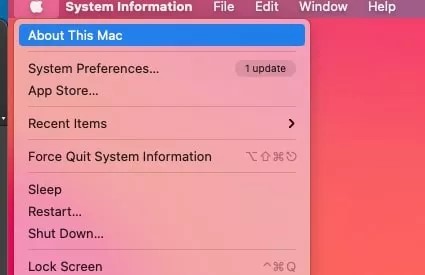
Step 3. Check the detailed information present on the Mac.
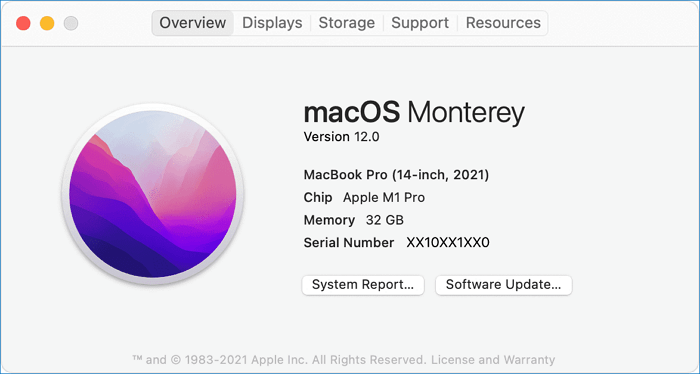
If your Mac model is not on the list of compatible models for the version you want to install, your Mac cannot support that version. The version you want to install may not be compatible with your Mac model. You should check the list of compatible models to see if your Mac model is supported.
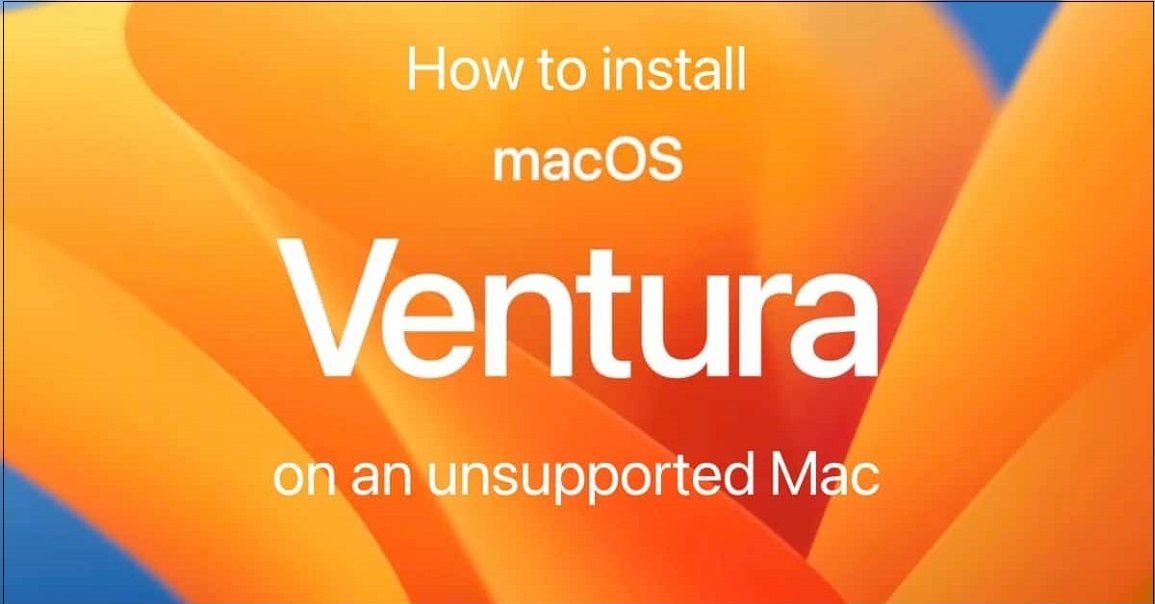
If your Mac can't support macOS Ventura, there are still other methods to install it. You can read more about these methods in this guide.
To install macOS Ventura on an unsupported Mac using OpenCore Legacy Patcher, you'll need to create a bootable installation USB drive with the Ventura installer, then install the OpenCore Legacy Patcher and configure it to support your Mac's hardware. You'll also need to add a boot entry for Ventura in the Patcher's configuration, and ensure that your Mac's firmware is updated to the latest version.
If you want to install macOS Ventura on an unsupported Mac, you can use OpenCore Legacy Patcher to achieve this. We will provide a detailed method to guide you through the process.
2. Check Apple's Software Update Servers Condition
Sometimes, the issue may not be something to do with the system, but rather a server crash caused by too many users trying to install the update at the same time, making the update unavailable.
To check if Apple servers are fine, visit the System Status page and search for macOS Software Update. If it's in green, everything is fine, but if not, wait for some time.
3. Shut Down and Restart Your Mac Device
You can try restarting your MacBook Pro or other Mac devices to resolve various problems. To restart, follow these steps: 1. Click the Apple logo in the top left corner of the screen. 2.
Step 1. Go to the Apple icon.
Step 2. Click on Restart.
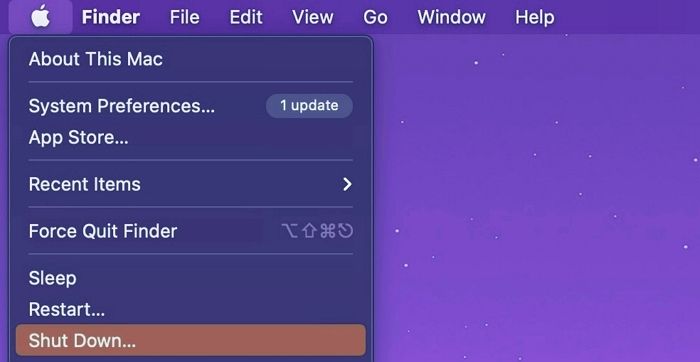
Step 3. To reset the device, locate the power button and press it for a few seconds to turn it off. Wait for the device to fully shut down, and then press the power button again to turn it back on.
4. Search for macOS Version in Apple App Store
To get the update you want, you can visit the App Store, where you can easily find and download the latest version of the app. Simply open the App Store, search for the app, and tap the "Update" button next to it. This will start the download and installation process, and you should have the updated app in no time.
Step 1. Open the App Store on your Mac.
Step 2. Type in macOS Ventura/macOS Monterey or other versions.
Step 3. When it appears, click the View or GET button.
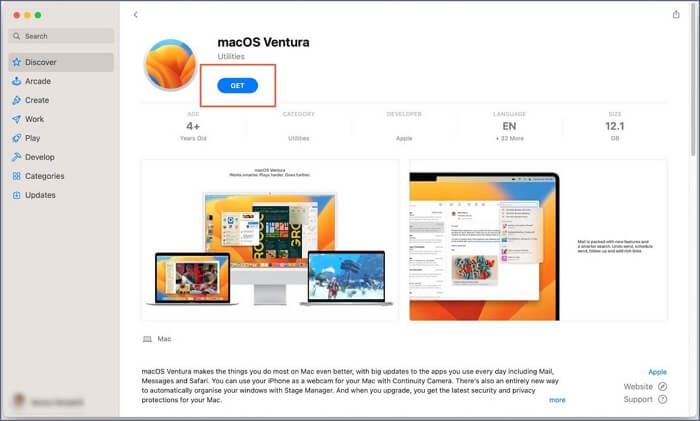
Step 4. If prompted, give the Apple ID.
5. Troubleshoot the Internet Connection on Mac
To check the internet connection on a Mac, you can open a tab in Safari to see if the website loads quickly, or check the network status via system settings.
Take a look at the steps:
Step 1. Go to the Apple menu.
Step 2. Choose System Settings from the drop-down.
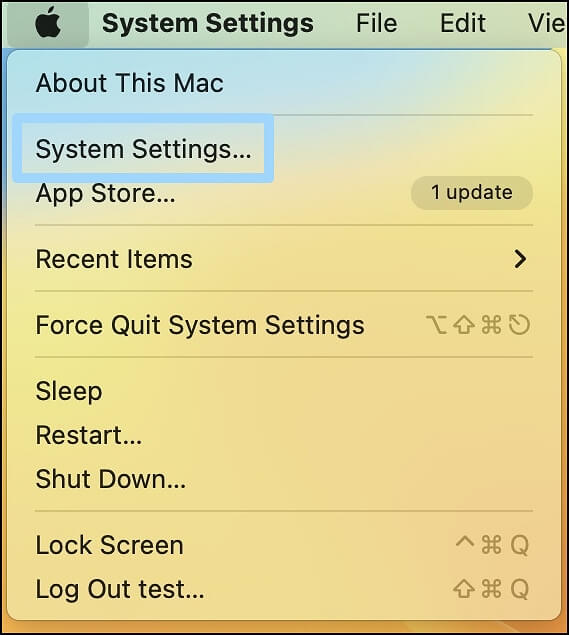
Step 3. Select Network from the sidebar to check the internet connection. If the Wi-Fi is not connected, enable and connect it.

If you have a Wi-If you're experiencing issues with your Mac, check your router and ensure the internet connection is stable. If the problem persists, consider changing your service provider. If you've resolved the update issue, share this page with other Mac users.
6. How to Update the macOS in Safe Mode
To update macOS in Safe Mode, restart your Mac and immediately hold down the Shift key. Keep holding it until you see the login screen. Then, log in as you normally would.
For Apple Silicon Macs:
Step 1. Shut down the system.
Step 2. Press the Power button on the device and hold it for a few seconds to turn it off.
Step 3. Release it when the Startup Menu appears.
Step 4. Choose the Mac startup disk.
Step 5. Press and hold the Shift key.
Step 6. Choose to Continue in Safe Mode.
Step 7. Release the Shift key.
Step 8. Now you can proceed with the update.
For Intel Macs:
Step 1. Restart the system.
Step 2. When it boots, press and hold the Shift key.
Step 3. Wait for the login window.
Step 4. Let go of the Shift key.
Step 5. You might need to log in twice.
7. Uninstall Suspicious Applications on Mac
To resolve the issue where your Mac's software update is not working, try uninstalling any suspicious applications that may be interfering with the process. You can do this by going to the Applications folder, selecting the app in question, and dragging it to the Trash. Alternatively, you can right-click (or control-click) on the app icon and select "Move to Trash" from the context menu. Once the app is removed, restart your Mac and try updating again.
Step 1. Go to the Finder icon.
Step 2. Long press the application icon.
Step 3. To uninstall an app, click on the delete option, or drag the app to the Bin if it doesn't have a delete option.

8. Download and Install the macOS Version Manually
To update your Apple device manually, visit the official Apple website, search for the latest OS update, and click the link to initiate the update process.
To update your iPhone, go to the App Store, select the update you want, and choose the Get button to download and install it.
How to Recover Data After macOS Update
Updating your Mac can sometimes lead to data loss, especially if the macOS Ventura update fails. To avoid this, it's crucial to have a backup of your data. If you haven't backed up your data yet, don't worry, and let's explore ways to recover it.
You can recover lost data with the help of professional data recovery software, such as Deep Data Recovery, which can restore data regardless of the reason, including accidental deletion, formatting, partition, or virus attacks.
Here are the highlights of Deep Data Recovery for Mac:
- 🥰You can easily retrieve photos, music files, videos, documents, emails, etc. and even recover lost files after a macOS Monterey update.
- 🖥️Hassle-This tool offers free restoration of Mac-based devices, including SSD, HDD, fusion drive, and more. It can also recover data from a bootable USB used to install macOS.
- 🚫If your Mac won't boot after a macOS update, a data recovery software can help you extract data from the internal hard drive.
Besides, the tool has a user-friendly interface and can even be used by beginners. All you have to do is follow these simple steps. Take a look:
Note: To create a backup, click on "Disk Backup" on the left. This will allow you to recover your data if the disk is damaged, or if data is accidentally deleted or lost, by restoring it from the backup image.
Step 1. Select the location
After updating to macOS Sonoma/Ventura/Monterey/Big Sur, go to Disk Utility, select the disk where your data was lost, click "Search for lost files", and follow the on-screen instructions to recover your lost data.

Step 2. Find lost data after the scan
Deep Data Recovery for Mac scans the selected disk volume, displaying the scanning results in the left pane, allowing users to find specific data using file type and file path.

Step 3. Recover data after macOS update
Select the files you want to recover and click the "Recover" button to retrieve them.

Summary
Mac users may experience issues with updating their system if it doesn't show available updates, possibly due to a poor internet connection or incompatibility issues, preventing the system from displaying available updates.
Restarting the system or updating in safe mode can help resolve the issue, but data loss is a possible risk. Alternatively, checking the Apple servers may also be a solution. However, if these methods fail, the problem persists and further troubleshooting may be required.
You can try Deep Data Recovery for Mac, a professional data recovery software with a wide range of features that's easy to use and helps users get back lost data.
Update My Mac When It Says No Update FAQs
To fix the no-update problem on a Mac, you can try restarting your computer, checking for software updates in System Preferences, and ensuring that your internet connection is stable. Additionally, you can reset the System Management Controller (SMC) and the Power Management Unit (PMU), or try updating the operating system manually. If none of these solutions work, you can try resetting the NVRAM or using the built-in Diagnostic Tool to identify any hardware issues.
1. How to fix the macOS Ventura update not showing up?
To fix the macOS Ventura update not showing up, check if your system is compatible, restart your computer, and ensure a stable internet connection.
2. How do I update my Mac to 10.15 when it says no update?
If your system isn't showing the 10.15 update, you can search for it on the App Store, download and install it, but first check that your Mac is compatible with the update.
3. How to check if my Mac is too old to update?
To check if your Mac is too old to update, you can follow these steps: First, click the Apple logo in the top left corner of your screen, then click About This Mac. This will open a new window that displays information about your Mac, including its operating system version, processor type, and memory.
- 1. Go to the Apple icon.
- 2. Select About This Mac.
- 3. Here, you can see the year of the Mac.
4. How to recover files lost due to macOS updates?
If you've lost files due to a macOS update, you can use a reliable data recovery tool to recover them. A tool like Deep Data Recovery for Mac can help you retrieve lost data.
Related Articles
- ReFS VS NTFS VS FAT32, Which One Should You Use?
- How to Factory Reset Dell Laptop [Step-by-Step Guide]
- How to Factory Reset HP Laptop Without Password
- Factory Reset ASUS Laptop F9 Not Working [Why & How to Fix]🔥
- FAT32 Structure Information - MBR, FAT32 Boot Sector Introduction
This article provides detail introduction of FAT 32 file system structure information, FAT 32 boot sector, FAT 32 partition table, FAT 32 MBR. If you lost data by accident, free download Deep Data Recovery to undelete files and recover lost data, unformat disk, restore formatted or deleted hard drives, partitions under FAT 32 file system. - How to Find Adobe Premiere Product Key? 8 Full Solutions
To install, reinstall, or activate Adobe Premiere or other versions, you need a product key. If you've lost or can't find your product key, follow these easy steps to locate it.