Factory Reset ASUS Laptop F9 Not Working [Why & How to Fix]🔥
ASUS is a leading manufacturer of computers and laptops, renowned for producing high-quality and efficient devices that are loved by many.
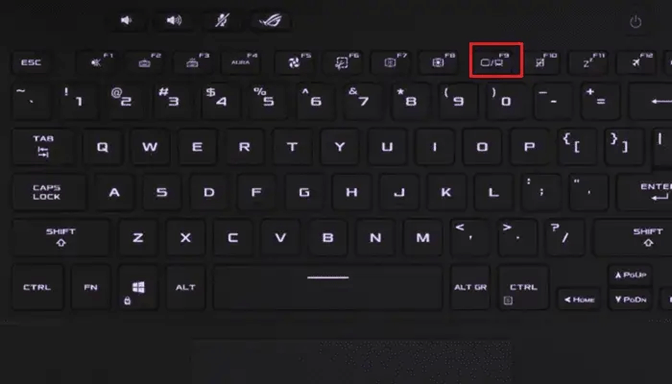
ASUS laptops use the F9 key to perform a factory reset, which removes all data, apps, and the operating system, restoring the laptop to its default setting, improving speed, clearing viruses, and preparing it for selling.
However, if the F9 key doesn't work on your ASUS laptop, you'll need alternative solutions to perform a factory reset. Fortunately, this post provides helpful information to guide you through the process.
What Causes Factory Reset ASUS Laptop F9 Not Working
The F9 key may not work properly due to hardware issues that affect other keyboard keys as well.
- Notice:
- The F9 key on an ASUS laptop may stop working due to dirt, debris, or dust accumulation, or worn-out keyboard drivers. Updating the keyboard drivers and pressing F9 again can resolve the issue. If the problem persists, visiting an authorized ASUS agent for keyboard repair is recommended.
If you're having trouble performing a factory reset on your ASUS laptop using the F9 Key, there are alternative methods to try. This blog will guide you through five different approaches to achieve a factory reset on your ASUS laptop without relying on the F9 Key.
Ways to Fix Factory Reset ASUS Laptop F9 Not Working
If the F9 key doesn't work on your ASUS laptop, you can try these 5 methods to factory reset your device: Press the F9 key and the power button at the same time for a few seconds. If that doesn't work, try pressing the F9 key and the power button separately.
- Reset Laptop with Windows Settings
- Reset from WRE
- Reset Directly via the Boot
- Reset with Recovery Partition
- Reset Using an Installation Disc
1. Reset Laptop with Windows Settings
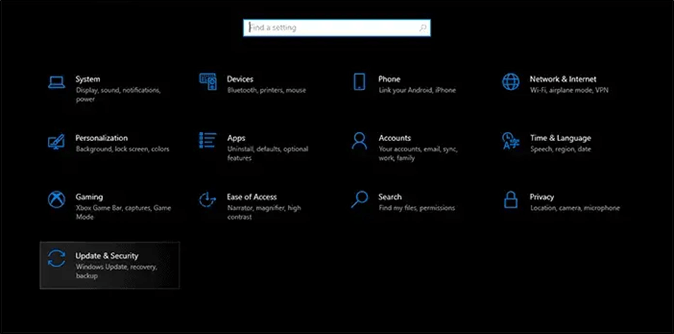
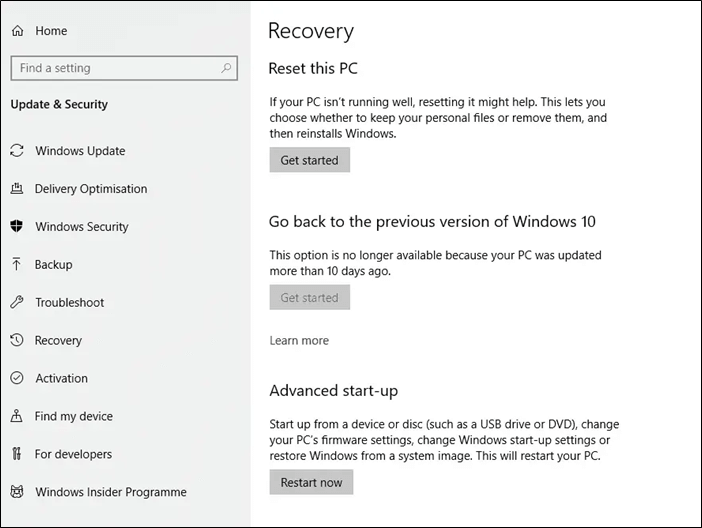
To reset your ASUS laptop, go to the Settings menu, then click on "Update & Security" and select "Recovery". From there, you can choose the "Reset this PC" option and follow the prompts to complete the process. This method allows you to reset your laptop without needing to press the F9 key.
Follow these steps to perform this method
Step 1: Press the Windows + L key simultaneously to open Windows Settings.
Step 2: Find the Update and Security menu and click it.
Step 3: Go to the menu and select the "Recovery Option". On the Recovery page, look for the "Reset this PC" section and click on "Get Started".
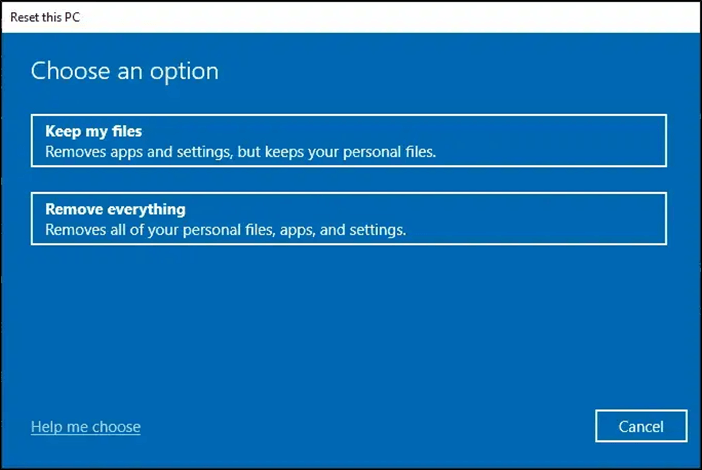
Step 4: A window will appear, offering to reset with "Keep My Files" or "Remove Everything". Select the latter option for a factory reset.
Step 5: Select "Local Reinstall" and choose any additional settings in the next window.
Step 6: Click "Next", the laptop is prepared for a reset. To initiate it, click "Reset Option" and the reset will start.
Step 7: Once the process is complete, the system will automatically revert to its default settings, ensuring everything returns to normal.
2. Reset from WRE
Windows Recovery Environment (WRE) is a tool that helps fix booting issues on a system, useful when a laptop fails to restart or does forceful shutdowns, and also allows a factory reset on an ASUS laptop without the need for the F9 key.
To perform a factory reset using WRE (Web Recovery Environment), follow these steps:
Step 1: Go to Windows Settings again and find the Update and Security option.
Step 2: Choose the Recovery Page > Advanced Startup> Restart now.
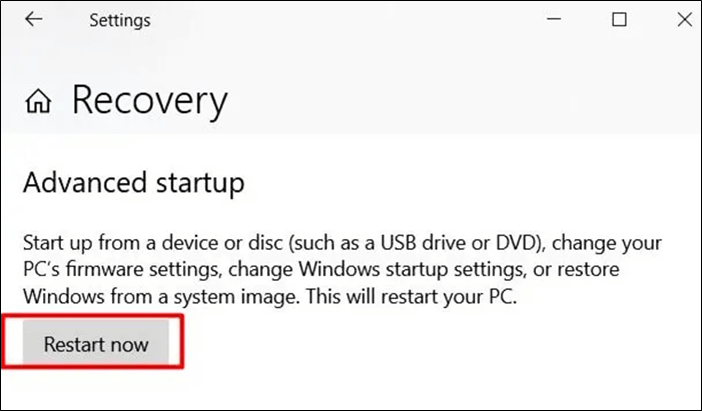
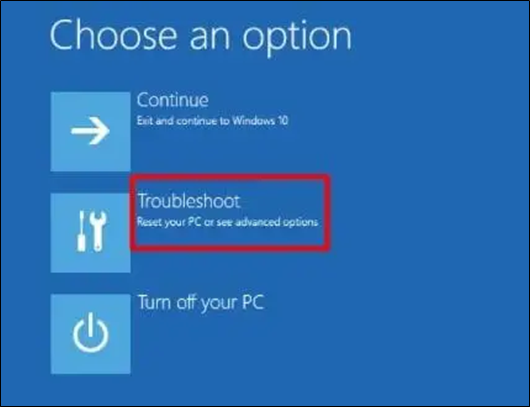
Step 3: To troubleshoot, click on the "Choose an option" window and select the "Troubleshoot" option from the available choices.
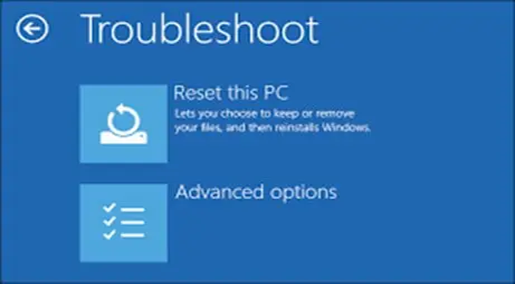
Step 4: In the troubleshooting menu, click on "Reset this PC".
Step 5: The windows will again have two options; keep my files or remove everything. For factory reset, choose the second option.
Step 6: Go to settings, select "Local Reinstall", confirm Additional Settings, and confirm the "Reset Option" to restore the original settings.
3. Reset Directly via the Boot
You can reset a laptop while booting the device, which is a direct method that doesn't require any complicated steps.
This is how you can do it.
Step 1: To restart your laptop, look for the Power button at the bottom half of your screen, press the Shift button, and click the "Restart" option.
Step 2: To proceed, open the "Choose an Option" window, select the "Troubleshoot" option, and then choose "Reset the PC".
Step 3: You should remove all unnecessary files and settings from your computer, and confirm any additional settings that are being applied. This will ensure a clean and efficient removal process.
Step 4: Click on the "Restart" option to start the factory reset process, which will take a few minutes to complete.
Don't forget to share this post with your friends if it is useful.
4. Reset with Recovery Partition
ASUS has a built-In the ASUS system recovery partition, users can restore their laptop to its original settings in case of issues such as slow speed or malware attacks. This partition also includes an option to create a system image, allowing users to make a replica of their system.
If your ASUS laptop's recovery partition is missing, you can try using the built-in ASUS LiveUpdate tool to restore the partition. You can also use a third-party recovery software like Qiling Backup to create a backup of your system and then restore it.
To restore factory settings, use the ASUS System Recovery Partition. Follow these steps:
Step 1: To restart your ASUS system and enter the BIOS, follow these steps: Restart your ASUS system. Press and hold the F9 key when the ASUS logo appears. This will allow you to access the BIOS settings, where you can make necessary changes or adjustments.
Step 2: Choose Windows Boot Manager from the menu and click Next. It will show the ASUS Windows Preload Wizard.
Step 3: The wizard will display three recovery options: Recover Windows to the first partition only, Recover Windows to the entire HD, and Recover Windows to the entire HD with 2 partitions. You can select any of these options.
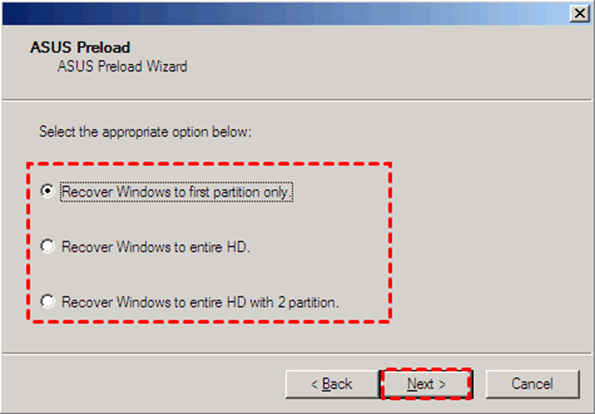
Step 4: Click "Next." Then follow the next instructions to complete the procedure. The laptop will reset.
You may also be interested in the following:
Restore Deleted/Lost ASUS Data with ASUS Data Recovery Software
5. Reset Using an Installation Disc
To reset an ASUS laptop with an external disc without pressing the F9 key, insert the disc into the laptop's disk tray. This method requires a disk tray for insertion, which is a feature some ASUS laptops have. If your laptop has this feature, you can use this method to reset it.
Step 1: Insert an external installation disc into the disk tray.

Step 2: Restart your laptop. Then, press the Escape button while the system is booting.
Step 3: Select the CD/DVD option and press the Enter button.
Step 4: To initiate a factory reset, tap the "OK" option twice, then follow the instructions that follow.
Bonus Tip: Backup Your ASUS Laptop Before Factory Resetting
A factory reset can be beneficial for system performance, but it should never compromise your valuable data, such as professional, educational, or personal information, which is now a crucial asset in today's digital world.
Before doing a factory reset on your ASUS laptop, it's essential to back up your data to prevent any loss. This includes backing up your files, settings, and applications.data loss. We recommend you use the Qiling Disk Master tool, an award-A reliable data recovery and backup tool offers a one-click backup solution with instant recovery capabilities, making it easy to safeguard and restore valuable data.
The Qiling Disk Master offers disk imaging and system restoration features, allowing access to data via cloud storage or an external drive. It securely backs up important files, hard drives, and the main operating system, protecting against viruses and malware.
The Qiling Disk Master tool is compatible with Windows 7/8/9/10/11 operating systems and is available for ASUS users to download, helping to prevent data loss issues.
To back up your system using Qiling Disk Master, follow these steps. First, download and install Qiling Disk Master on your system.
Step 1. Launch Qiling Disk Master on your computer, click Create Backup on the home screen, and select backup contents by clicking the big question mark.

Step 2. To back up your Windows operating system, click "System backup" to initiate the backup process.
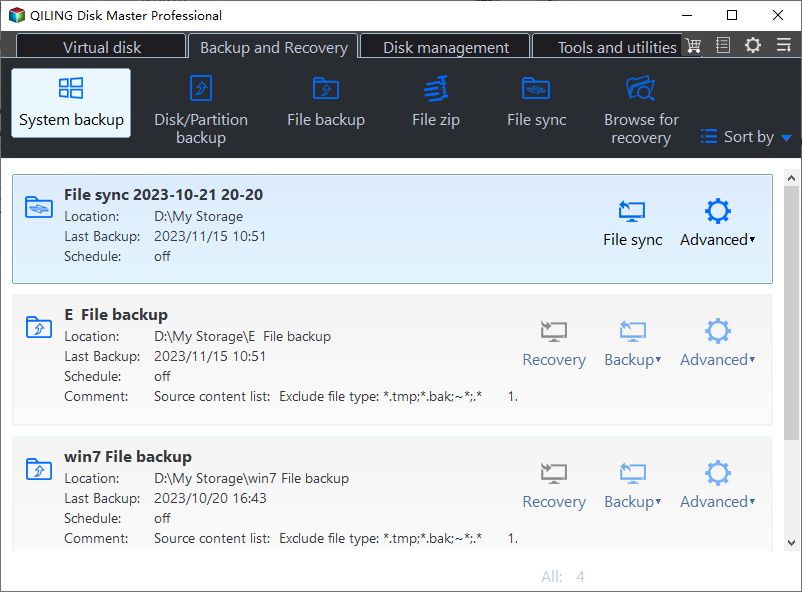
Step 3. In Windows, the operating system information and all system-related files and partitions will be automatically selected, so no manual selection is required. Next, you'll choose a location to save the system image backup by clicking on the designated area.

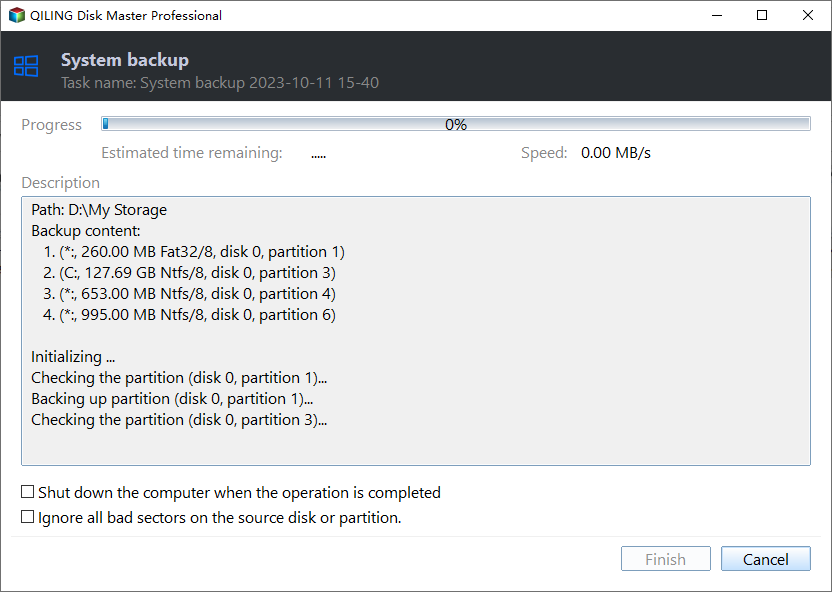
Step 4. A backup location can be a local drive on your computer, an external hard drive, network, cloud, or NAS. It's generally recommended to use an external physical drive or cloud to preserve system backup files.

Step 5. The Windows system backup process can be customized with options such as enabling an automatic backup schedule, choosing between differential and incremental backups, and setting the frequency to daily, weekly, or monthly. Once the desired settings are selected, clicking "Proceed" initiates the backup process, which can be monitored on the left side of the interface. Upon completion, the task will be displayed in a card style, showing the progress of the backup operation.
The Bottom Line
ASUS laptop factory reset issues, specifically when the F9 key is not working, can be frustrating for users. However, there are 5 alternate solutions to restore factory settings on an ASUS laptop, providing a way to recover the original settings without relying on the F9 key.
The issue has been thoroughly explained with a detailed introduction, steps, and pictorial images to ensure clarity for users. To fix the problem, you can use any of the provided methods, and we have also offered the Qiling Disk Master tool to recover system data.
FAQs on Factory Reset ASUS Laptop F9 Not Working
1. How Do I Factory Reset My ASUS Laptop Without F9?
To factory reset an ASUS laptop without pressing F9, you can use Windows Recovery Environment, the ASUS System Recovery partition, or Windows Settings methods.
2. How Long Does a Factory Reset Take on an ASUS Laptop?
The time it takes to download and install the ASUS Update tool depends on your laptop's performance and data connection speed, typically taking around 15 minutes to an hour.
3. How Do You Do a Factory Reset on An ASUS Laptop When the Laptop Is Locked?
To reset your ASUS laptop, you can do so during the boot process when the laptop is locked. This allows you to restore your laptop to its original settings without having to access the operating system.
- Click the power icon on the screen.
- Press and hold the shift key to access the Restart Option.
- Afterward, select "Troubleshoot" from the "Choose an Option" menu.
- To reset your laptop to its factory settings, select the "Reset this PC" option from the troubleshooting menu. This will initiate the laptop factory reset process.
Related Articles
- Fix 'DCIM Folder Shows Empty But Not' Error on PC/Android/iPhone
- Top 8 SSD Temperature Monitor Software Recommended in 2023
- 5 Ways to Force Quit Apps on Mac| Ctrl+Alt+Del Alternative
- How to Fix Windows 11 KB5026446 Update Error Efficiently
- What Is Dell Boot Menu & How to Access?🔥
Have you ever heard of the Dell boot menu? Do you know what the Dell boot menu means and how to enter it? This article will describe the Dell boot menu in detail and tell you how to enter the boot menu of a Dell laptop. - What Is Difference between .BAT and .EXE files? [Full Information]
A full description of .BAT and .EXE files.