Mac Software Update: How to Update Software on Mac [Automatically & Manually]
Updating your Mac's software is crucial and shouldn't be ignored. The Mac Software Update application, a built-in feature of macOS, allows you to update your software. Keeping your Mac software up to date ensures you get the most out of your machine, with benefits including improved performance, additional features, and enhanced security.
Regularly updating your Mac's software is essential to avoid cyberattacks, protect your data, and prevent system failures. To stay safe, check for updates every week and update to the latest macOS. This guide walks you through the process and provide more information, so be sure to read on and share with others!
How to Use Mac Software Update [Automatically]
To update Mac software, go to System Settings, then click on Software Update on macOS Ventura and older versions, and follow the prompts to download and install the latest updates. Alternatively, you can also check for updates by clicking on the Apple logo in the top left corner, selecting System Settings, and clicking on Software Update. A video tutorial is available for further assistance.
Updating the software on your Mac is essential to keep it running at its best, and this video shows you how to do it. By keeping your Mac up to date, you can ensure it continues to function smoothly and efficiently. The video covers the key points of updating your Mac's software, allowing you to stay on top of the latest updates and security patches.
How to Use Mac Software Update on macOS Ventura
Software updates for macOS and its native apps like Safari improve performance, security, and compatibility, allowing you to install enhancements and updates, with the latest version, macOS Ventura, introducing powerful new features.
To use the software update feature on macOS Ventura, follow these instructions:
Step 1. Choose System Settings from the Apple menu in the corner of your display.
Step 2.To update your Mac, click on the General option on the left side of the window and then select Software Update on the right side.
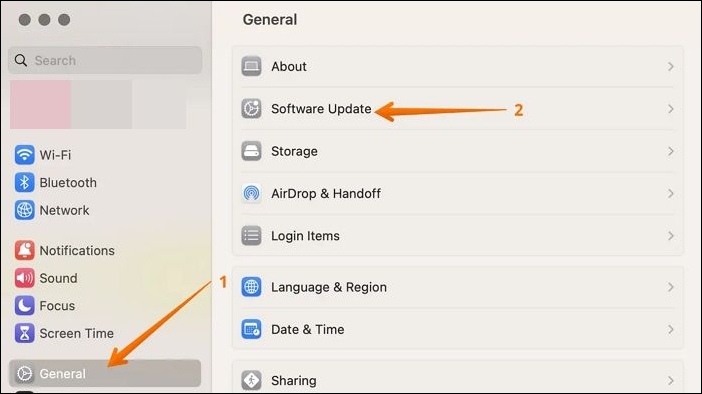
Step 3.Software Update will then look for updates. If it discovers new software, select the Install button, which may be titled Update Now, Upgrade Now, Install Now, or Restart Now. You may be prompted to input your administrator password.
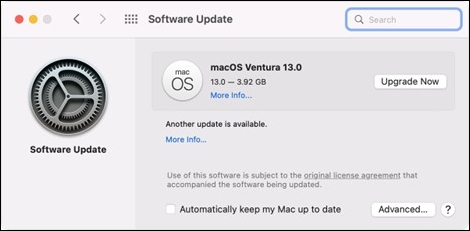
Note: If the macOS Ventura update is not showing up, it's likely because your Mac model is not compatible with the update. However, you can check the "Automatically Keep My Mac Up To Date" option in the Software Update window to ensure your Mac is automatically updated. This may resolve the issue and prompt the update to appear.
Here are 7 ways to fix the macOS 13 Ventura upgrade failed issue:
If your macOS 13 Ventura upgrade fails and keeps displaying error messages, don't worry! There are seven effective ways to fix Mac won't update errors. You can try restarting your Mac, checking for software updates, running the System Report, resetting the System Management Controller, using the Terminal to clear the software update cache, or even performing a clean install of macOS. Additionally, you can also try using the Recovery Mode, creating a bootable USB drive, or seeking professional help from Apple Support.
How to Use Mac Software Update on Older Versions
If your Mac is running an older version of macOS, such as macOS Monterey or earlier, you can upgrade your Mac using software updates. The procedure may vary slightly depending on your version, but you can follow these general guidelines to upgrade your Mac.
Step 1. Select "About This Mac" from the menu in the screen's corner.
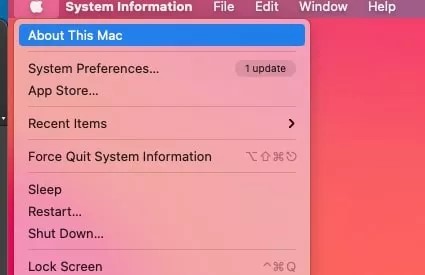
Step 2.To update your iPhone, click Software Update in the resulting window, which will launch the App Store app and check for any available updates.
Step 3.If any updates are available, select the Update section and choose Update All or Update beside each item. You will then be asked to enter your Apple ID and password.
Note: You can select the "Automatically Keep My Mac Up To Date" option to ensure your Mac is updated automatically.
To fix a Mac stuck on checking for updates, try restarting the Mac, force-quitting the Software Update window, or resetting the System Management Controller (SMC). If the issue persists, reset the NVRAM, disable the Gatekeeper, or use the Terminal to resolve the issue.
Mac's update checking process can become stuck due to various reasons, such as network connectivity issues, corrupted cache, or a problem with the System Preferences. To resolve this issue, users can try restarting their Mac, resetting the System Preferences, or even reinstalling macOS. If the problem persists, they can also try running the Terminal command "softwareupdate --flush" to clear the update cache and restart the update process. Additionally, users can also try resetting the SMC (System Management Controller) or the PRAM (Parameter RAM) to resolve any hardware-related issues.
How to Update Software on Mac [Manually]
To manually update your macOS, you can download macOS resources through the App Store, where the installation will not start immediately. You can also download and update applications in the Apple App Store. To proceed, follow the steps:
Step 1. To find the most recent macOS version, open the App Store window on your Mac. Click the "Updates" tab, and then click the "Update All" button.
Step 2.To start the installation of macOS, select the "Download" option. This will save the macOS installer in the Applications subfolder.

Step 3. After manually downloading macOS, open the installer from the Applications subdirectory and follow the on-screen instructions to install the new version.
After learning how to update Mac software automatically and manually, you can share this page to mark it. This knowledge will help you keep your Mac up-to-date with the latest security patches and features, ensuring a smooth and secure computing experience.
Mac Software Update Common Issues
Users may experience issues during the Mac software update process, including a stuck macOS Monterey update, slow download or installation speeds, and update failure or error messages.
1. Slow Download or Installation Speed
If your Mac update is taking forever to download or install, it could be due to various reasons such as a slow internet connection, server congestion, or insufficient disk space. To resolve this issue, you can try restarting your Mac, checking your internet connection speed, checking for available disk space, and ensuring that your Mac is connected to a stable power source. Additionally, you can try canceling and restarting the update process, or seeking assistance from Apple Support if the issue persists.
- 🌐Check your internet connection speed to ensure it's steady and fast enough. If it's slow, try restarting your router or modem, moving closer to the Wi-Fi source, or using an Ethernet cable instead of Wi-Fi.
- 👩💻"Examine the server status to check whether Apple's servers are experiencing problems. If the servers are experiencing any issues, you must wait until they are addressed before downloading or installing the update."
- ❌To ensure a smooth and successful update process, please check your available disk space to confirm you have enough room to download and install the update.
Not Enough Free Space for macOS Ventura Update/Installing/Downloading macOS 13
Struggling with not having enough free space for the macOS Ventura update? The steps below can help! Several fixes are available to resolve this issue, and we'll guide you through them.
2. Update Failure or Error Messages
If your software update fails to finish or displays an error message, it might be due to damaged files, incompatible programs, or hardware difficulties. You can try restarting your device, checking for corrupted files, and ensuring that your operating system and software are up-to-date. If the issue persists, you may need to seek further assistance from a technical support specialist.
- 🖥️Many software update issues can be resolved with a simple restart. To restart, go to the Apple menu, choose Restart, and then try downloading or installing the update again.
- 👿To resolve software update issues, launch the App Store app and go to the Updates section in the sidebar. From there, click "Update All" or "Update" next to each item to update applications and drivers. This should resolve any conflicts caused by old or incompatible programs.
- 💽To fix corrupted or incorrect disk permissions, open Disk Utility, select your starting disk (usually titled Macintosh HD), and click on First Aid. Then, click Run to start the repair process. This will allow software updates to access and alter files or directories that were previously restricted.
How to Prevent Data Loss from Mac Software Update
In rare cases, updating your Mac software can unintentionally erase crucial data, making a reliable data recovery solution essential to avoid data loss. A sophisticated and dependable data recovery application like Deep Data Recovery for Mac can assist you in recovering lost or destroyed data due to Mac software upgrades.
- The Qiling recovery tool helps recover lost files quickly and easily after a macOS Ventura update, even if files were deleted or lost due to a botched update.
- Qiling is a great option for avoiding data loss during Mac software upgrades due to its user-friendly interface and robust recovery features, making it a reliable choice for those who want to safeguard their data.
- Qiling data recovery tool's comprehensive scanning capabilities can swiftly search for missing or deleted data, and its powerful filters can help you identify and recover deleted files, such as photos, quickly.
Key Features of Deep Data Recovery for Mac
- With both rapid and thorough analyses, users can quickly recover lost files.
- Permits you to preview the files discovered during the scan.
- The device offers multiple flexible scanning modes, enabling users to focus on specific file types or locations during analysis.
- A high success rate is beneficial for recovering lost or deleted files.
Now, follow the leads to recover lost files after updating macOS:
Note: To create a backup, click on "Disk Backup" on the left, and then use the backup to recover data if the disk is damaged or data is lost.
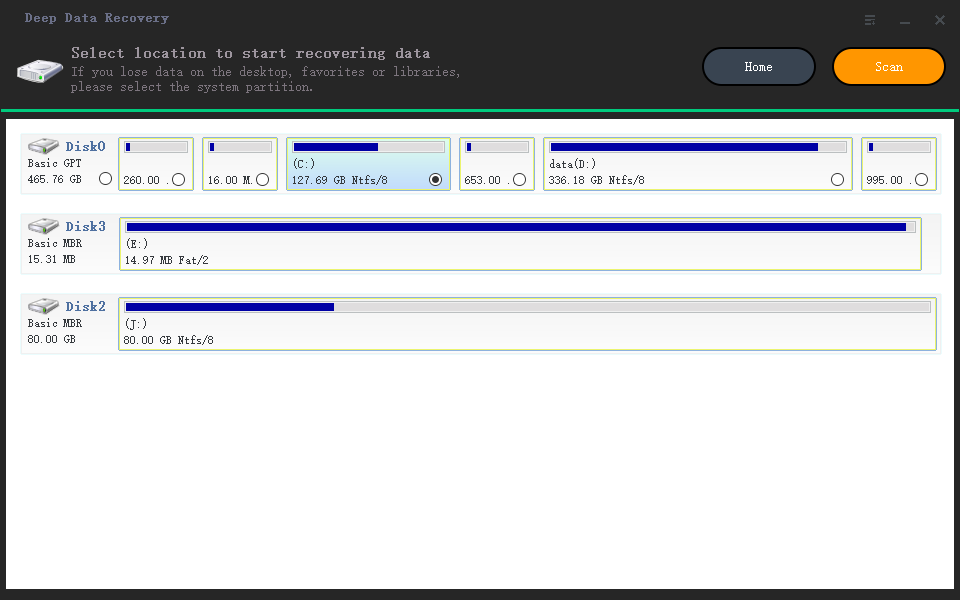
Step 1. Select the location
After updating to macOS Sonoma/Ventura/Monterey/Big Sur, select the disk where you lost data, click "Search for lost files", and then follow the on-screen instructions to recover your lost data.
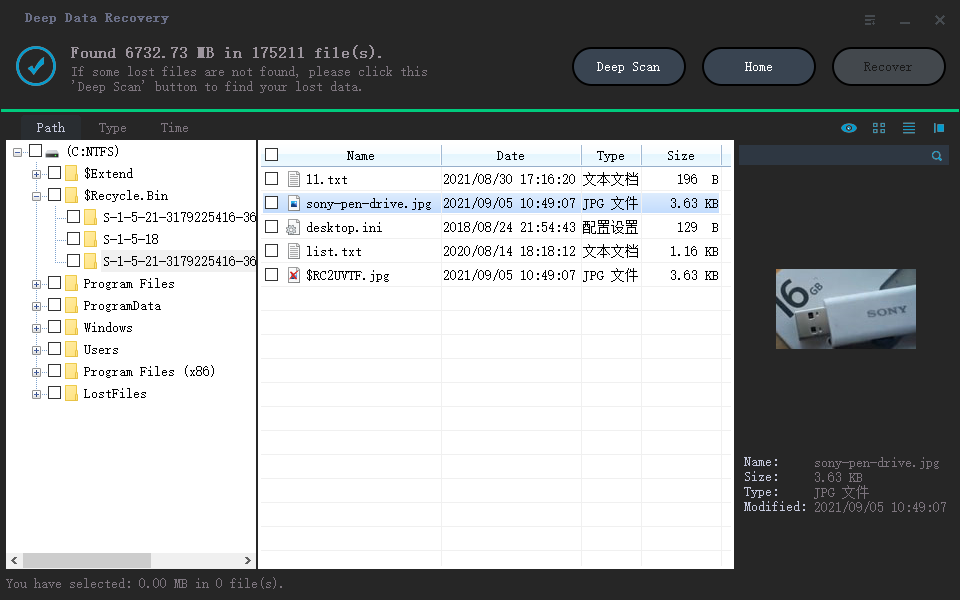
Step 2. Find lost data after the scan
Deep Data Recovery for Mac scans the selected disk volume, displaying the results in the left pane, allowing users to find wanted data using file type and file path.
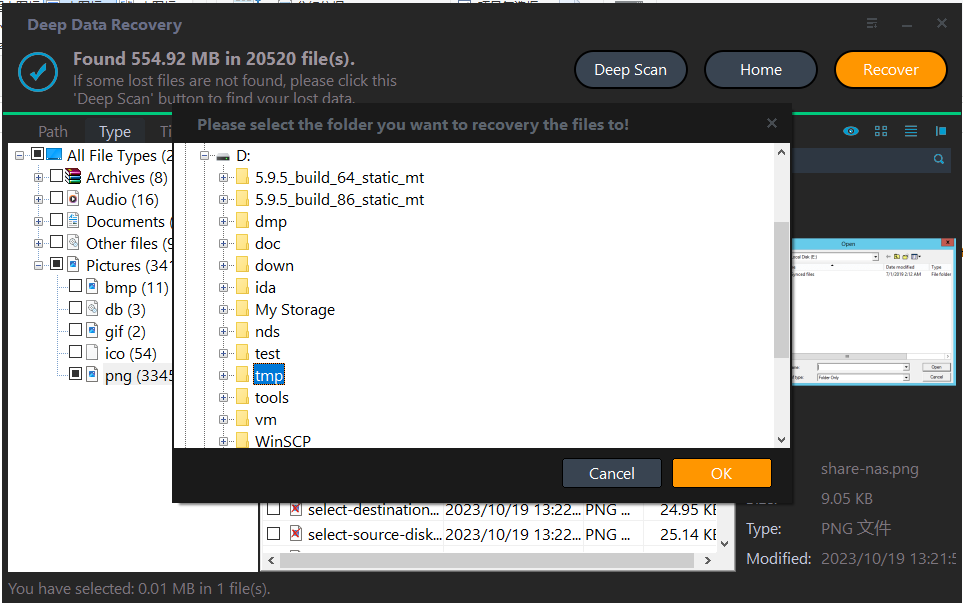
Step 3. Recover data after macOS update
Select the lost files and click the "Recover" button to retrieve them.
Bottom Line
Updating your Mac's software is essential for optimal performance and security, but it's crucial to be prepared for potential data loss during the update process. Fortunately, with Deep Data Recovery for Mac, you can recover lost or deleted files quickly and easily, giving you peace of mind during the update.
Deep Data Recovery for Mac is a reliable and effective data recovery application that offers fast and thorough scans, file previews, and flexible scanning modes, making it the optimal solution for recovering lost data during Mac software updates, ideal for both individuals and businesses.
Mac Software Update FAQs
Here are four frequently asked questions about Mac Software Update, answered briefly:
1. Why can't I update my Mac?
You're unable to update your Mac due to insufficient storage space, compatibility issues with the latest macOS release, or a malfunctioning internet connection.
2. What is the latest version of macOS for Mac?
macOS Ventura 13.3, released on March 27, 2023, is the latest version of macOS for Mac, fixing bugs and enhancing security.
3. How to manually update my Mac software?
To manually update your Mac software, open System Preferences, select Software Update, and then click Check for Updates. If any updates are available, click Install.
4. How long does a Mac software update take?
The time it takes to update your Mac software depends on your internet connection speed and the update size, with most updates taking a few minutes to install.
Related Articles
- 2 Ways to Reinstall Windows 10 [Full Guide]
- How to Restore Backup From Google Drive to Every Device You Want
- How to Downgrade from Monterey to Big Sur [macOS 12 to 11]
- Full Guide: How to Fix HP Laptop Black Screen
- Highlights of SanDisk Extreme | Is it Worth Buying and How to Choose it
Compare SanDisk Extreme, Extreme Pro, and Ultra SD cards. Learn their features, 4K support, and transfer speeds to choose the best card for your needs. - Seagate External Hard Drive [Full Information]
What is Seagate external hard drive? This article shows you all the information you want about Seagate external hard drives, including their capacity, working life, and how they differ from Western external hard drives.
Products
Articles & Tutorials
- Data Recovery
- Data Backup
- File Recovery
- File Backup
- System Backup and Restore
- Disk and Partition Clone
- Technical articles
- Mobile articles
- Disk Master Help
- Windows Data Recovery Tutorials
- Windows Secure Delete Tutorials
- Windows Partition Management Tutorials
- Windows File Backup and Restore Tutorials
- Windows System Backup and Restore Tutorials
- Windows Disk Backup and Restore Tutorials
- Windows Clone Tutorials