Not Enough Free Space for macOS Ventura Update/Installing/Downloading macOS 13
If you're experiencing the 'Not enough space for macOS Ventura update' issue, there are several methods you can try to resolve the problem. These include the methods below.
| Workable Solutions | Step-by-step Troubleshooting |
|---|---|
| Fix 1. Use macOS Storage Optimizer to Free Up Space for macOS Ventura | Click the Apple menu. Select "About This Mac". Select the "Storage" tab and click "Manage"...Full steps |
| Fix 2. Clean Up Junk Files to Free Up Space for macOS Ventura | Open Finder, select the "Go" tab, and click "Go to Finder". To open the cache folder, type...Full steps |
| Fix 3. Clean Up Mac Downloads Folder to Free Up Space | Open Finder and select the "Downloads" tab. Filter the contents to display the...Full steps |
| Fix 4. Uninstall Applications to Free Up Space for macOS Ventura | You can open the Applications folder from the "Go" menu or open Finder and select the...Full steps |
| Fix 5. Delete Some Time Machine Backups to Free Up Space | Click the Apple menu and select "System Preferences". Click "Time Machine"...Full steps |
Why Your Mac has no Enough Space for macOS Ventura Update
Storage space is a concern that arises when it's almost depleted, even with ample space for media content. The macOS Ventura update, in particular, may not fit due to its large installation file size and the space required for installation.
Apple no longer provides a baseline recommended available storage for macOS Ventura. The previous recommended storage was 44.5 GB for Big Sur. That is no longer provided for Ventura. The recommended storage is no longer provided.
To ensure a smooth installation of macOS Ventura, it's recommended to have at least double the size of the installer file in extra storage space. Since the installer takes up about 12 GB, having up to 36 GB of free space on your computer is a good rule of thumb to follow, and keeping it higher can help resolve any potential issues.
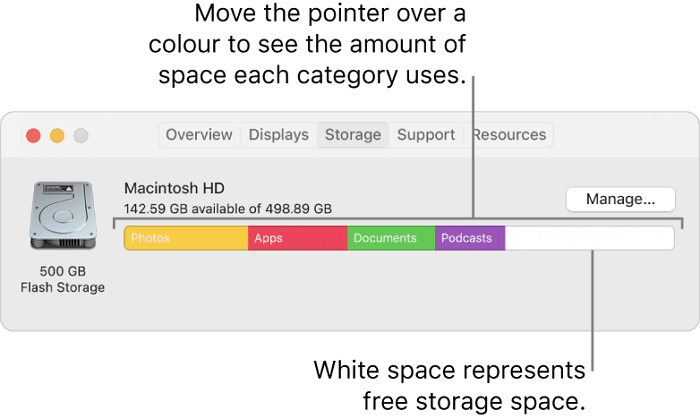
To check for free space on your Mac, click the Apple logo and select "About This Mac", then click the "Storage" tab, which will show your available disk space. If the space is not enough, you can free up space for the macOS Ventura update by following further instructions.
Fix 1: Fix Not Enough Free Space for macOS Ventura Update with macOS Storage Optimizer
Below, we will discuss five methods you can use to fix the not having enough space to install macOS 13 issue. Any one of these may be enough to resolve the problem, but you are free to combine multiple to give you the extra gigabytes you need.
Apple introduced a native optimization feature in recent versions of macOS, and users can access it to improve their device's performance.
Step 1. Click the Apple menu. Select "About This Mac".
Step 2. Select the "Storage" tab and click "Manage".

The Manage feature will display a list of recommendations for optimizing storage space, suggesting what can be deleted, with options like "Store in iCloud" to free up space by storing most media and files in iCloud, leaving only recent files on the computer.
To free up your Mac storage space, follow the instructions for each category by clicking the buttons beside them.
Fix 2: Clean Up Junk Files Without Software to Free Up Space for the macOS 13 Update
Your Mac is likely cluttered with numerous junk files, including temporary and obsolete files created by apps and system utilities, such as cache and log files, that are taking up valuable space.
Junk files may seem insignificant on their own, but they can quickly add up and take up valuable space. To clear them up without using third-party software, you can take steps to remove them.
Delete Cache Files:
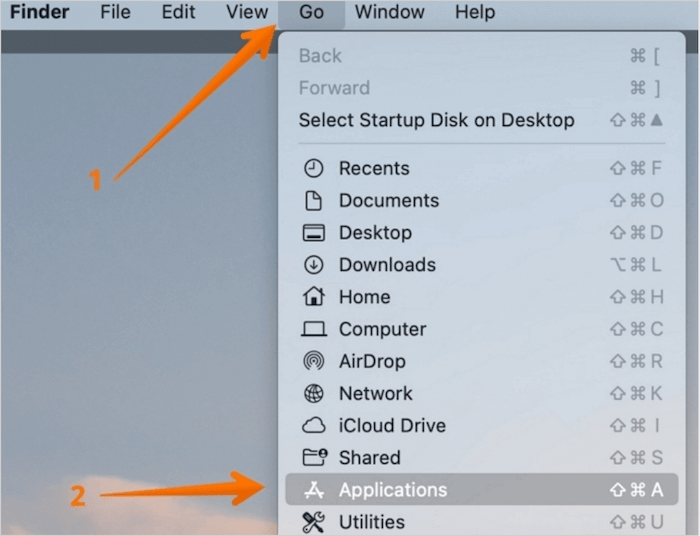
Step 1. Open Finder, select the "Go" tab, and click "Go to Finder" in one sentence: Open Finder and select the "Go" tab, then click "Go to Finder".
Step 2. To open the cache folder, type "~/Library/Caches" and hit return.
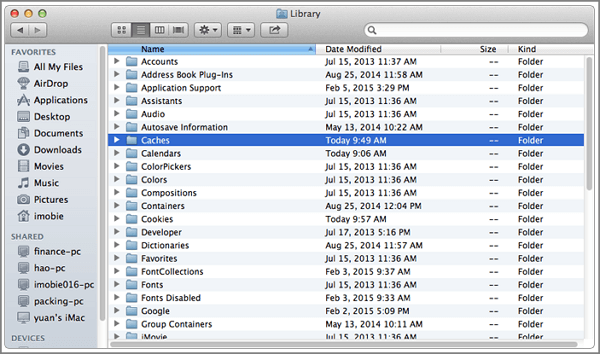
Step 3. Delete files in the cache folder by pressing Control + A to select all files, then drag them to Trash.
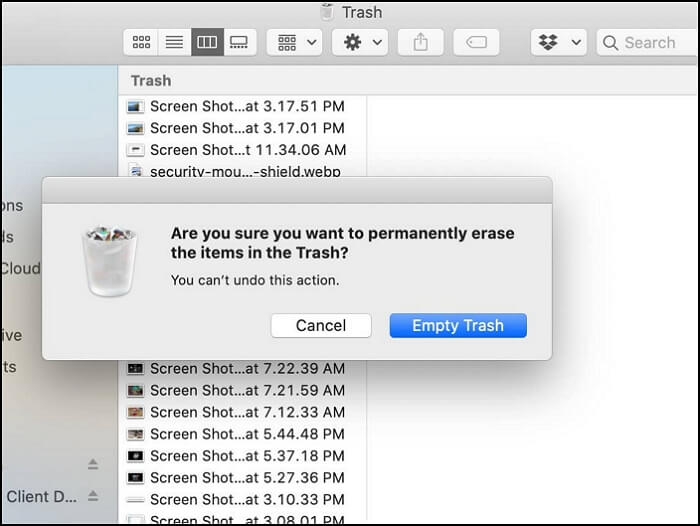
Step 4. Empty the Trash Mac.
Delete Log Files:
Step 1. To navigate to the Finder, open the Finder application and click on the "Go" tab at the top of the screen. From the dropdown menu, select "Go to Finder" to open the Finder window.
Step 2. To open the cache folder, type "~/Library/Logs" and hit return.
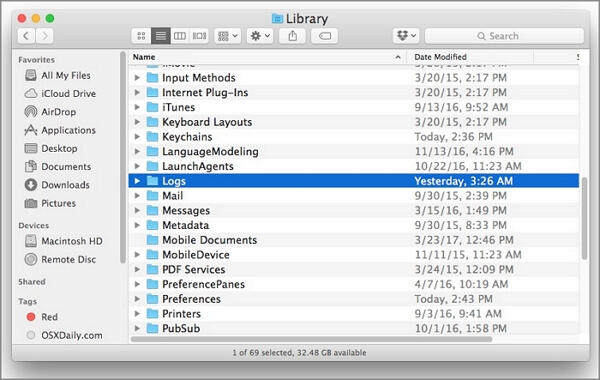
Step 3. To delete files in the logs folder, select all files by pressing Control + A, then drag them to the Trash.
Step 4. Empty the Trash bin.
Delete App Leftover Files:
Step 1. Open Finder and select the "Go" tab.
Step 2. To access the Library Folder on a Mac, open the Finder, then press the Option (⌥) key and click on "Library" in the top-level menu, which will reveal the Library Folder.
Step 3. Locate deleted app folders and delete all files.
Fix 3. Check and Clean Up Mac Downloads Folder to Fix Not Enough Free Space for macOS Ventura Update
Your Mac's Downloads folder is often cluttered with files you no longer need, taking up valuable disk space. This is because you download movies, photos, app installers, documents, and other files temporarily, only to forget about them once you're done. As a result, these unnecessary files accumulate and can slow down your computer.
If you're having trouble downloading macOS Ventura because your computer's storage is full, try cleaning up your Downloads folder. You can also recover your deleted Downloads folder on your Mac if you accidentally deleted it.
Step 1. Open Finder and select the "Downloads" tab.

Step 2. The files can be filtered to display them by the date they were downloaded, making it easier to manage and organize the contents.
Step 3. Explore the folder, selecting the unwanted files, then right-click and choose "Move to Trash" or use the Mac move to Trash shortcut.
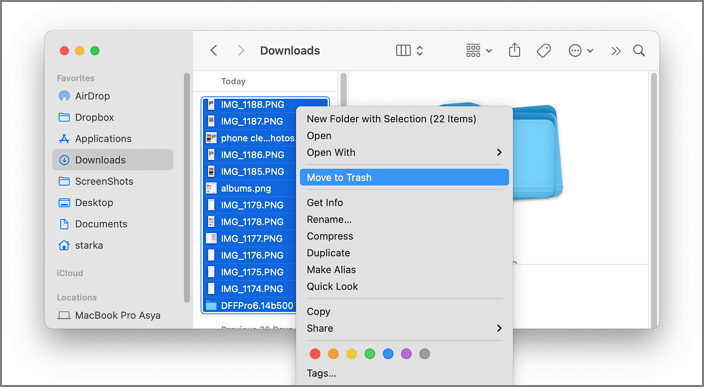
Step 4. Empty the Trash bin.
Fix 4. Uninstall Applications to Fix Not Enough Space for macOS Ventura Update
With tens of thousands of apps available on the Mac App Store, it's easy to accumulate unused apps that take up valuable space on your computer, leading to issues like not enough space to download macOS Ventura. To resolve this, simply uninstall the apps you rarely or never use, freeing up space and allowing you to download the latest macOS updates. To uninstall applications on Mac, follow the steps to remove them.
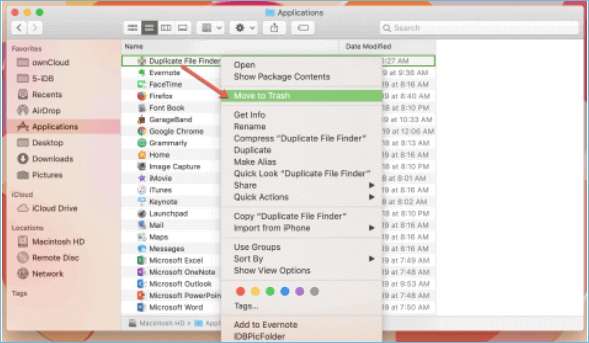
Step 1. You can open the Applications folder by going to the "Go" menu and selecting "Applications", or by opening Finder and selecting the "Applications" tab on the left-hand sidebar.
Step 2. To delete an unwanted app on a Mac, navigate to the app, right-click it, and select "Move to Trash".
To avoid clutter and ensure the app's installer doesn't become a junk file, clear it out using the steps in "Fix 3" after installation. Typically, Mac app installers have DMG or PKG file extensions.
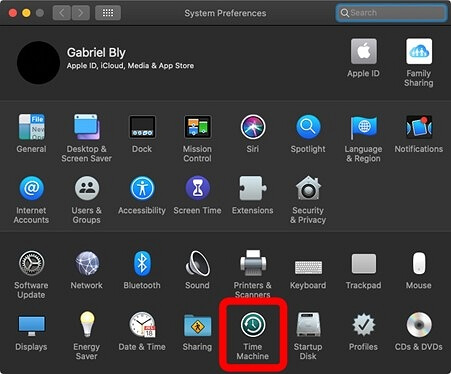
Fix 5. Delete Some Time Machine Backups to Free Up Space for macOS Ventura Update
Here's how to delete Time Machine backups on your Mac: If Time Machine on your Mac backs up your computer automatically, several old snapshots remain on the device, taking up space and potentially leaving insufficient space for macOS Ventura updates, so you can delete them.
Step 1. Click the Apple menu and select "System Preferences".
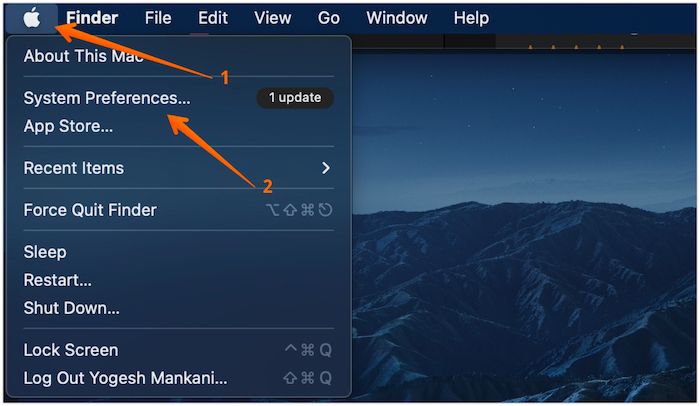
Step 2. Click "Time Machine".
Step 3. If "Back Up Automatically" is checked, uncheck it.
Step 4. To check the list of local Time Machine snapshots, launch Terminal and type in tmutil listlocalsnapshots in the terminal window.
Step 5. The Time Machine local snapshots are listed in chronological order, starting from the oldest to the most recent. The list displays the date and time of each snapshot, allowing users to easily identify and select the desired snapshot to restore their system to a previous state.
Step 6. To delete a local Time Machine snapshot, you can use the command `tmutil deletelocalsnapshots "date"` in the terminal. Replace "date" with the actual date of the snapshot you want to delete.
How to Retrieve Deleted Data on macOS Ventura with Software
Removing useless files is crucial for freeing up space for the macOS Ventura update, but be careful not to delete important files in the process, as the satisfaction of extra storage space can quickly turn sour.
With Deep Data Recovery for Mac, you can recover data lost while deleting files or emptying the Trash bin, even if it's a picture, video, or any other file type, and also handle data loss from other issues like formatting, malware, hard drive damage, and system crashes.
If you're experiencing issues with macOS Ventura, such as failed upgrades or installations, Deep Data Recovery for Mac can help you recover lost data. This freemium app supports macOS Ventura and older versions up to OS X Mavericks, making it a reliable solution to retrieve your files. Let's dive into the detailed tutorial and get started with the recovery process.
Note: To create a backup of your Mac, click on "Disk Backup" on the left first. This will allow the software to recover deleted files from the backup image, preventing further damage to your disk and data, making it a safer and more reliable option.
Step 1. Select the location and scan
Launch Deep Data Recovery for Mac, select the disk where data was lost, and click "Search for lost files" to initiate scanning.

Step 2. Filter and preview lost files
After scanning, use the file format filter on the left or upper right corner to locate the deleted files you're looking for.

Step 3. Recover lost data or files
You can double-Click a file to preview its content, or select multiple files to recover them together. After selecting the files, click "Recover" to restore the lost data to a local drive or cloud storage.

Conclusion
The release of a new Mac update can be exciting, but it can fall flat if you're unable to download and install it due to insufficient free space for the macOS Ventura update. Fortunately, this article provides a solution to fix the issue, offering various ways and steps to address the problem.
If you accidentally delete something important, don't panic - Deep Data Recovery for Mac is a tool that can recover your files, regardless of their format or size.
Not Enough Space for macOS Ventura Update FAQs
If you're experiencing issues with the macOS Ventura update, the steps below can help! We've identified five solutions to help you resolve the problem. For more information, you can also check out our frequently asked questions section, which provides additional details on how to troubleshoot and fix the issue.
1. Why does my MacBook not have enough space to download and install macOS Ventura?
The macOS Ventura installation bundle includes around 12 GB, but the actual installation requires more space, with a minimum of 35 GB needed for an upgrade from macOS Sierra or later, and up to 44 GB for upgrades from earlier macOS versions.
2. How to download and install macOS Ventura on my Mac?
To download macOS Ventura, first check if your Mac is compatible with the operating system, then download it from the App Store and create a USB installer, which can be used to install macOS Ventura on other Mac devices.
To update your Mac, you can either go to the "App Store" icon on the dock, click on it, and then click on the "Updates" tab. From there, you can choose to update the macOS version.
3. How to clean macOS system data on my Mac?
To clear the macOS system on your Mac, you have five options: reinstall macOS, erase and reinstall macOS, reset the System Management Controller (SMC), reset the Power Management Unit (PMU), and erase the startup disk. These methods can help you restore your Mac to its original settings, resolve system issues, and free up storage space.
- 1. Empty the Mac Trash folder.
- 2. Delete Time Machine snapshots.
- 3. Clean some iOS backups.
- 4. Remove Cache files.
- 5. Update the macOS version.
4. How to free up space on Mac to offer enough space for macOS Ventura update?
If you're experiencing the 'Not enough space for macOS Ventura update' issue, there are five methods you can try to resolve it. You can boot your Mac in safe mode, restart it and try updating again, or use the 'Other' option in the App Store to download the update.
- 1. Use macOS Storage Optimizer.
- 2. Clean up junk files on Mac.
- 3. Clean up the Mac Downloads folder.
- 4. Uninstall applications on Mac.
- 5. Delete Time Machine backups.
Related Articles
- Recover Saved Game Data on Xbox Series X [ 5 Proven Ways]
- Solve Zsh: Command Not Found: Pip on Mac | 4 Fixes
- HDD Low Level Format Tool, 2023 Top Checklist
- My Computer Turns on but the Screen Is Black Windows 10, How to Fix
- What Is Windows Hyper V? [Detailed Description]
Don't know what is Windows Hyper-V? Windows launched a virtualization software in 2008 called Hyper-V. With Windows Hyper-V, you can create multiple virtual machines with different operating systems. Read on for the details about Hyper-V! - Lost Windows License? Top 10 Best Windows Key Finders Can Help - Qiling
The page provides a list of the top 10 Windows key finder software and tools that can help you locate the missing product key for your Windows OS and other installed software. With these tools, you can easily find your Windows license on your own.