Solve Zsh: Command Not Found: Pip on Mac | 4 Fixes
If you're experiencing the "zsh: command not found: pip" error, the steps below can help. The error can be resolved using one of the top 4 methods, which include installing pip using the Homebrew package manager, running the command with the full path to pip, adding the Python directory to the system's PATH environment variable, or using the Python package manager to install pip. By following these methods, you should be able to fix the "zsh: command not found: pip" error and get back to using pip without any issues.
| Workable Solutions | Step-by-step Troubleshooting |
|---|---|
| 1. Install Pip Package on macOS Ventura, Monterey | The most elementary solution needs programmers to utilize the pip install process to debug...Full steps |
| 2. Update pip to the Latest Version on Mac | Hit the Command + Space key. Type the terminal button. Press the enter button...Full steps |
| 3. Set Up Path or Environment Correctly in Terminal | When you're trying to utilize the inaccurate version of pip, this zsh: command not found: pip error...Full steps |
| 4. Restart or Reset Mac Terminal and Try Again | Shut down the Terminal application in case it's open. Shut down the Terminal application in case it's open...Full steps |
Main Causes of Zsh: Command Not Found: Pip Error
Using pip allows you to download packages to reference them in your Python code, which can be useful if the Python packages that come with the OS need to be updated or could potentially lead to conflicts during installation.
If you're trying to install a package using pip but haven't downloaded the package manager on your PC, you'll likely encounter the "zsh: command not found: pip" error. This issue can occur on both macOS and Linux systems. In this article, we'll explore how to resolve the "zsh: command not found: pip" error and get pip working on your system.
The "Zsh command not found" error can occur due to several reasons, but often it's because the pip command is not correctly inserted. This leads to the system not being able to find the pip package, causing issues during programming sessions. This error is typically experienced by users who are new to programming and need to remember to add essential functions. It's worth noting that this error only affects macOS and Linux users, while Windows users are not affected.
Installing Pip on macOS can be a straightforward process, but it's recommended to follow the instructions carefully to avoid potential issues. Before proceeding, it's worth noting that there may be underlying causes for any errors that could arise during the installation process. By following the steps outlined in this article, users can minimize the risk of encountering problems and successfully install Pip on their macOS system.
- 1. To resolve the "zsh: command not found: pip" error on a Mac M1, install the pip package from the official archive, which will eliminate the error.
- 2. The error occurs when the PATH variable contains a detailed list of system binaries, making it difficult to locate the pip binary. This results in an inability to execute pip commands. To resolve this issue, you can try resetting the PATH variable to its default value or updating the PATH variable to include the pip binary's location. This will ensure that the system can locate the pip binary and execute pip commands without any issues.
Note: If your photos are lost or damaged due to a JPEG repair issue, you can recover them on a Mac with a professional recovery tool.
Ensure You Won't Lose Data When Fix Zsh: Command Not Found: Pip
You may encounter the "zsh: command not found: pip" error, which can lead to data loss. To avoid this, consider using Deep Data Recovery for Mac to recover lost data caused by errors like "zsh: command not found: brew".
- Qiling recovery tool is a quick and efficient solution that can recover data from formatted hard drives and even retrieve files from the Trash on Mac.
- Qiling can support over 1000 file types and formats, including JPG, RAW, ART, XLTX, DOC, APE, M4A, etc.
- Qiling can recover files deleted from Mac Terminal and also retrieve files deleted by antivirus software.
To avoid data loss due to the "zsh: command not found: pip" error, first, check if pip is installed in your system's PATH. You can do this by running the command "which pip" in your terminal.
Step 1. Search for lost files
Select the disk location where you lost data and files, and then click the "Search for lost files" button.
Note: Before attempting data recovery, it's recommended to create a backup of your disk using the "Disk Backup" feature, which can be accessed from the left sidebar. This will ensure that your data is safe in case something goes wrong during the recovery process. Once a backup is created, you can use the software to recover data from the backup, and then reuse the original HDD or SSD.

Step 2. Go through the scanning results
This software will scan your selected disk volume and display pictures, documents, audio, videos, and emails on the left pane.

Step 3. Select the file(s) and recover
To recover your lost data, click on the data to preview it, and then click the "Recover" button to restore it. This process will retrieve your lost data and make it accessible again.

How to Fix Zsh: Command Not Found: Pip Error on Mac
Here are four solutions to help you fix the Zsh problem on Mac:
Method 1. Install Pip Package on macOS Ventura, Monterey
To debug the Pip error on Mac, programmers can use the pip install process from their Python syntax without affecting other functions. This is a hassle-free solution as it allows developers to install an isolated package using the system's manager, keeping other functions unaffected.
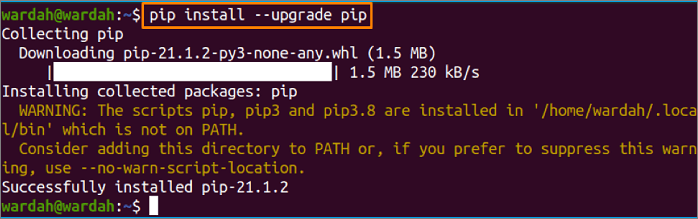
To install the current pip package on macOS Ventura and Monterey, you can use the following syntaxes in your Python program: `python3 -m pip install --upgrade pip` or `python3 -m pip install pip --upgrade`. These commands upgrade pip to the latest version, allowing you to use the current pip package on your system. By running these codes, you can ensure that your Python environment is up-to-date with the latest pip package.

Customers can obtain the latest pip update vital for troubleshooting the error. Additionally, developers can utilize an identical syntax to install pip: $ sudo yum install python34-pip. This command aids programmers in installing Pip 3 across all platforms, guaranteeing that the Pip issue won't recur when utilizing Python and its features. If the aforementioned fixes are unsuccessful, you may employ the code in the accompanying example to set up the most recent Pip 3: $ sudo pacman -Syu python-pip.
The new answer syntax will allow Pip 3 to be enabled on all platforms without modifying the core components of Python or Pip, making it easier for developers to troubleshoot and resolve issues quickly.
If you have fixed this error with our recommended method, you can share this method with your friends!
Method 2. Update Pip to the Latest Version on Mac
To fix the 'command not found: pip' error on Mac, install Homebrew, then run 'brew install python' to install Python, which includes pip. Alternatively, you can install Python directly using 'brew install python --with-brewed-python' or use a package manager like pipx.
Step 1. Hit the Command + Space key.
Step 2. Type the terminal button.
Step 3. Press the enter button.
Step 4. If pip isn't working, you can upgrade to the newest version by running the command: Python -m pip install --upgrade pip.
To uninstall the recent pip version and replace it with the current version, you can run the following commands in your terminal: pip3 uninstall pip -y && curl https://bootstrap.pypa.
Method 3. Set Up Path or Environment Correctly in Terminal
When trying to use an outdated version of pip, you'll get a "zsh: command not found: pip" error. This is because pip3 is only for Python3, while pip is for Python2.
It's possible to verify your Python version on Mac Terminal like this:

If your code is in Python 2 and you're willing to use an outdated version of pip, follow these steps to install pip on your system. First, check if you have pip installed by running `python -m pip --version` in your command line.
NB: Python 2 is no longer maintained and it's recommended to use the latest pip version and update your code repository to Python 3 instead.
These are the leading steps to follow only when using Python 2.
Install pip (The outdated version):
Step 1. You can install pip on your machine using the sudo easy_install pip command.
Step 2. Utilize the pip program now, and it ought to function correctly.
Method 4. Restart or Reset Mac Terminal and Try Again
To factory reset Mac Terminal, open the Terminal app and type the command `defaults delete com.apple.Terminal` followed by `killall Terminal`.
Step 1. Shut down the Terminal application in case it's open.
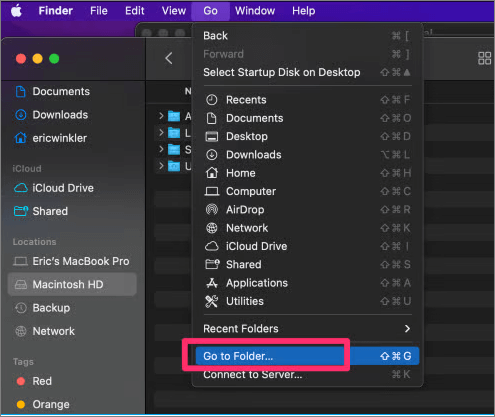
Step 2. Opt for the Go->Go to Folder on the Finder menu.
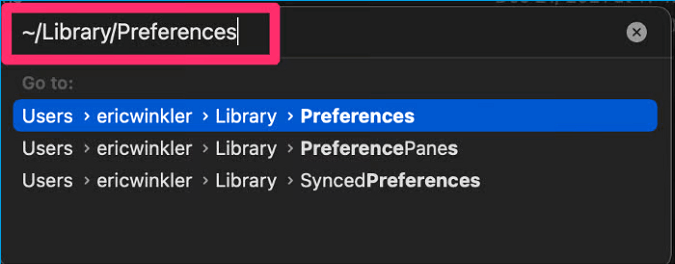
Step 3. Enter/Library/Preferences in the Go to Folder box when prompted.
Step 4. To find the file named com.apple.Terminal.plist, open the destination folder in Finder and look for the file in the list of files displayed. If it's hidden, show hidden files by going to Finder > Preferences > Advanced and checking the box next to "Show all filename extensions" and "Show the size of files on the toolbar".
Step 5. To move a document to the trash, right-click on the document's name and select "Move to Trash".

Step 6. After restarting the Terminal program, you will now notice that the preferences have been restored to their defaults.
Bottom Line
This zsh: command not found: pip error mainly occurs while working with distinct Python versions in Linux and macOS. You must follow the below-mentioned troubleshooting processes:
- The path's location is crucial as it establishes the connection between Python and the operating system.
- When programmers forget to install the current pip unit, they may encounter an error.
- Because developers can duplicate and replace the code segments, executing the suggested syntaxes is simple.
If you're experiencing data loss while trying to fix an error, you can use Deep Data Recovery for Mac to retrieve the lost files. This process can be simplified by following a series of debugging steps.
Zsh: Command Not Found: Pip FAQs
These are the detailed FAQs to under this error better:
How to fix the zsh permission denied issue on Mac?
To fix the Zsh permission denied issue on Mac, you can try running the command `sudo chown -R $
- The "command" button needs to be double-checked, which is a great idea to start by verifying the command causing this error.
- Unlock the directory or file.
- Insert execute permissions.
- Modify the user and group's access.
Why is the pip command not found on Mac?
The "pip: command not found" problem can occur when installing packages, and several factors may be to blame. Despite being set up, pip may be incompatible with the current setup, leading to this error.
How do I install pip on my Mac Terminal?
- The Mac terminal needs to be opened via the launchpad.
- Hit the Python 3 or Python -m ensurepip and the "Enter" button.
- Ensurepip will download pip in case pip is missing.
How do I fix the command not found on Mac?
- Verify the command's syntax.
- Set the usual macOS path to $PATH.
- You need to incorporate your directory into PATH.
- macOS can be reinstalled or restored using Time Machine.
Related Articles
- What Graphics Card Do I have? Here's How to Check Graphics Card
- Repairing Disk Errors This Might Take an Hour - How to Fix?
- How to Fix PC Randomly Turns Off
- External Hard Drive Lifespan: How to Prolong It [5 Ways]
- What Is Wake on LAN and How to Enable Wake on LAN in Windows 10
Are you wondering What Is Wake on LAN and How to Enable Wake on LAN in Windows 10? This article contains the perfect solution for you to switch on your computer remotely! So, keep reading to know more. - How to Fix Black Screen of Death Windows 10 in 8 Different Ways
Do you know how to fix black screen of death Windows 10? This article will describe the black screen of death, its causes, and how to resolve the black screen of death on Windows 10. After reading, you can pick any method to fix the black screen of death.