What Graphics Card Do I have? Here's How to Check Graphics Card
The graphics card is a crucial component of a computer, as it affects the performance of certain tasks. Computers often come with preloaded graphics cards, which have different functionalities.
Knowing the graphics card(s) in your computer is essential, especially when using it for gaming or overclocking. This information helps you assess your computer's capability and determine if the preloaded graphics card meets your needs. By understanding what graphics card(s) your PC is equipped with, you can make informed decisions about upgrading or using your computer for specific purposes.
You can check your computer's GPU without taking the case off by using various techniques. Four effective ways to do this include checking the Device Manager, using the GPU-Z software, looking up the specifications on the manufacturer's website, and checking the System Information in the Control Panel. Each method provides a way to get the necessary information without having to physically access the hardware.
Method 1. Check The Graphics Card in Task Manager
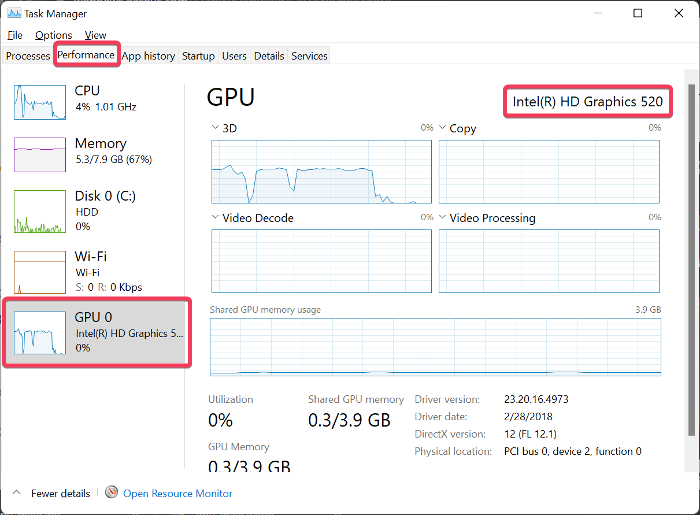
The Windows Task Manager has a feature that displays the GPU performance, allowing you to easily see the name of the graphics card in your computer.
To check your graphics card in Task Manager, follow these steps:
Step 1. Right-click on the Start menu and select Task Manager, or press Windows + S, type Task Manager and open the top result.

Step 2. To view the Performance tab in Task Manager, navigate to the Task Manager window, then click on the "Performance" tab. If the tabs are not visible, click on the "More details" option to expand the Task Manager page and display the Performance tab.
Step 3. To see the GPU running on your computer, tap on the GPU option on the left-hand side pane, and you'll see the GPU displayed in the top-right corner of the page.
Method 2. Check The Graphics Card in the Device Manager
The Device Manager allows you to view the names of all hardware components on your computer, including the graphics processing unit (GPU). This means you can use it to check the graphics cards installed on your computer.
To check your graphics card using Device Manager, follow these steps: Open Device Manager by pressing the Windows key + X and selecting Device Manager. In the Device Manager window, expand the "Display Adapters" section.
Step 1. To open the Device Manager, press the Windows key + S to open the Search bar, type "Device Manager", and select the top result to launch it.

Step 2. On the Device Manager window, navigate to the Display adapters option and double-click it.
Step 3. After expanding the Display Adapter, you will see the name of the GPU(s) your computer has, which is the main component responsible for rendering images on your screen. This is the key piece of information you're looking for to determine the type of graphics card your computer is using.
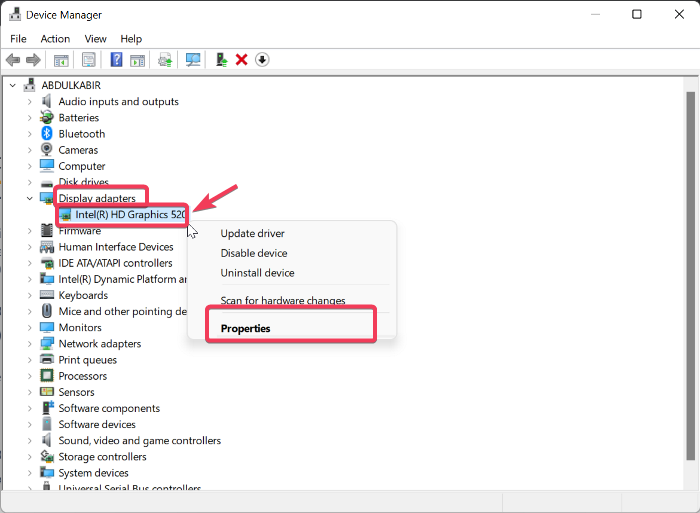
Step 4. To see more details about your GPU, right-click on it and select the "Properties" option from the context menu. This will provide you with additional information about your graphics processing unit.
Method 3. Using DxDiag
The Microsoft-created DirectX Diagnostic, also known as DxDiag, is a built-in tool on Windows computers that allows you to view details about your system, sound card, and graphics card, making it a useful resource for troubleshooting hardware-related issues.
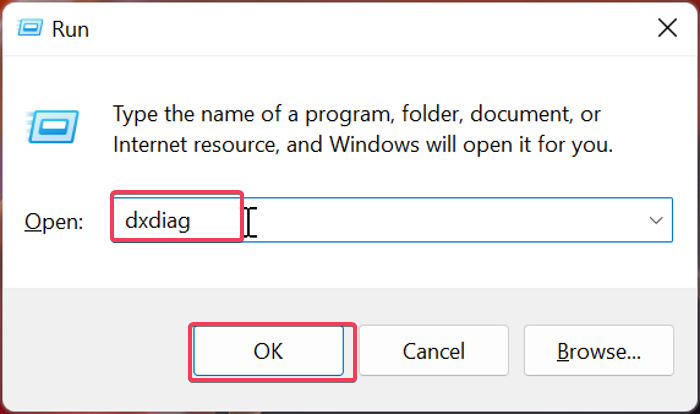
To check the graphics card on your computer using DxDiag, follow these steps: First, click on Start, then type "dxdiag" in the search bar and press enter. This will open the DirectX Diagnostic Tool.
Step 1. Press Windows + R to open the Run Command box.
Step 2. Type dxdiag in the box and hit Enter.
Step 3. The DirectX Diagnostic Tool is used to open and navigate to the Display tab, where the Device Name part is located, to see the name of the computer's GPU.
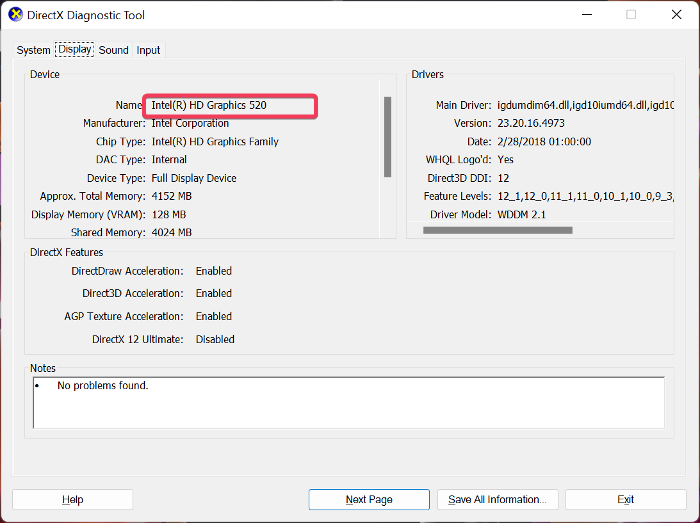
The page also includes information about the graphics card and its driver, providing a comprehensive overview.
Method 4. Using CPU-Z & GPU-Z
If you're looking for alternative ways to get your graphics card details, you can consider using third-party applications like CPU-Z or GPU-Z. These tools can provide you with detailed information about your graphics card, including its model, manufacturer, and other specifications.
Use CPU-Z
CPU-Z is a lightweight piece of free software that gathers information on important hardware in your computer, including your GPU and CPU. This tool allows you to access details about your computer's hardware, and its lightweight design ensures smooth operation even on older computers. To use CPU-Z to check for the graphics card on a Windows computer, you can follow the steps to access the necessary information.
Step 1. Go to the CPU-Z download page and download the program on your computer.
Step 2. After downloading the setup file, install the program and launch it. Then, follow the on-screen instructions to complete the installation. Once installed, you can access the program and start using its features.
Step 3. In the CPU-Z window, switch to the Graphics tab at the top, where you will find the name of your computer's graphics card.

Use GPU-Z
GPU-Z is a system utility that provides detailed information about your video card and graphics processor, specifically designed to display a comprehensive list of specifications for your graphics card. It supports various Windows versions and graphics devices, including NVIDIA, AMD, ATI, and Intel.
Below are the steps to use GPU-Z to check for details about the graphics card on your computer.
Step 1. Download the GPU-Z program and install it on your computer.
Step 2. After the installation, launch the program, and you will see details about your graphics card under the Graphics Card tab.
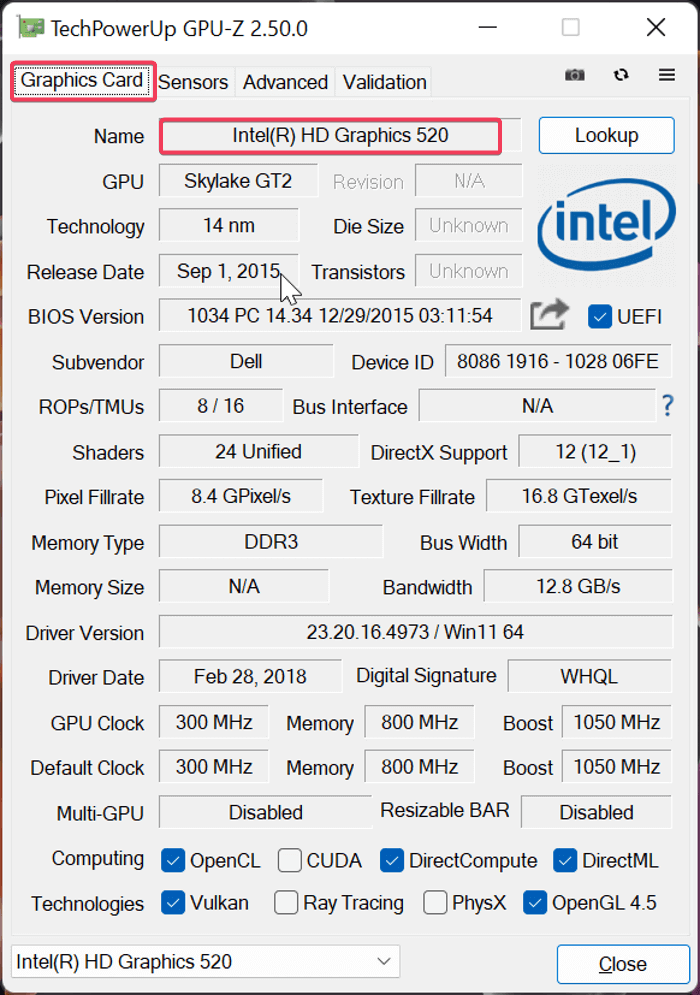
With GPU-You can click on the "Lookup" option in front of your graphics card name to find out more information about the GPU.
Conclusion
You can check your computer's graphics card without opening the casing by using Windows Task Manager, Device Manager, DxDiag, and outside software like CPU-Z and GPU-Z, which provide detailed information on the GPU available on your computer.
Related Articles
- User Profile Service Failed the Logon (Causes & Solutions)
- Fix Windows 10 Doesn't Recognize or Detect Second Hard Drive Error
- How to Factory Reset Laptop Windows 7[2022 Ultimate Guide]
- [Tips] AutoSave Is Greyed Out or Not Working in Office, Word, Excel
- [6 Quick Fixed] Computer Turns On But No Signal to Monitor
If your computer turns on but there's no signal to the monitor, it's likely due to driver or power issues. Fortunately, there are 6 simple fixes that can resolve the problem and get you back to work quickly. By learning these fixes in detail, you can troubleshoot and resolve the issue, and also consider using a handy backup tool to prevent data loss on your computer. - How to Connect PS4 Controller to PC? Follow A Full Guide
Unleash the full potential of your PS4 controller on your PC by following our simple step-by-step guide. Pair your controller with your computer in no time and customize its settings to take your gaming experience to the next level.