How to Fix Overwatch Voice Chat Not Working on Windows 11/10
If you're an Overwatch fan, you might be aware of the issues that make the game unplayable. While playing on Windows 11/10, you'll need to focus intensely and have a reliable microphone to interact with your team effectively.
If your microphones are not working properly, it can be difficult, especially if they're constantly on mute or there's an issue with your audio settings. Fortunately, there are solutions to fix the issue with Overwatch voice chat not working.
You can also read these posts to get more game information:
What Does the "overwatch-2-voice-chat-not-working" Error Mean?
The "overwatch-2-voice-chat-not-working" error can occur due to various reasons such as hardware issues with the headset or Microphone, in-game settings problems, or voice chat being turned off in the game settings. This issue can be experienced when accessing the game through an app or web browser.
Valuable Solutions to Fix Overwatch Voice Chat Not Working Error
Here are 7 solutions to fix the Overwatch voice chat not working error, keep reading and you will find the suitable one.
- Solution 1. Checking Your Headset or Microphone
- Solution 2. Check the Audio Settings of Your Overwatch In-Game
- Solution 3. Set Default Devices of Your PC
- Solution 4. Disable the Exclusive Mode of Audio Device on Your PC
- Solution 5. Allow Access to Apps for Using the Microphone
- Solution 6. Check for Windows Updates
- Solution 7. Installation of the Game Patch in The Latest Version
Solution 1. Check Your Headset or Microphone
Check the headset or microphone for any physical issues, such as a faulty connection or a broken microphone, to fix Overwatch voice chat not working. If the hardware seems fine, proceed with the troubleshooting steps below.
Steps to Follow:
Step 1: Check if the Microphone or headset is plugged in loosely.
Step 2: If you have switched on the mute button on the Microphone or headset, then you need to switch it off.
Then check if the issue got resolved.
Solution 2. Check the Audio Settings of Your Overwatch In-Game
Changing the settings can often resolve Overwatch voice chat not working issues and restore voice chat functionality instantly.
Steps to Follow:
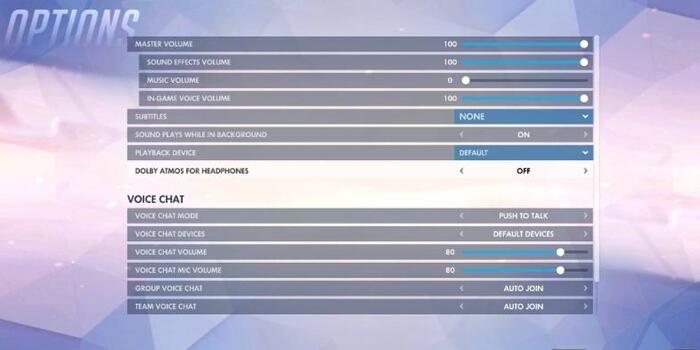
Step 1: Start by opening Overwatch and tapping on "Options" then "Sound".
Step 2: The audibility level of a speaker or microphone can be checked by turning on the sound for that device. This is typically done by adjusting the volume settings or using a sound test feature, if available.
Step 3: Now set "Auto Join" for Team and Group voice chat.
Step 4: Make a selection for the proper Voice Chat devices.
Step 5: To resolve the issue with the 'Push to Talk' option, users need to access the controls, locate the key assigned to the 'Push to Talk' feature, and change it. After making the change, they should join the chat and test if the issue has been resolved. This simple troubleshooting step can often resolve the issue and get the 'Push to Talk' option working properly again.
Solution 3. Set Default Devices of Your PC
If checking the audio settings didn't resolve the issue of Overwatch voice chat not working, check your PC's settings. Your PC may automatically detect your audio device when plugged in, but it might not set the playback device as default. You may need to manually set it as default.
Steps to Follow:
Step 1: Exit the Overwatch.
Step 2: To open the Sound settings, press the "Windows key" and "R" on your keyboard. This will open the Run dialog box. Type "mmsys.cpl" in the Run dialog box and press Enter.
Step 3: To set a headphone or speaker as the default device, go to the Playback tab, select the desired device, right-click on it, and choose 'Default' from the context menu.
Step 4: To disable the device on all devices except one, right-click on the device and select "Disable on all devices". This will prevent the device from being used on all devices except for the one that needs to be set as default.
Step 5: To set up your headphones or speaker as the default device, tap on the "Recording" tab, select the desired headphone or speaker, right-click on it, and choose "Set as Default Device". Finally, tap the "OK" button to confirm the change.
Solution 4. Disable the Exclusive Mode of Audio Device on Your PC
You might have a third-If you're experiencing issues with Overwatch voice chat, try disabling the speaker, microphone, or headset exclusive mode in your device settings to resolve the problem.

Steps to Follow:
Step 1: To access the Multimedium System Properties, press the Windows key and R together on your keyboard. This will open the Run dialog box. In the Run box, type "mmsys.cpl" and press Enter.
Step 2: To identify the default device used for playback, go to the "Playback" tab, right-click on the device, and select "Properties".
Step 3: To disable the application from taking exclusive control of the device, go to the Properties Window, click on the "Advanced" tab, and uncheck the "Allow the application to take exclusive control of this device" checkbox.
Step 4: To resolve the issue, tap on the "Apply" and "Ok" buttons in sequence, and then verify if the problem has been resolved.
Solution 5. Allow Access to Apps for Using the Microphone
If you're having trouble using certain apps due to microphone restrictions, it may prevent you from using features like voice chat. For instance, if you're experiencing issues with voice chat in Overwatch, you'll need to grant permission for the app to access your microphone. This will typically involve going to your device's settings, finding the app's permissions, and allowing it to use your microphone. Once you've done this, you should be able to use voice chat in the app without any issues.
Steps to Follow:
Step 1: To access the Settings app on Windows 11, press the "Windows key" and "X" simultaneously, which will open the Power User menu. From there, select the "Settings" option to open the Settings app.
To access Settings on Windows 10, simply move your cursor to the bottom left corner of the screen, click on the Start button, and then select "Settings".
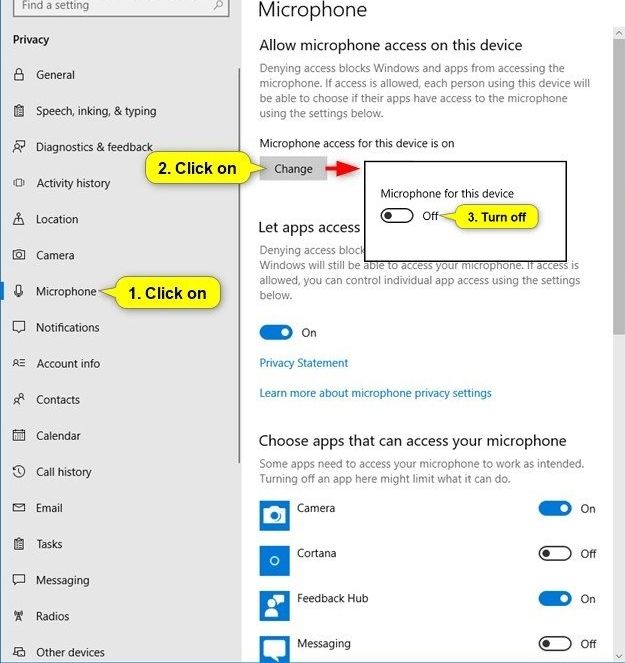
Step 2: To access the "Privacy and Security" section, select the "Privacy and Security" option from the navigation menu on the left.
In Windows 10, choose "Privacy" from Settings.
Step 3: To change your Google account's microphone settings, scroll down to the 'Privacy and Security' screen, then select 'Microphone'.
Step 4: To allow apps to access your microphone, switch on the toggle for "Microphone access". This setting can also be found as "Allow apps to access your Microphone" in Windows 10. Make sure it's turned on.
Step 5: Now, by scrolling down the list, look for Overwatch and go ahead by setting the toggle for microphone access.
Solution 6. Check for Windows Updates
To resolve Overwatch voice chat issues, try updating Windows to the latest version, as outdated operating systems can cause bugs and security problems.

Steps to Follow:
Step 1: To access settings, press the I hotkey + Windows key on Windows 11, or the Windows key and select settings on Windows 10.
Step 2: To update Windows, select Windows Update from the navigation pane on the left in your Windows 11, or look for the Update and Security option and select Windows Update in Windows 10.
Step 3: In Windows 10/11, on the Windows Update screen, tap on the "Check for Updates" button.
Windows will automatically download and install available updates, and then prompt the user to restart the system to complete the installation of necessary updates.
Solution 7. Installation of the Game Patch in The Latest Version
If you're experiencing issues with Overwatch voice chat not working, try applying the latest game patch to fix the problem. The game developers often release patches to address known bugs and issues, so checking for updates may resolve the issue you're facing.
Steps to Follow:
Step 1: Start by launching the application for Battle.net on your PC.
Step 2: Select a game from the installed list, and choose Overwatch.
Step 3: Now make a selection for "Options".
Step 4: Select "Patch Notes" under the Options section.
You will see all available patches. Download and install the updated ones. Test them by launching the game and checking if the issue is resolved.
Conclusion
We've covered various methods to resolve Overwatch voice chat issues, including checking internet connection, updating the game, and resetting voice chat settings. If these steps don't work, you can try contacting Blizzard's support team for further assistance.
Related Articles
- Solved: Taskbar/Start Button Not Working Windows 10
- PowerShell Get Disk Space on Windows 10/11 [Full Tutorial]
- How to Check If Disk Is Failing in Windows/Mac [2023 Complete Guide]
- [2023 Guide] macOS High Sierra Download and Install
- Fixes for "An Error Occurred While PowerPoint Was Saving the File" in 2023
This article analyzes the reasons behind the error “An Error Occurred While PowerPoint Was Saving the File” and provides easy solutions to fix the issue, also introducing a professional tool to check for bad sectors and file system errors. - How to Fix 'An Error Occurred While Preparing the Installation' Error [macOS Upgrade Issue]
If you receive an error message saying 'An Error Occurred While Preparing the Installation', you can fix the issue and reinstall macOS by following this guide. This guide explains how to resolve the error and regain access. It's also essential to check and recover any lost data, whether the issue is resolved or not.