FIXED: PC Won't Boot to BIOS - 4 Ways Included
Accessing the BIOS on a computer allows users to change settings, make tweaks, and improve performance by enabling or disabling certain features. The BIOS is specific to the motherboard, making each PC unique in this regard. This process is essential for PC users, providing a way to customize and optimize their computer's settings.
If your PC won't boot to BIOS, there are several potential causes and solutions to consider. Analyzing the issue is the first step, followed by a few possible fixes.
Why My PC Won't Boot to BIOS
If your PC won't boot into BIOS, it's likely due to a hardware issue or misconfigured settings. The BIOS settings are designed to help you troubleshoot and tweak your PC, so if it can't enter BIOS, there could be several problems, such as a faulty BIOS chip, incorrect boot order, or corrupted settings.
- You're pressing the wrong buttons, i.e., F2 instead of F10, F10, or DEL
- Your motherboard's CMOS battery has gone bad
- RAM or other hardware preventing it from booting into BIOS
- The keyboard is broken, and the BIOS key doesn't work
- Broken or missing BIOS jumper on the motherboard
- The power connector isn't seated properly
- Your motherboard is broken
- The BIOS chip on your motherboard has gone bad
If your PC won't go into BIOS, it's likely due to a faulty motherboard, a loose or damaged connection, or a malfunctioning BIOS chip. While a motherboard replacement is the only permanent fix, you can try other solutions like checking for loose connections, resetting the BIOS, or using a USB drive to access the BIOS. If none of these work, it may be worth considering RMA or contacting the manufacturer for assistance.
If your computer is stuck on the BIOS splash screen, you can try resetting the BIOS to its default settings, updating the BIOS to the latest version, or running a BIOS reset tool. You can also try pressing the F2, F12, or Del key repeatedly to access the BIOS settings and reset the BIOS. If none of these methods work, you may need to consult the user manual or contact the manufacturer for further assistance.
PC Stuck on BIOS Screen - How to Fix?
If you're experiencing a PC stock on BIOS screen error, there are several practical ways to troubleshoot and resolve the issue. First, try pressing the F2, F12, or Del key to access the BIOS settings and save the changes. Next, check the power supply and ensure it's properly connected.
How to Fix PC Not Booting to BIOS
Now that we know why BIOS may not work on your PC, let's try some known fixes. These fixes will help you ensure that the BIOS works or identify if the issue is software-related. To start, we'll try each of the four fixes if your computer can't access BIOS.
- Fix 1. Use UEFI Firmware Settings
- Fix 2. Remove BIOS Battery to Reset CMOS
- Fix 3. Troubleshoot the RAM Sticks
- Fix 4. Fix the Faulty Power Connector
Fix 1. Use UEFI Firmware Settings
To access your PC's UEFI firmware settings, you'll need to press a specific key during the boot process. The key you need to press varies depending on your PC manufacturer, but common keys include F2, F12, Del, or Esc. Once you're in the UEFI settings, look for the "Boot Order" or "Boot Priority" section. In this section, you should see a list of devices that your PC can boot from, such as your hard drive, SSD, or USB drive.
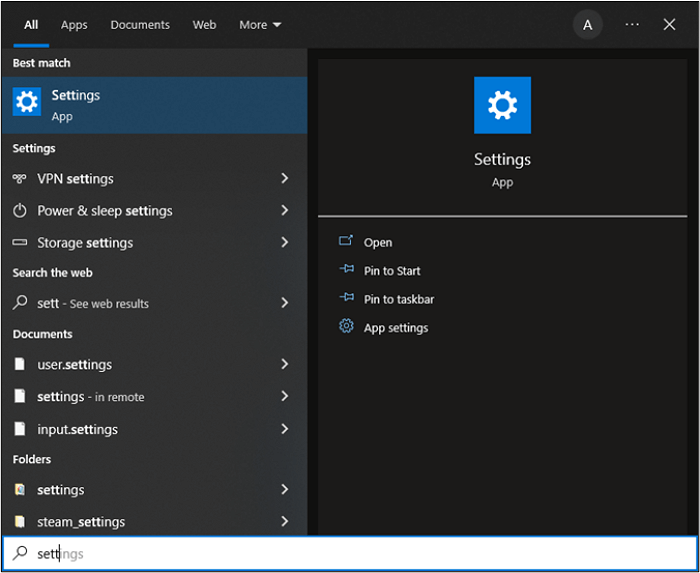
Step 1. Open start and type Settings, then click on it.
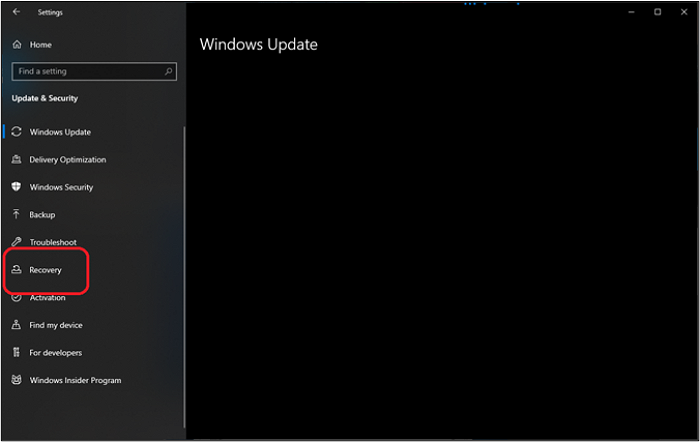
Step 2. Next, head into Update & Security option.
Step 3. Inside Update & Security, tap on the Recovery option.
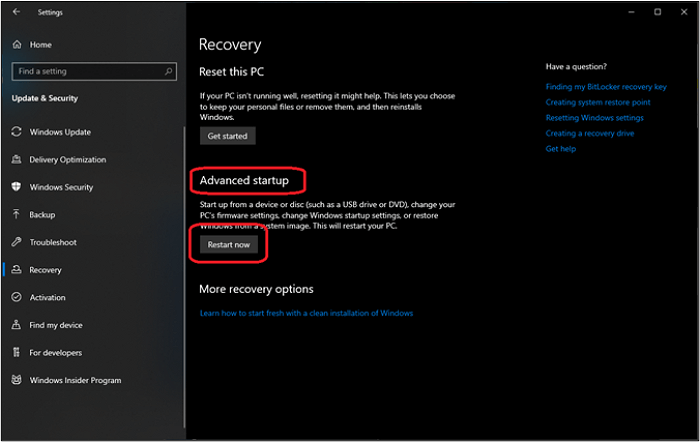
Step 4. Then find Advanced startup and click on Restart now.
Step 5. Wait for your PC to restart into Advanced startup/Recovery mode.
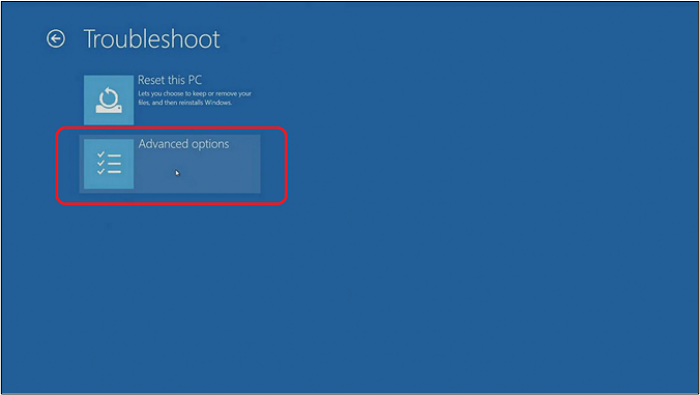
Step 6. Inside recovery mode, tap on Troubleshoot.

Step 7. Inside Troubleshoot, head into Advanced options.
Step 8. Inside the advanced options, click on UEFI Firmware Settings.
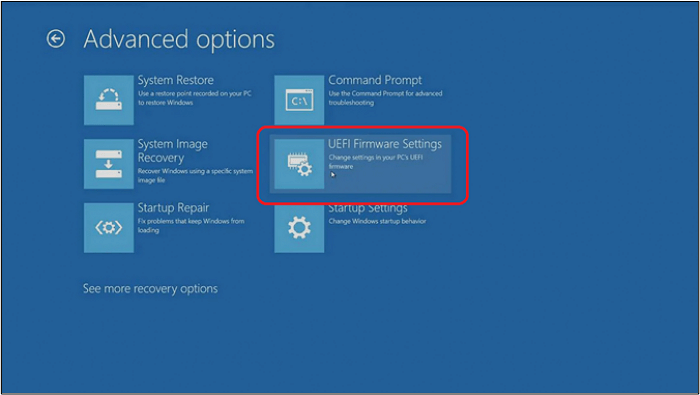
Step 9. Click on Restart to go into BIOS.
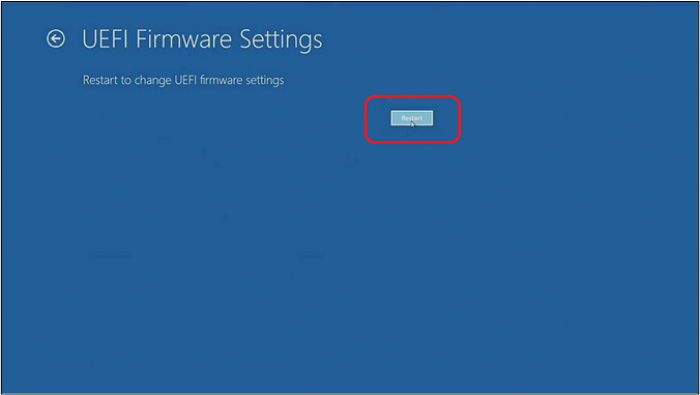
Step 10. Done.
If you need to access your computer's BIOS settings, you can reboot into it without restarting your PC entirely. To do this, simply shut down your computer, press the power button to turn it back on, and immediately start pressing the key that allows you to access the BIOS settings (usually F2, F12, or Del). If this method doesn't work, you can try other fixes.
You May Also Like: If your computer won't boot, don't panic! There are several possible causes, including a dead battery, faulty power supply, loose connections, and software issues. To troubleshoot, try unplugging and replugging the power cord, checking for loose connections, and running a diagnostic test.
Fix 2. Remove BIOS Battery to Reset CMOS
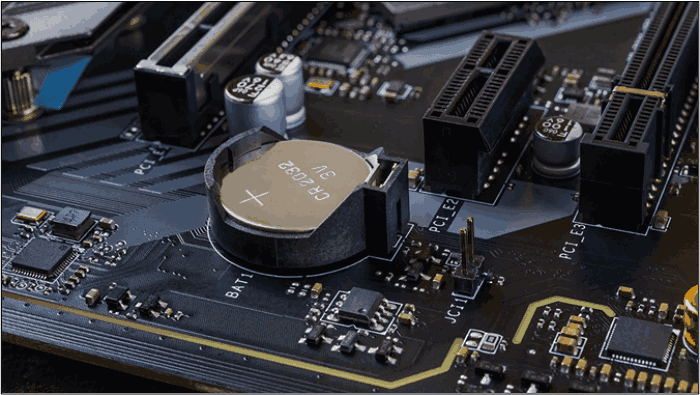
To reset the BIOS battery, you'll need to access the PC case and locate the CMOS battery, which is usually a small coin-sized lithium battery. Remove the battery and let it sit for about 30 minutes to discharge. Then, reconnect the battery and let it sit for another 30 minutes to recharge. This process should reset the BIOS to its default settings.
Step 1. Shut down and unplug your PC from the wall outlet.
Step 2. Open your PC case and locate the CMOS battery.
Step 3. Press the battery latch backward until the CMOS battery pops out.
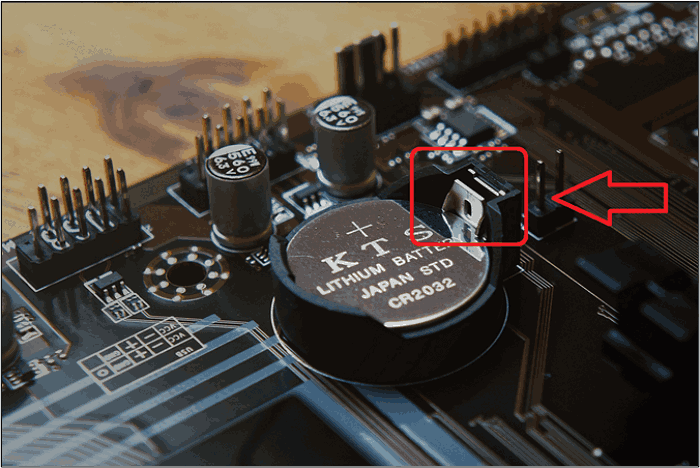
Step 4. Once the battery is out, wait for 10 seconds.
Step 5. Pop the same or a new battery back in.
Step 6. Done.
To completely reset the BIOS, you would need to enter the BIOS settings, go to the reset or restore to default option, and confirm the reset. This process will erase all custom settings, so it's essential to note down any changes you've made before proceeding. Once the reset is complete, you'll see a notification on the BIOS screen indicating that the BIOS has been reset.
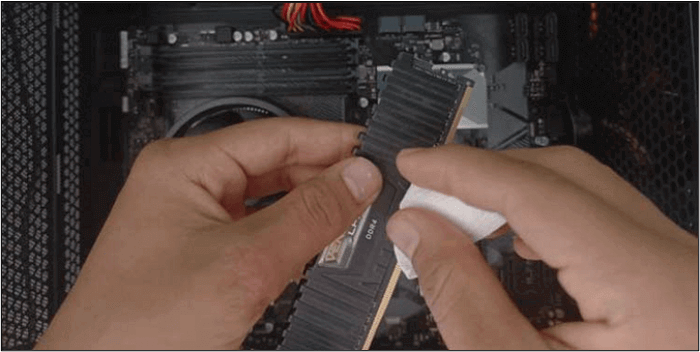
Fix 3. Troubleshoot the RAM Sticks
If your BIOS is not working, try removing one or two RAM sticks and plugging them back in to ensure they are properly seated. This can sometimes resolve the issue if a faulty RAM stick is preventing the BIOS from loading.
Step 1. Open your PC case.
Step 2. Unplug your RAM sticks.
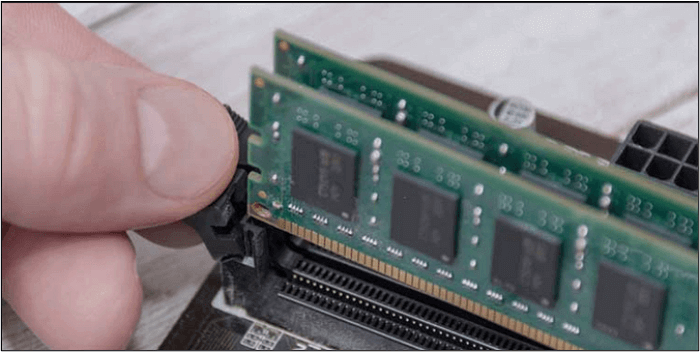
Step 3. Use a pencil eraser to clean the connectors.
Step 4. Plug your RAM back in.
Step 5. Try to turn on the PC again.
Step 6. Done.
To resolve the issue of your RAM not allowing your PC to go into BIOS mode, you can try resetting the CMOS by removing the CMOS battery, pressing the power button for 30 seconds to discharge the power, or using a CMOS reset tool. Additionally, try removing one stick of RAM at a time to isolate the issue, and ensure that the RAM is properly seated and the slots are clean.
Fix 4. Fix the Faulty Power Connector
To ensure your power supply's power connector is seated properly, first, turn off your computer and unplug it. Next, locate the power connector on your power supply and gently push it back into place until you hear a slight click. This indicates that the connector is securely seated. Finally, plug your computer back in and turn it on to test if the issue has been resolved.
Step 1. Locate the ATX 24-pin connector on your motherboard.

Step 2. Unlatch the ATX cable by pressing the latch with the ATX cable.
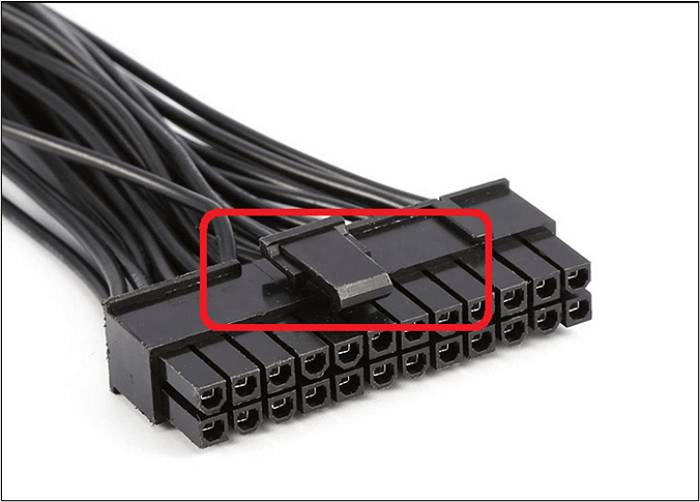
Step 3. Unplug the cable, then wait for 10 seconds.
Step 4. Plug the cable back in.
Step 5. Done.
Reconnecting the power cable to the motherboard will resolve the BIOS issue. Simply unplug the power cable, reseat it into the motherboard, and then restart your PC. This should fix the problem.
Bonus Tip: How to Update BIOS
Updating your BIOS can help prevent data loss and system failures, and also provide new security features and bug fixes from your motherboard manufacturer.
Before updating BIOS, create a system image in case something goes wrong during the update process.
The remarkable tool, Qiling Disk Master Pro, is all you need to create a backup under such circumstances.
It has become the go-The option is ideal for many users around the globe, and it's ideal for creating a backup for various reasons, such as data loss prevention, disaster recovery, and business continuity. It's a secure and reliable way to protect sensitive information and ensure that businesses can quickly recover in the event of an unexpected issue. This option is also useful for users who want to create a backup of their personal files, photos, and other important documents.
- Ability to back up your system, disk, file, etc.
- Create full, differential and incremental backups
- Thorough system backup and recovery in a few clicks
- Compress a backup to save space
- Place your backup in a free 250GB cloud storage
Here are the main reasons you need this tool to help create an easy-to-recover system backup: to ensure business continuity, minimize downtime, and prevent data loss. This tool helps create a backup that can be easily restored, allowing you to recover your system quickly and efficiently. With this tool, you can update BIOS from a USB drive, which can be a game-changer in case of a BIOS failure or other hardware issues. To update BIOS from USB successfully, simply read the backup, and then use the USB drive to update your BIOS.
- Download the right BIOS from your motherboard manufacturer
- Format the USB into a FAT32 file system
- Copy and paste the BIOS file into the USB
- Boot your PC from a USB
- Update the BIOS/ or update using the UEFI BIOS option
- Done
Updating your PC's BIOS using Qiling Disk Master Pro will create a backup of your system, making it easier to restore your PC to its previous state if needed. Once the update is complete, you'll have a reliable backup to fall back on. This process ensures that your system is updated, and you have a safeguard in place, making it a convenient and secure option.
There are 2 articles about updating BIOS. For more details, you can read them.
The Bottom Line
If your PC won't boot to BIOS, try pressing the correct key combination, such as F2, F12, or Del, to access the BIOS settings. You can also try alternative keys like F10 and F12, as different motherboard manufacturers may use different keys. This should allow you to boot into your PC's BIOS settings.
To summarize, you can use methods like checking for loose connections, updating the BIOS, and running a diagnostic test to identify the issue with your PC's BIOS. These steps can help you diagnose the problem and determine if it's a hardware or software issue.
It's always a good idea to create a backup of your computer in case something goes wrong. Before updating your BIOS, use a tool like Qiling Disk Master Pro to create a system backup and protect your data.
FAQs on PC Won't Boot to BIOS
1. Can BIOS be broken?
A BIOS (Basic Input/Output System) is a storage chip on the PC's motherboard that contains the motherboard's firmware. If this chip is damaged or broken, the BIOS will not function. Additionally, the BIOS is powered by the CMOS (Complementary Metal-Oxide-Semiconductor) battery when the PC is turned off, so a faulty or dead battery can also cause the BIOS to malfunction.
2. Can malware destroy BIOS?
Malware can corrupt or delete the BIOS file, rendering the computer unusable until the BIOS is fixed.
3. Why is my PC booting to BIOS, not Windows?
If your PC is booting directly into BIOS and not Windows, check the Boot options and prioritize the device with Windows on it to resolve the issue.
4. What causes BIOS to fail?
The BIOS can fail due to sudden power failure, technical malfunction, malware attacks, or accidental damage during software updates.
Related Articles
- How to Boot from USB Ubuntu? [Full Guide in 2024]
- When Is the Next Apple Event 2024: September Event [macOS Sonoma included]
- 10 Fixes to Solve Chromebook Black Screen [2024 Guide]
- Why Is My Chromebook So Slow and How Do I Speed It Up? [Complete Guide]
- Call of Duty Modern Warfare 2 File Location [All You Should Know]
As a world-The Call of Duty (COD) series is always highly popular when released, and for new players, learning how to manage their game files is crucial for a smooth gaming experience. This article provides information on the file location for Call of Duty: Modern Warfare 2, including where to find, change, and backup COD documents. - Can I Clone a Damaged Hard Drive [Detailed Guide]
You can clone a damaged hard drive, but it may not be a straightforward process. The article provides a step-by-step guide on how to do it, and recommends a professional cloning tool to help with the process. This tool can help recover data from a damaged hard drive and clone it to a new one.