How to Fix Screenshot Not Working Mac Ventura [Multiple Plans]
Screenshot not working on Mac VenturaTo fix the issue, you can try the following solutions:
| Workable Solutions | Step-by-step Troubleshooting |
|---|---|
| 1. Shut Down and Restart Your Mac or MacBook | Go to the Apple menu. Select "Restart" from the drop-down menu. Wait a few seconds for the ...Full steps |
| 2. Verify & Restore Default Shortcuts of Taking Screenshots | Go to the Apple logo and Select System Settings or System Preferences. Choose the Keyboard option...Full steps |
| 3. How to Move the Preference File to Desktop | Go to Finder. Select Go. Choose to Go to Folder. Type: ~/Library/Preferences/. Look for a file: com...Full steps |
| 4. How to Reset NVRAM on Mac or MacBook | Restart the system. Press and hold Command, Option, P, and R keys. Release the keys when you...Full steps |
| More Solutions | Open Preview. Choose File. Select Take Screenshot. Choose the option you want as per your needs...Full steps |
How to Use Screenshot on Mac Ventura
If you're experiencing issues with screenshots not working on Mac Ventura, you can try using the built-in screenshot features, which have been made easy to use on Mac, with different methods available for different computers.
Users on Mac Ventura have reported issues with screenshots not working due to various reasons such as.
- Shortcuts settings issue
- NVRAM problems
- Malware attack
In Mac, you can take a full-screen screenshot by pressing Command, Shift, and 3 keys, which saves the screenshot to the desktop.
To take a screenshot, you can select the entire screen, a specific area, or even a window. This can be done from the drop-down menu, making it a convenient option. Understanding how to take screenshots is essential as it allows you to capture and analyze problems more effectively, ultimately making it easier to find and apply the correct solution.
How to Fix Screenshot Not Working Mac Ventura [7 Ways]
There are multiple solutions to fix the screenshot not working on macOS Ventura, and you can go through them individually to check if your issue is resolved.
Let's take a look:
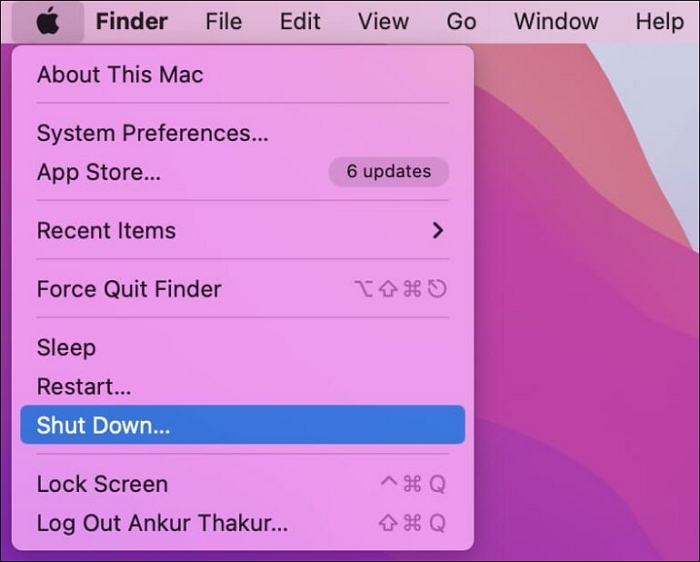
1. Shut Down and Restart Your Mac or MacBook
Restarting your MacBook Pro can be a simple solution to fix the screenshot issue. This process removes temporary files and allows the system to resolve the error, making it a good starting point for troubleshooting. To restart, follow the necessary steps.
Step 1. Go to the Apple menu.
Step 2. Select "Restart" from the drop-down menu.

Step 3. Wait a few seconds for the system to shut down and turn on again.
If your Mac is unresponsive and won't shut down, press and hold the Power button until it turns off. Then, wait a few seconds and turn it back on. If this doesn't work, you may need to force shut down your Mac by pressing and holding the Power button until it turns off, and then try to troubleshoot the issue by checking for software updates, running a diagnostic test, or resetting the System Management Controller (SMC).
If your Mac won't shut down, try pressing the power button for 10 seconds to force it to turn off. If that doesn't work, try booting in Safe Mode by restarting your Mac and immediately holding down the Shift key.
If your Mac is unresponsive and cannot shut down successfully, you can fix this issue in three minutes! Simply hold the power button until the Mac shuts down, then press the power button again to turn it back on.
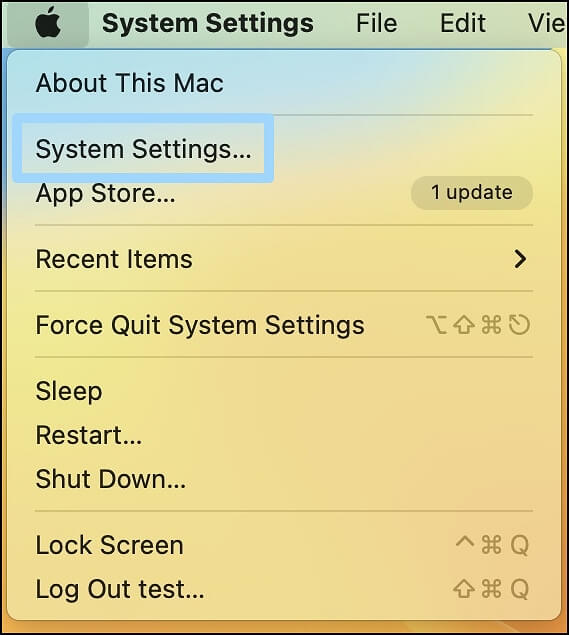
2. Verify & Restore Default Shortcuts of Taking Screenshots
Sometimes, the cause of being unable to take a screenshot is simple: check if the default shortcut setting is enabled.
Here are the steps to follow:
Step 1. To access System Settings, go to the Apple logo at the top left corner of the screen, click on it, and select "System Settings" from the dropdown menu. Alternatively, you can also click on "System Preferences" from the same dropdown menu.
Step 2. To access keyboard shortcuts, go to the sidebar and choose the Keyboard option, then click on the Keyboard Shortcuts button on the right-hand side.
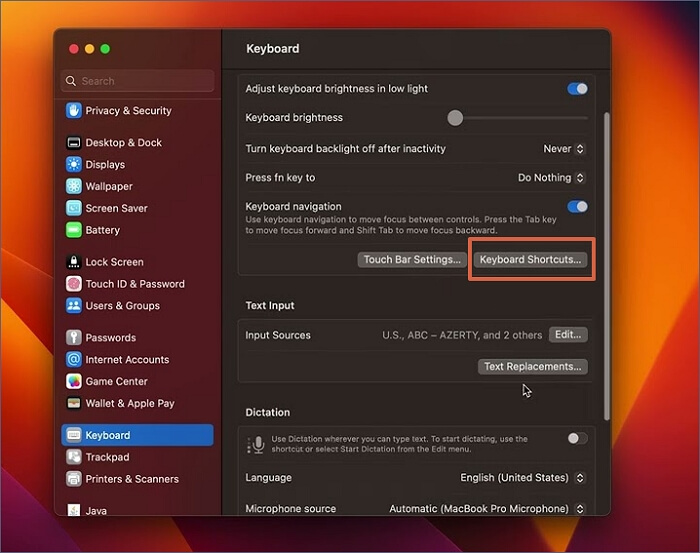
Step 3. From the sidebar, click on Keyboard Shortcuts.
Step 4. Check if the shortcuts are enabled under Screenshots.

If you notice any changes from the default settings, click on the Restore Defaults option. This will revert the settings to their original state when you first set up the system.
3. Move the Preference File to Desktop
To fix the screenshot not working on Mac Ventura, try moving the preference file. To do this, open Finder, click on "Go" in the top menu, select "Go to Folder", and type in "~/Library/Preferences/com.apple.screencapture.
Step 1. Go to Finder.
Step 2. Select Go.
Step 3. Choose to Go to Folder.
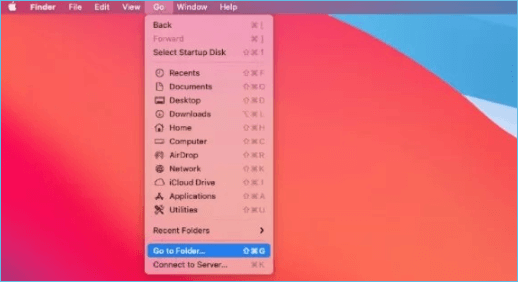
Step 4. Type: ~/Library/Preferences/.
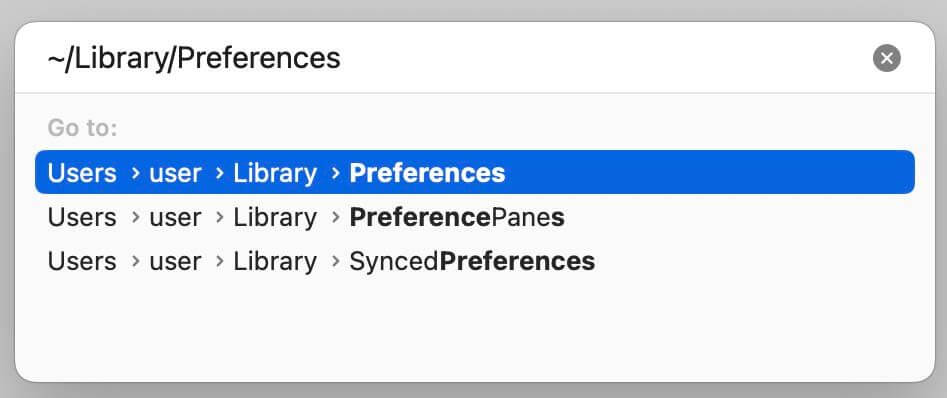
Step 5. Look for a file: com.apple.ImageCaptureApp.plist.
Step 6. Shift the file to the desktop.
Step 7. Restart the system.
Step 8. Now see if you can take screenshots.
Step 9. If everything is fine, delete the file on the desktop, and you can share this method with your friends!
4. Reset NVRAM on Mac or MacBook
To resolve the screenshot issue on a Mac, resetting the NVRAM, which stores settings such as time zone and sound levels, may be the solution. This can be done by restarting the computer and immediately holding down the Command + Option + P + R keys, then releasing them after about 20 seconds. This process can help resolve the screenshot problem.
Step 1. Restart the system.
Step 2. Press and hold Command, Option, P, and R keys.
Step 3. Release the keys when you hear the startup chime.
Step 4. Use Grab to take screenshots on Mac Ventura.
To take a screenshot on a Mac Ventura, you can use the Grab feature, which allows you to capture screenshots with ease. Simply go to Applications > Utilities > Grab, or use Spotlight to search for it. Once open, you can select the type of screenshot you want to take, such as the entire screen, a selected area, or a window. You can then save the screenshot to your desired location on your Mac.
Step 1. Go to Finder.
Step 2. Choose Applications.
Step 3. Select Utilities.
Step 4. To take a screenshot, first, open the application or window you want to capture. Then, choose the screenshot option from the menu. You will see several options, such as taking a screenshot of the entire screen, a selected area, or a window. Choose the one you need and go ahead with taking the screenshot.
5. Use Preview to Make Screenshots on Mac Ventura
If the Command, Shift, and 4 keys are not working for you to take a screenshot, you can use the Preview tool as an alternative. This tool not only allows you to take screenshots but also enables you to edit images. To do this, you can follow these steps:
Step 1. Open Preview.
Step 2. Choose File.
Step 3. Select Take Screenshot.
Step 4. Choose the option you want as per your needs.

6. Check for Computer Viruses or Malware on Mac
Malware may be the reason you're unable to capture screenshots on your Mac. If you suspect a malware attack, take immediate action to resolve the issue.
To remove computer viruses or malware, uninstall all programs and clean the system to free up space. Installing anti-virus software can also provide extra security.
7. Update or Reinstall macOS Ventura on Mac
Lastly, out-Outdated software can also cause the screenshot problem, but you can easily resolve this by updating to the latest macOS version. To do this, follow some simple steps, which will ensure your software is up-to-date and running smoothly.
Step 1. Go to the Apple menu.
Step 2. Choose System Settings.
Step 3. To update your Mac, click on "General" from the sidebar and then select "Software Update" from the right-hand side.
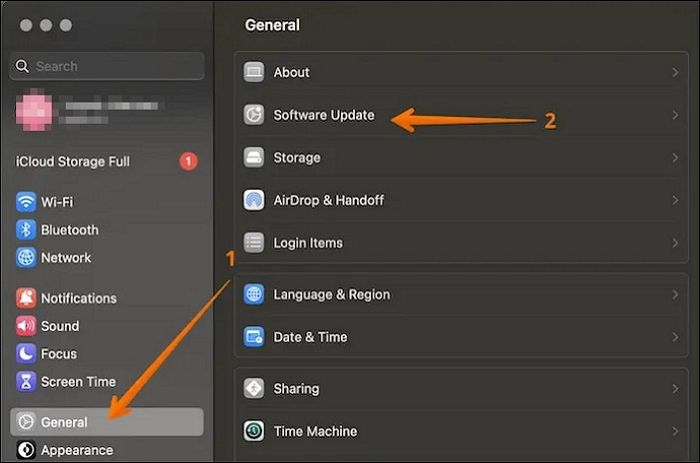
Another way to fix the issue is to delete the existing macOS Ventura and reinstall it again.
The solutions to the "screenshot not working" problem include checking for updates, restarting the computer, and ensuring that the screenshot key is not being used by another program. Additionally, checking the screenshot key settings in the control panel or settings app, and verifying that the screenshot key is not being used by a third-party app can also resolve the issue. Furthermore, checking for any conflicts with other keyboard shortcuts and disabling any unnecessary keyboard shortcuts can also help.
How to Retrieve Screenshots on Mac Ventura with Software
If you're having trouble finding screenshots on your Mac, don't worry - it's not uncommon! To resolve the issue, you can try a few solutions. However, it's essential to note that applying these fixes might result in data loss, so be cautious. But rest assured, with a little care, you can resolve the issue without losing any important data.
To recover lost screenshots on a Mac, using professional data recovery software is the most effective solution. A highly recommended tool for this purpose is Deep Data Recovery for Mac, which can automatically retrieve lost screenshots without requiring users to know where they are saved on the Mac.
The software can recover data lost due to various situations such as formatting, malware attack, accidental deletion, partition loss, and system crashes. It's user-friendly and doesn't require in-depth technical expertise. The Qiling screenshot recovery program is designed to be easy to use, making it accessible to anyone.
- Easy data retrieval with support for recovering deleted pictures, music files, videos, documents, and more.
- Hassle-Free data recovery from Mac-based devices is now possible, and the software also supports Mac USB recovery.
- The filter and preview file feature allows you to quickly locate and preview files you want to recover, making the recovery process more efficient.
To use Deep Data Recovery for Mac, follow these easy steps:
Note: To create a backup, click on "Disk Backup" on the left, which will allow you to recover photos from a backup image in case the disk is damaged or the photos are accidentally lost.
Step 1. Scan for lost photos
To recover your lost photos, go to the location where they were saved, click the "Search for lost files" button, and follow the prompts to scan for deleted files.

Step 2. Select wanted photos
Deep Data Recovery for Mac scans the selected disk volume and presents the results in the left pane, allowing users to quickly filter lost photos by path and type.

Step 3. Recover lost photos
To recover your deleted photos, select the target photos and click the "Recover" button to get them back at once.

Summary
If your Mac's screenshot isn't working, it's likely due to a variety of reasons. Understanding how screenshots are taken can help you pinpoint the issue. To resolve the problem, you can try resetting your Mac's NVRAM or updating the system. These solutions can help get your screenshot feature up and running again.
Data loss can occur while applying solutions to fix the issue, and in such cases, using a reliable data recovery tool is essential. A user-friendly option like Deep Data Recovery for Mac can be chosen to restore lost data.
If you haven't tried Deep Data Recovery for Mac yet, check it out today!
Screenshot Not Working Mac Ventura FAQs
Now that you know how to fix Screenshot Not Working Mac Ventura, it's time to learn more. For that, read the questions and answers listed here -
1. How to delete screenshots on Mac?
To delete screenshots on a Mac, simply select the screenshots you want to delete and then press and hold the Command and Delete buttons simultaneously. This is the simplest way to remove unwanted screenshots from your Mac.
2. How do you screenshot on a MacBook Ventura?
To take a screenshot on a MacBook Ventura, you can press Shift, Command, and three keys simultaneously to capture the whole screen, or press Shift, Command, and five keys simultaneously for an open screenshot.
3. Where do screenshots go in macOS Ventura?
Screenshots in macOS Ventura are saved to the desktop by default, but can be saved to a different location, with each screenshot being named "Screen Shot" followed by a date and time.
4. How to fix the screenshot not working on macOS Ventura?
To fix the screenshot not working on macOS Ventura, you can try restarting your system, updating your Mac, resetting NVRAM, or checking if the default settings for taking screenshots are correctly set.
Related Articles
- How to Factory Reset PS4 [2023 Complete Guide]
- Best NAS for Home Media (2023 Selected)🏅
- [Quick Fixed] No Login Screen on Windows 10/11 Issue
- Full Guide: Move Partition Gparted in Windows 11/10/8/7 [Step-by-Step Guide]
- How Many Pictures Can a 32GB SD Card Hold [Full Info]
A 32GB SD card can hold approximately 9,000 to 10,000 high-quality photos, depending on the camera's resolution and file format. The storage capacity of an SD card is affected by factors such as image resolution, file format, and compression level. - How to Backup Google Account on Android and PC
Backing up your Google Account is crucial in today's digital age. To do so, you can follow the methods to back up your Google Account data on Android and PC, which will be detailed below. Additionally, we'll provide you with solutions on how to further secure your Google data.