(Solved!) Secure Boot Enabled But Not Active🔥
Secure Boot, introduced by Microsoft in Windows 8, is a feature that ensures the operating system of a computer is secure and free from unauthorized apps that could cause trouble during boot-up.
Users have reported that their devices show "Secure Boot Enabled but not Active" after installing Windows, which can create an additional security layer but also causes issues.
If you're experiencing issues with the secure boot feature, don't worry, this blog covers the issue. Qiling's post shares effective ways to overcome this problem and run your system smoothly.
Why Is Secure Boot Enabled But Not Active
- Notice:
- Before moving to the solution to such problems in your computer, you should understand a few common reasons behind it. Doing so will enable you to understand the solutions properly and move ahead without trouble. So, we are here with some common causes behind this error.
The issue may be caused by "Secure Boot Disabled" in UEFI firmware settings, which might be technically enabled but not actually functioning due to this setting.
Another common reason for this error is the activation of your system's CSM (Compatibility Support Module), which is enabled in UEFI settings, causing the issue. To resolve this, you'll need to change the settings using specific steps.
If your BIOS isn't up-to-date, you may encounter issues like "secure boot enabled but not active," which can cause problems regardless of whether you have a Dell device or an ASUS device.
Don't forget to share this post if you find it helpful.
How to Fix Secure Boot is Enabled But Not Active
The above-The most common reasons behind the Secure Boot error are a corrupted system file, a faulty UEFI firmware, a mismatch between the UEFI firmware and the system's BIOS, or a problem with the Secure Boot settings. To resolve this issue, you can try resetting the UEFI firmware, checking the Secure Boot settings, or updating the UEFI firmware to the latest version. Additionally, checking the system for malware and viruses can also help resolve the issue.
Way 1. Enable Secure Boot
To resolve the issue, we recommend enabling Secure Boot, which requires restarting your computer and manually enabling the feature. This involves following a series of steps, including restarting your computer and enabling Secure Boot.
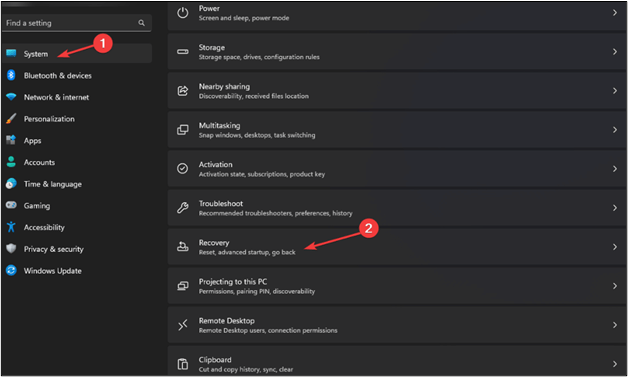
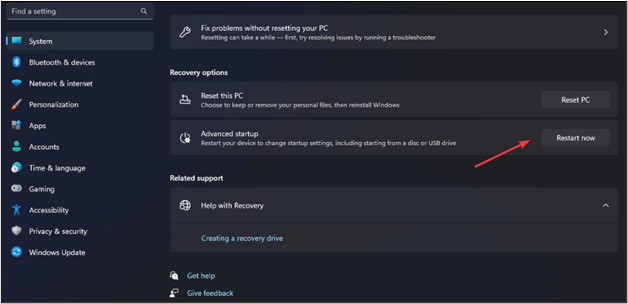
Step 1: Go to "Settings" & look for the "System" option.
Step 2: In the "System" tab, click on the "Recovery" option.
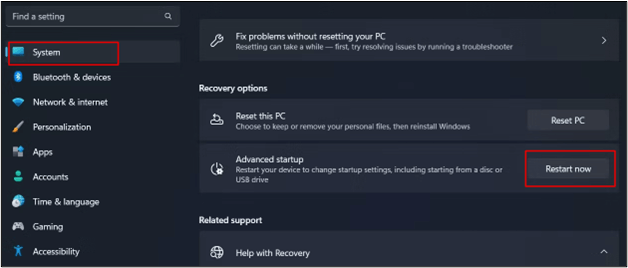
Step 3: Now, choose the "Restart Now" option given beside the "Advanced Startup".
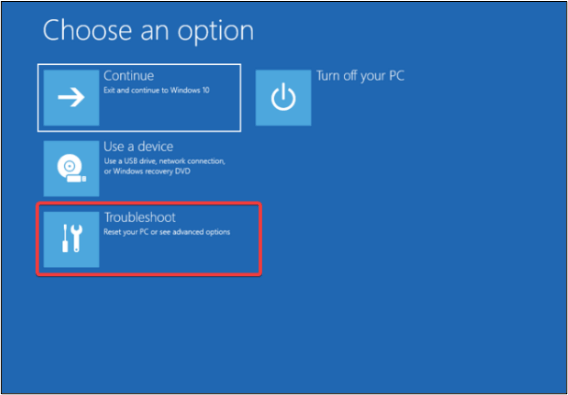
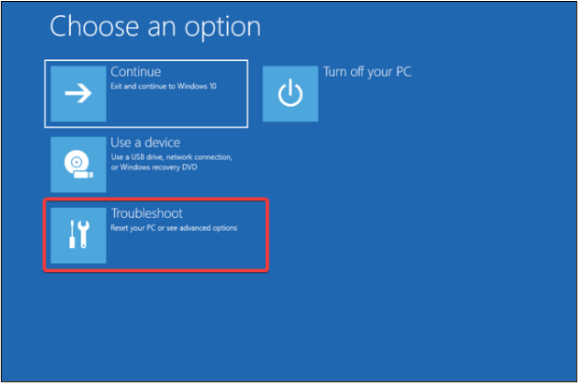
Step 4: In this mode, look for the "Troubleshoot" option and click on it.
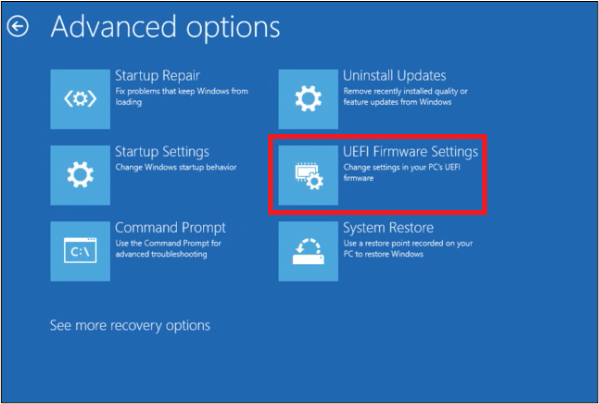
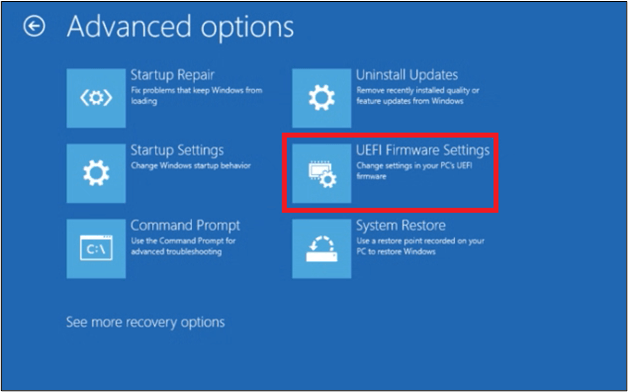
Step 5: To restart your computer, tap on "Advanced Options" and then click "Restart" after selecting "UEFI Firmware Settings".
Step 6: The system will boot in UEFI BIOS.
Step 7: Look for "BIOS Setup" and click on it.
Step 8: Now, choose the "Secure Boot" option.
Step 9: Check in the box given beside "Enable Secure Boot."
To enable secure boot in your system, follow these simple steps. It's a straightforward process if you follow our guide step by step.
Way 2. Disable Compatibility Support Module
CSM (Compatibility Support Module) allows a computer system to function smoothly even if it doesn't support UEFI settings, but it can also enable secure boot without making it active.
To disable the setting, follow these steps: Go to Settings, then select System, and click on Display. Next, click on Night Light, and toggle the switch to Off.
Step 1: Open "Settings" of your system.
Step 2: Look for the "System" option and then "Recovery" under that new tab.
Step 3: Choose the "Restart Now" option given in front of "Advanced Startup."
Step 4: Choose "Troubleshoot" from the new screen.
Step 5: Tap on "Advanced Options."
Step 6: Select "UEFI Firmware Settings."
Step 7: Go to "Boot" in BIOS & then open "CSM" settings.
Step 8: Choose the "Disable" option from the list.
Step 9: Click on "Save Changes & Reset".
Restart your computer to check if the issue has been solved or not. It might be possible that you have done with the problem and can use your system seamlessly.
Way 3. Change Platform
If you're experiencing issues with secure boot, one potential solution is to change your platform, which may resolve the problem. To do this, you can follow the necessary steps to modify your system. This approach may provide a good chance of fixing the secure boot issue.
Step 1: Enter the "BIOS" in your system.
Step 2: Look for "System Mode."
Step 3: If it is set to "Setup", change it to "User."
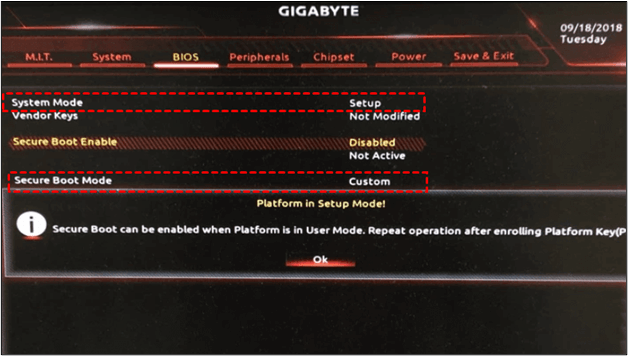
Step 4: Open "Secure Boot Mode" & switch it to "Custom" from "Standard."
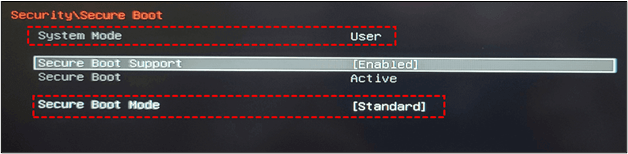
Step 5: Again change it to the "Standard" option and accept the "Factory Defaults" option.
Your system will restart, and it will change the platform to resolve this issue. Many users have reported that they have resolved secure boot-related issues by following this simple method.
Pro Tip: Backup Computer to Avoid Data Loss
When a device is set to secure boot but not active, the most common outcome is data loss. Users have experienced losing important data during device resets or platform changes. To prevent this, it's recommended to back up data in cloud storage.
To safeguard your data, you can utilize Qiling Disk Master, which is specifically designed to protect your data in case of system issues. This tool allows for easy and regular backups of your data, giving you peace of mind knowing that your information is safe even if your system experiences problems.
While there are multiple tools available, the one we've chosen stands out for its unique features that make it a better option than others.
- Users can easily back up their data regularly with the scheduled backup option, which allows them to set a specific time and frequency for automatic backups.
- It securely stores your data in a cloud-storage, protecting it from system errors.
- Backing up and restoring data can now be done through simple options, eliminating the need for a complex process.
Qiling Disk Master offers a range of features, making it a better choice than others. It allows users to explore and back up their files in a timely manner. The toolkit is easy to download and install, providing users with a safe experience.
To Wrap Things Up
To resolve the issue of secure boot enabled but not active, you can try the methods outlined in the guide, such as using Qiling Disk Master to keep your data safe, and attempt each one to see which works. However, we recommend using Qiling Disk Master to ensure your data remains secure.
It will enable you to backup and restore every file, saving it in storage outside of your system, allowing you to start procedures without fear of losing data.
FAQs on Secure Boot Enabled But Not Active
1. How to fix Secure Boot enabled in BIOS but not Windows 11?
If you're unable to enter Windows 11, you can still fix the secure boot-enabled problem through BIOS. To do this, you'll need to follow these steps below.
- Enter the BIOS settings using specific keys, which can be found in your system's manual.
- Disable "Fast Boot" settings through this option
- To restore the settings to their original factory defaults, save the current settings under the "Factory Defaults" option, which will change the settings back to the ones they were when the system was first released by the manufacturer.
2. Why is Secure Boot not showing in BIOS?
Your system may be using outdated UEFI firmware that doesn't support secure boot, or the option might not be enabled in UEFI settings, preventing you from seeing it in BIOS.
3. How do I enable Secure Boot without BIOS?
You can enable the secure boot option without BIOS through Windows. Here are the steps that you have to follow in this regard.
- Press "ctrl" + "R" to open the "Run" dialogue box
- Enter "msinfo32" in that box
- If the laptop screen displays "off" instead of the BIOS menu, you need to enable the secure boot option from the BIOS settings. To do this, restart your laptop and immediately start pressing the key that takes you to the BIOS menu (usually F2, F12, or Del).
4. What happens if I enable Secure Boot in BIOS?
The system will verify the digital signature of downloaded files, ensuring safety from unauthorized app installations. This process checks each file before execution, allowing users to identify safe and potentially corrupted programs.
Related Articles
- How to Check SSD Health on Windows 10 via CMD [2023 New Guide]
- Five Ways to Fix "Path Not Found C:Boot" Error in Windows
- Mac Format SSD: How to Format SSD on Mac [Step-by-Step Guide]
- Show Hidden Partition Using Command Prompt [100% Working Solutions]
- [Quick Steps] How to Enter Startup Repair Windows 10 in 2024
Problems with sign-If your Windows 10 PC is experiencing issues with booting normally, it's likely that there are some problems that need to be solved. In such cases, the Startup Repair tool can be a helpful solution. However, in some instances, this tool may not appear automatically. - How to Factory Reset ASUS Laptop [Step-by-Step Guide]
If you're having trouble selling your ASUS laptop or need to troubleshoot issues, factory resetting it might be the solution. This article provides 5 methods to factory reset your ASUS laptop in various situations, helping you to resolve any problems and prepare the device for sale.