How to Turn On FileVault on Mac [with Video Tutorial]
To secure your data, it's recommended to enable FileVault on your Mac, especially if you frequently take it to public places where it may be lost, stolen, or accessed by others. This will protect your data from unauthorized access.
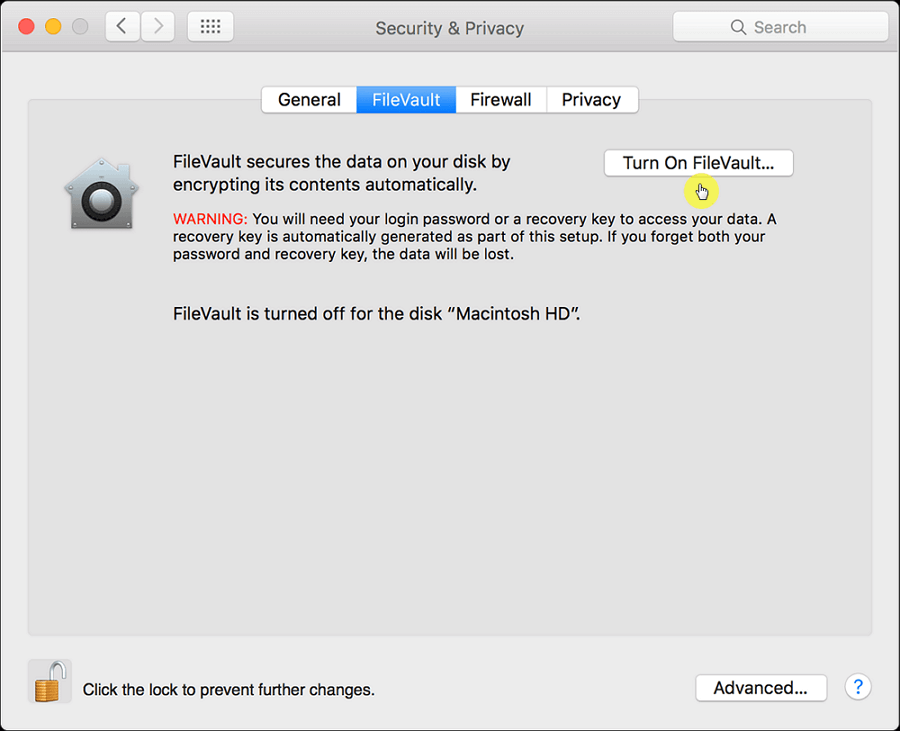
To turn on FileVault on your Mac, go to System Preferences, then Security & Privacy, and click on FileVault. From there, select Turn On FileVault and follow the prompts to set up a recovery key and choose a user account to unlock the disk. This will encrypt your startup disk and protect your data.
What is FileVault on Mac
FileVault is a robust security feature provided by Apple that protects Mac users' data against unauthorized access and potential breaches. It encrypts the entire start-up disk, ensuring all data remains confidential, even if the device is lost.
FileVault is a security feature that encrypts your data, making it unreadable to unauthorized users. Unlike lock screens, which only prevent access to your device, FileVault uses advanced encryption algorithms to protect your files and data. By enabling FileVault, you can safeguard your sensitive information and keep it secure, even if your device is lost or stolen.
This process encrypts files so they can only be accessed with a decryption key, which is linked to the user's account credentials, providing a secure barrier between the threat and the data.
When you start your Mac, FileVault asks for a password, which is the first step towards accessing the system and unlocking the decryption key.
To enable FileVault, go to System Preferences, then Security & Privacy, and click on FileVault. From there, you can turn FileVault on, and it will automatically encrypt your data. When you turn off or log out, FileVault will re-encrypt the data, keeping your information safe.
Should I Turn on FileVault Disk Encryption
Enabling FileVault on a MacBook protects hard disk data and maintains data security by employing robust encryption to safeguard files, applications, and other sensitive information from unauthorized access.
Your Mac's data is protected by robust encryption techniques, making it inaccessible to unauthorized individuals, who would need your correct passcode or recovery key to access it.
Turning on FileVault protects your data by encrypting it, ensuring compliance with data protection regulations, and safeguarding against breaches. It operates in the background with minimal performance impact, making it a convenient and effective security measure that provides peace of mind.
Turning on FileVault on your Mac can provide an additional layer of security and convenience, as it allows you to unlock your MacBook Pro without needing a password. So, let's learn how to turn it on!
How to Turn on FileVault on Mac [with Video]
To enable FileVault, go to System Preferences, then click on Security & Privacy, followed by FileVault. Click on the lock icon to unlock the preferences, then select "Turn On FileVault" and follow the on-screen instructions to create a recovery key and select a user account to unlock the disk.
Step 1. Click the Apple icon from the top-left of the screen
Step 2. Open System Preferences, then click on Security & Privacy.
Step 3. In the FileVault tab, click the padlock icon at the bottom.
Step 4. Now, input your Apple passcode and click "Turn on FileVault".
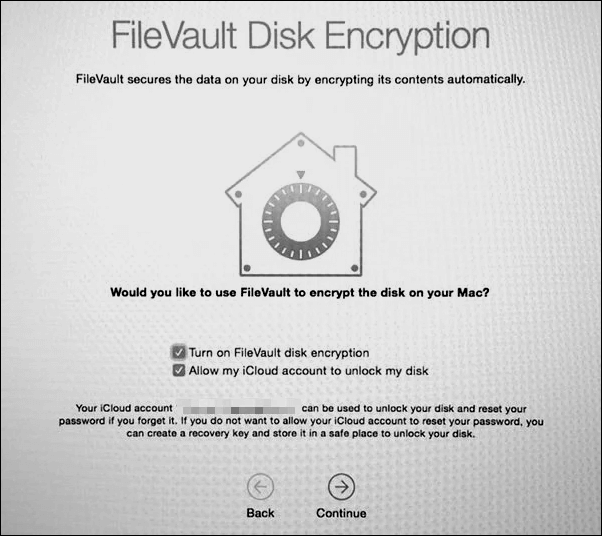
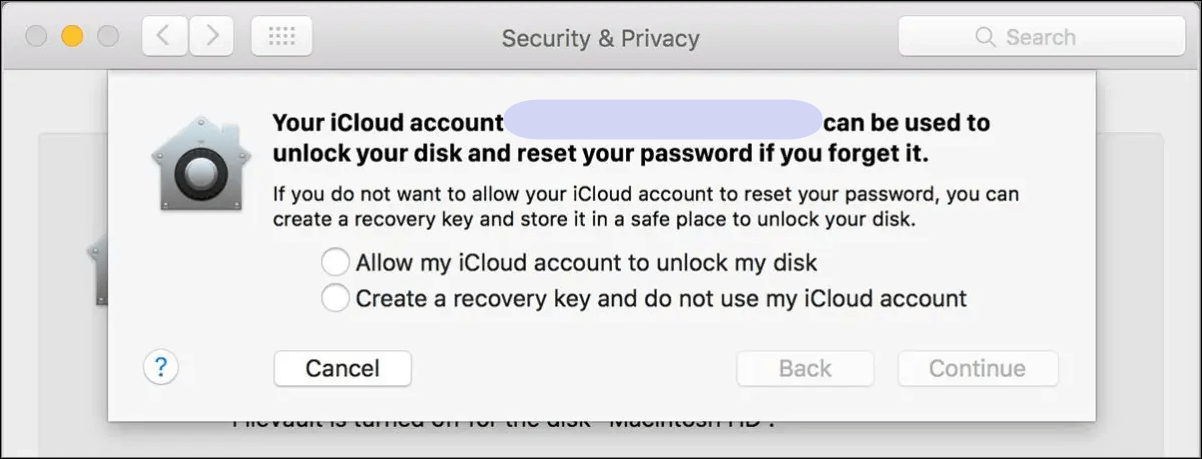
Step 5. When you enable FileVault, you'll need to choose how to unlock your startup disk if you forget your password. You have three options: enter a recovery key, use the Apple ID and password associated with the encrypted disk, or use the Recovery Mode. Each option has its own set of instructions and requirements.
- iCloud account and password: You can use the existing one if it's already available.
- Recovery Key: It generates a key that you must write down and keep safe, allowing you to recover your startup disk through the Mac recovery key if you forget your password.
Step 6. Plug in the charging cable to start the encryption process.
The entire process of data cleaning and formatting takes a couple of hours, sometimes even a day, depending on the type and volume of data.
To turn on FileVault on your Mac, go to System Preferences, then select Security & Privacy, and click on FileVault. From there, click on Turn On FileVault, then create a password and follow the on-screen instructions to complete the encryption process.
Recover FileVault Encrypted Data on Mac
If you've forgotten your iCloud credentials and recovery key, and can't recover your encrypted data, you might consider seeking professional help from a data recovery service or a reputable computer repair shop. They may have specialized tools and expertise to access and extract your data, but be aware that this approach comes with risks, such as data corruption or even permanent loss. Another option could be to contact Apple Support directly, as they may be able to assist you in recovering your account or data, but this would likely require providing detailed information about your account and the issue you're experiencing.
The technological revolution has made it possible for a solution to any problem to be just around the corner. This is especially true for Mac users, where Deep Data Recovery for Mac can provide a reliable solution. With this APFS recovery tool, you can recover APFS SSD with an encrypted partition on your Mac, making it a great option for those in need of data recovery assistance.
This software can safely recover permanently deleted files on Mac, regardless of how the data was lost. It's versatile and can recover lost files from multiple devices, including MacBook, SD cards, and hard drives, without the need for the original device.
Here are the 3 steps to recover your data on FileVault encrypted Mac in one paragraph:
Step 1. Select the drive to be scanned
In the main Deep Data Recovery window, select the drive you need to recover lost/deleted files from and click the "Search for lost files" button.
Note: Before attempting data recovery, it's recommended to create a backup of your Mac using the "Disk Backup" feature from the left sidebar. This will ensure that your data is safe and can be recovered if needed. Once the backup is created, the software can then recover data from the Mac backup, allowing you to restore your files and continue using your computer.

Step 2. Select your lost data/files
Deep Data Recovery for Mac will immediately scan your selected disk volume and display the scanning results on the left pane, allowing you to sort and find specific files if needed.

Step 3. Recover lost/deleted data
Once you have found the desired files, preview them and then click "Recover" to initiate the recovery of your deleted/lost Mac files.

Conclusion
To enable FileVault encryption on your Mac, follow these steps: first, go to System Preferences, then Security & Privacy, and click on the lock icon to make changes. Next, click on the FileVault tab and follow the prompts to enable FileVault. You will be asked to create a recovery key, which is essential for unlocking your encrypted drive if you forget your password.
Installing recovery software like Deep Data Recovery for Mac can provide an extra layer of protection for your data, allowing you to access it even in situations where you may need to recover from iCloud or use a recovery key. This can be a peace of mind in anxious situations.
How to Turn on FileVault on Mac FAQs
Now that you know how valuable FileVault is for macOS users, let's check out some FAQs and learn more.
1. How to disable FileVault on Mac?
To disable FileVault on a Mac, go to System Preferences, click on Security & Privacy, then select FileVault, unlock with the admin password, click Turn Off FileVault, and follow the prompts to complete the process, which involves restarting the computer. This will remove encryption and decrypt data.
2. How is FileVault enabled on my Mac?
To check if FileVault is enabled, go to System Preferences, click on Security & Privacy, then select FileVault. If it's enabled, "FileVault is On for [username]" will be displayed, and the disk icon will show a lock, indicating that the drive is encrypted. If it's not enabled, the disk icon will be unlocked, showing that the drive is decrypted.
3. How do I use the FileVault recovery key on my Mac?
To use the FileVault recovery key on your Mac, start your Mac, enter your username, click "Forgot all passwords", enter the recovery key, reset your password, and log in with the new password to access your data.
4. What can I do when I forget my FileVault password?
If you forget your FileVault password, you can use the recovery key you generated during setup to regain access. Simply restart your Mac, enter your username, click "Forgot all passwords" on the login screen, and input the recovery key. This will allow you to reset your password and log in. Alternatively, if you've lost both your password and recovery keys, you can use data recovery software like Qiling to recover your data.
Related Articles
- How to Backup SD Card on the Go with Every Possible Way
- How to Restore Missing Downloaded Files Steam
- How to Reset NVRAM/PRAM on Your MacBook Pro/Air [2023 Fresh Guide]
- Boot From USB HP Laptop | Everything You Need to Know
- (Solved!) Secure Boot Enabled But Not Active🔥
One of the most common problems computer users have faced is secure boot enabled but not active. Learn about the solutions here and solve this problem within minutes. - [All Methods to Fix] Selected Boot Image Did Not Authenticate
Is your PC continuously showing the