[All Methods to Fix] Selected Boot Image Did Not Authenticate
Why the Selected Boot Image Did Not Authenticate Error Occurs
The "selected boot image did not authenticate" error on the blue screen appears immediately after pressing the power button on HP Computers, preventing the system from starting, and persisting even after multiple restarts. The error message remains the same, displaying the selected boot image did not authenticate. This issue is specific to HP Computers. The system will not boot up normally. The system will not boot up normally.

The error indicates that either a security protocol has been compromised against the firmware database or the device loading Windows lacks the necessary information to boot, resulting in a malfunction.
There are four possible reasons for this error on your PC.
- A change in the boot order of the system
- A boot image can become corrupt due to an unwanted update or malware attack, causing the system to malfunction or fail to boot properly.
- Any changes during Window installation
- A window update/upgrade affecting boot settings
You can try pressing the power button or unplugging the power cord and plugging it back in. If that doesn't work, you might need to reset the computer to its factory settings.
5 Ways to Fix Selected Boot Image Did Not Authenticate
There are plenty of ways to address this issue. For you, we have shortlisted the 5 easiest ways to fix the "selected boot image did not authenticate" error. Here are the details of these Fixes with images.
- Fix 1. Change from Secure Boot to Legacy Boot in BIOS
- Fix 2. Hard Reset Your Computer
- Fix 3. Run Startup Repair
- Fix 4. Clear Secure Boot Keys
- Fix 5. Run Hardware Diagnostics
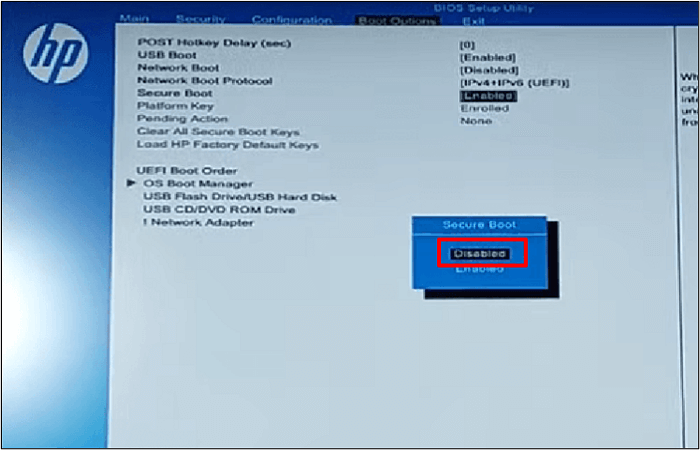
Fix 1. Change from Secure Boot to Legacy Boot in BIOS
To resolve the issue of not being able to boot due to secure boot settings, you can switch to legacy boot mode to start your system. This can be done by accessing the BIOS settings, usually by pressing a key such as F2, F12, or Del during boot-up, and then selecting the legacy boot option. Once selected, save the changes and restart your system.
Step 1. Restart your PC and enter the BIOS Settings by pressing F10 to open the BIOS Setup.
Step 2. Go to System Configuration, select Boot Menu and press Enter.
Step 3. In the boot menu, look for "Legacy Support", then press Enter. If it shows "Disabled", choose "Enabled" and again press the Enter button.

Step 4. Select "Secure Boot" and set it as "Disabled".
Step 5. Press the F10 key to save the changes, select Yes and press Enter to confirm the changes.
Step 6. The system will restart with Legacy Support, and the error will be removed.
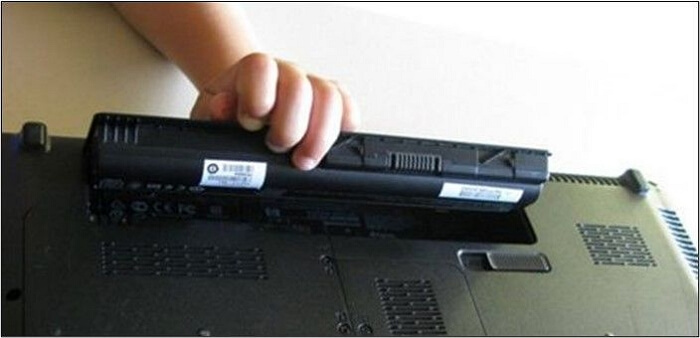
Fix 2. Hard Reset Your Computer
To resolve the error, you can perform a hard reset, which rearranges the primary configurations of your BIOS system. This process can help eliminate unwanted changes causing the error. To do this, follow these below.
Step 1. Turn off your computer.
Step 2. Unplug the AC adapter and remove the battery.
Step 3. Press the Power Button for 15 seconds, and your computer will reset.
Step 4. Restart your system and check if the error has been removed.
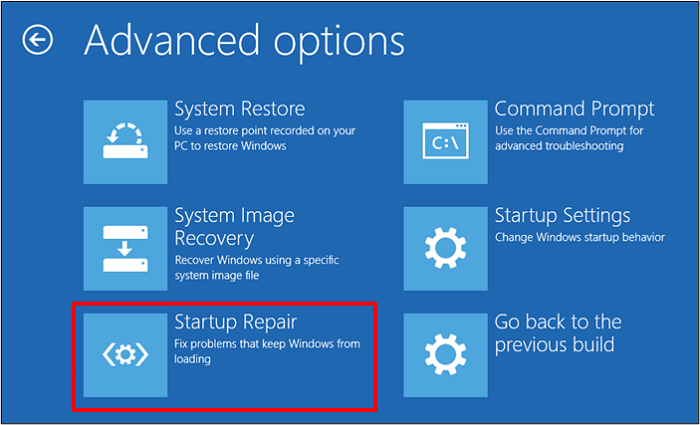
Fix 3. Run Startup Repair
If the primary cause of this error is the changes in the bootloader, you should run a startup repair. It will automatically remove all issues concerning the bootloader, bringing it to its original form. This is how you can do it.
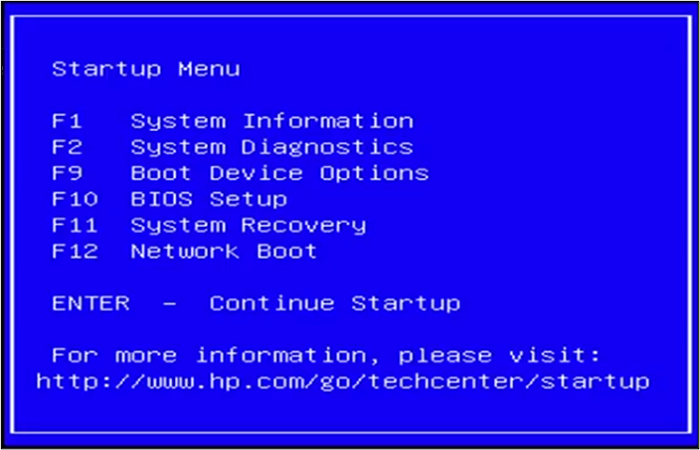
Step 1. Turn off your computer, then press the power button to start it. During startup, press ESC multiple times to display the startup menu.
Step 2. Now Press F11; it will take you to recovery options.
Step 3. To troubleshoot, go to Advanced Options, then select Startup Repair.
Step 4.Wait for the repair to complete and restart the system. It should load without any errors.
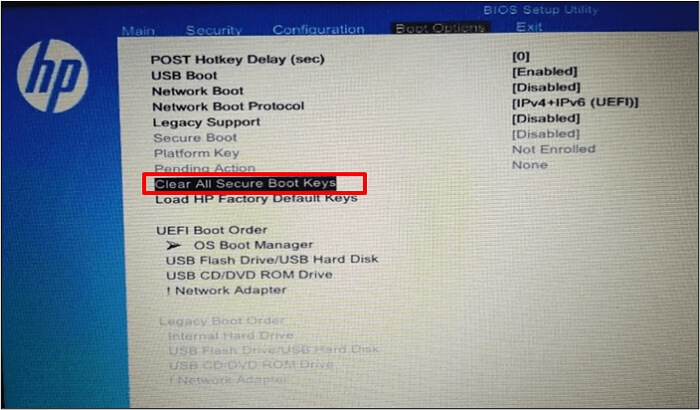
Fix 4. Clear Secure Boot Keys
Clearing secure boot keys can automatically disable Secure Boot, allowing the system to restart without showing any error. This process involves understanding how to access and clear the secure boot keys, which may vary depending on the system's firmware and operating system. The specific steps and tools required to clear secure boot keys will depend on the system's architecture and the firmware version. In general, this process may involve accessing the UEFI firmware settings, navigating to the secure boot section, and clearing or resetting the secure boot keys.
Step 1. Press the F10 key to enter the BIOS setup.
Step 2. In the boot options, select "Clear all Secure Boot Keys".
Step 3. Now type the passcode shown on the blue screen and press Enter.
Step 4. Save these changes and exit from the BIOS menu.
Step 5: Restart your system from any bootable USB. It will not show the error.
Fix 5. Run Hardware Diagnostics
The hardware diagnostic can identify if a hardware issue is causing the error. This diagnostic process involves the system checking its hardware without any external assistance, and it typically involves several steps.
Step 1. Turn off your computer.
Step 2. Remove the power cable and battery.
Step 3. Now press the power button for 15 seconds.
Step 4. Restart your system and Press F2 Button.
Step 5. It will load system diagnostics. Run a startup test for the evaluation of hardware components.
Step 6. If the system test is clean, let it load the main menu. If not, you will have to repair the affected problem. Restart the system. If the test is clean, let it load the main menu. If not, you will have to repair the affected problem.
Pro Tip: How to Back up Your Computer for Data Security
When installing a device or updating the OS on an HP computer, the error "selected boot image did not authenticate" is common, putting the data on your computer at risk.
To ensure your computer's safety, it's essential to back up your data in case anything goes wrong. This approach is more effective than trying to fix issues after they occur. We recommend using Qiling Disk Master, award-winning backup software that securely protects your data.
Qiling Disk Master Pro features a simple UI that allows you to create backups for your entire PC, including disks, partitions, operating systems, and more. The software enables you to back up multiple hard drives simultaneously and create an iso image of your hard drives. Your backed-up data can be saved to various locations, such as local drives, external hard drives, Security Zone, NAS, and Cloud. Perhaps most importantly, Qiling Disk Master Pro can help you factory reset your computer without losing any data.
Key Features of Qiling Disk Master
- Clone a hard drive and migrate Windows
- Create full, incremental, and differential backups
- 250GB of free cloud storage is available to back up your PC to the cloud, allowing for secure and remote access to your files. This can be especially useful in the event of a hardware failure or data loss, as your files will be safely stored online and can be accessed from any device with an internet connection.
- Mount and unmount your backup images
- Install Windows 7 on a hard drive for another computer
After installing Qiling Disk Master, here is how to back up your computer.
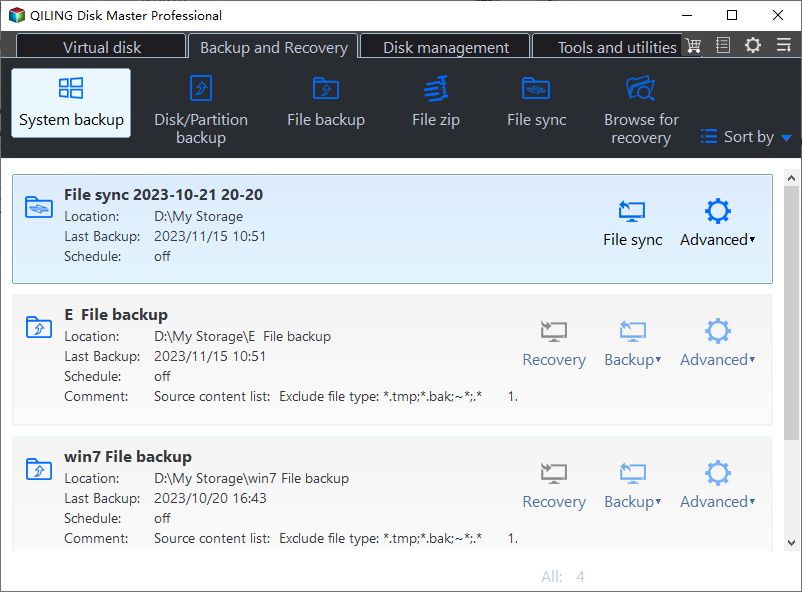
Step 1. Launch Qiling Disk Master on your computer, and click the Backup and recovery tab page.

Step 2. To back up your Windows operating system, click on the "System backup" option to initiate the backup process.
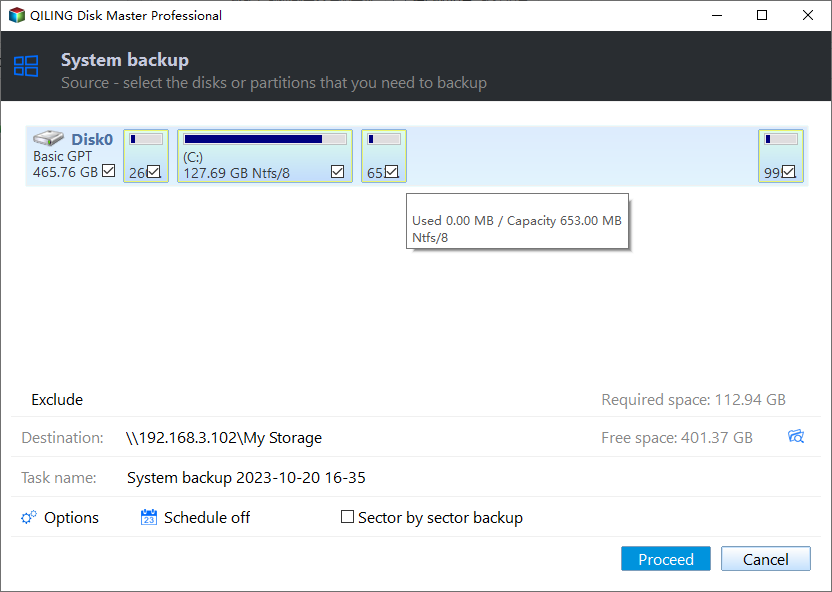
Step 3. You'll automatically select your Windows operating system information and all system-related files and partitions, so no manual selection is needed at this step. Next, choose a location to save the system image backup by clicking the illustrated area.

Step 4. The backup location can be another local drive, an external hard drive, network, cloud, or NAS, with external physical drives or cloud being recommended for preserving system backup files.
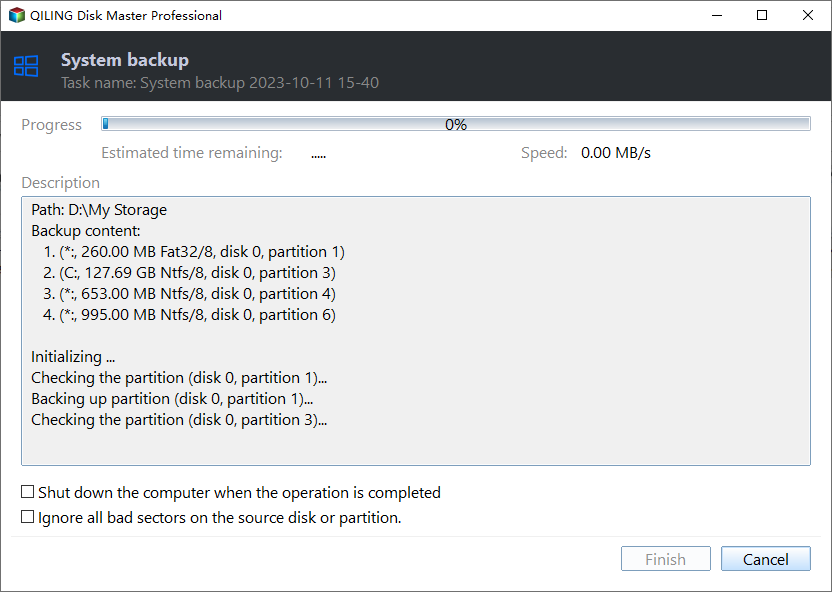
Step 5. The customization settings for automatic backup schedules, including daily, weekly, monthly, and upon an event, are available in the Options button. These settings also allow for differential and incremental backups. After selecting the desired settings, clicking Proceed initiates the Windows system backup process, which can be tracked on the left side in a card-style format once completed.
To Wrap Things Up
The "selected boot image did not authenticate" error in HP computers often occurs during startup repair. The system fails to start, and the boot security system is highlighted as the issue. Despite multiple startups, the main menu won't show. This error can be resolved using one of the five methods outlined in the blog.
Creating a backup of your computer is essential to prevent data loss in case something goes wrong. This is a precautionary measure that can save you from potential data security issues. A tool like Qiling Disk Master can be a useful option to help you protect your data on your computer, and downloading it can provide you with peace of mind knowing that your data is secure.
FAQs on Selected Boot Image Did Not Authenticate
The "Selected Boot Image Did Not Authenticate" error occurs when the selected boot image fails to authenticate, preventing the computer from booting up properly. This error is often caused by a corrupted or incorrect boot image or a problem with the boot process itself.
1. How do I enable UEFI and Secure Boot on my HP?
To enable UEFI and Secure Boot on your HP PC, follow these steps: Ensure the computer is powered off. Press the Power button to turn it on, then immediately start pressing the F10 key.
To enable UEFI and secure boot on your HP, go to the System Utilities screen, navigate to System Configuration > BIOS/Platform Configuration (RBSU) > Server Security > Secure Boot Settings > Secure Boot Enforcement, select the Enabled option, and press Enter. This will enable UEFI and secure boot on your HP.
2. How do I get BIOS to recognize my USB?
To change the boot order, go to the BIOS settings, select the external USB as the boot sequence priority, and save the changes. This allows the computer to automatically boot from the external USB if it's available.
3. How do I fix the select boot device?
To resolve the "select boot device" error, reset your BIOS settings by following these steps: locate the BIOS settings by pressing F2, F12, or Del on your keyboard, navigate to the boot settings, and save the changes. Alternatively, you can try booting from a USB drive or CD/DVD, or reinstall the operating system. If none of these solutions work, it may be necessary to seek further assistance from a professional.
- Restart your system.
- To enter the BIOS settings, press the DEL, F10, or ESC key on your keyboard immediately. In most systems, the DEL key is used to access the BIOS setup screen. This is a common method, but the key used may vary depending on your system's configuration.
- To reset your BIOS to factory settings, you can usually do this by pressing a specific key (such as F2, F12, or Del) as your computer boots up. This will take you to the BIOS settings screen, where you can look for an option to reset the BIOS to its default settings. Once you've done this, save the changes and exit the BIOS settings screen.
4. What does it mean when your computer says the selected boot device failed?
The BIOS couldn't find a device to boot the system, preventing it from uploading. To resolve this, remove any external USB devices and try again. If that doesn't work, reset the BIOS to its original settings.
Related Articles
- Fix: Blue Yeti Not Recognized on Windows 10/11 [Step by Step]
- QuickBooks Online Keeps Crashing [Troubleshoot with Comprehensive Guide]
- How to fix the error DNS PROBE FINISHED NO INTERNET? [A Complete Guide]
- Call of Duty Modern Warfare 2 File Location [All You Should Know]
As a world-The Call of Duty (COD) series is always highly popular when released, and for new players, learning how to manage their game files is crucial for a smooth gaming experience. This article provides information on the file location for Call of Duty: Modern Warfare 2, including where to find, change, and backup COD documents. - How to Factory Reset Windows 10 Without Settings | 3 Ways🔥
Windows 10 is now the most popular operating system in the Windows family, owning the biggest market share. In this article, we'll tell you how to factory reset Windows 10 without settings and make your PC fresh without losing any data and apps. - How to Fix Windows 11 23H2 Update Failure in 5 Ways
Many users have reported issues with the Windows 11 23H2 update, and if you're experiencing problems, try checking the system requirements, restarting the update process, or running the System File Checker (SFC) and DISM tools to resolve the issue.