Upgrade from Monterey to Ventura | Detailed Information
Upgrading from macOS Monterey to Ventura depends on your needs, and only you can decide if it's necessary. If you're curious about the process, you can learn more in the following sections. A table is also available that outlines various ways to upgrade from Monterey to Ventura.
| Workable Solutions | Step-by-step Troubleshooting |
|---|---|
| 1. Upgrade from Monterey to Ventura with Software Update | Go to the Apple menu, and select "System Settings" from the drop-down menu...Full steps |
| 2. Upgrade from Monterey to Ventura with App Store | Go to the App Store, and search for macOS Ventura. Click on the Get button to see the Get button...Full steps |
| 3. Upgrade from Monterey to Ventura with Bootable Installer | Download macOS Ventura from the App Store and click on the option "Quit Install macOS"...Full steps |
Should You Upgrade from Monterey to Ventura
If you're unsure whether to upgrade from Monterey to Ventura, there are both exciting features and potential issues in macOS Ventura, so it's essential to learn more about the new features before making a decision.
Learn New Features of macOS Ventura
If you're planning to upgrade from macOS Monterey to macOS Ventura, it's essential to know about the new features that come with the latest operating system. To stay informed, you can check them out here.
- Focus
- Live Text
- Visual Look Up
- Stage Manager
- System Settings
- Continuity Camera
- Freeform
- Spotlight
- Passkeys
- iCloud Shared Photo Library
Here Are the Macs Support Ventura Version
To upgrade to macOS Ventura, ensure your Mac model is compatible, which means checking if it's on the list of supported models shared, as only certain models can be upgraded.
- iMac Pro (2017)
- MacBook (2017 and later)
- MacBook Pro (2017 and later)
- iMac (2017 and later)
- MacBook Air (2018 and later)
- Mac Mini (2018 and later)
- Mac Pro (2019 and later)
- Mac Studio (2022)
1. Upgrade from Monterey to Ventura with Software Update
Upgrading from Monterey to Ventura is a straightforward process that can be completed using the Software update option. To do this, users simply need to follow a few simple steps, which will guide them through the upgrade process.
Step 1. Go to the Apple menu.
Step 2. Select "System Settings" from the drop-down menu.

Step 3. To update your software, click on the "General" tab on the sidebar, then select "Software Update" from the right-hand side menu.

Step 4. When you see the Ventura update, click "Update Now".

Step 5. The download will start.
- Notice:
- To install macOS Ventura, ensure you have at least 12.5 GB of free space on your system. After downloading, follow the on-screen instructions to install it. If the update is not showing up, you can try one of the five solutions outlined in the article "Fix macOS Ventura Update Not Showing Up on Mac in 5 Proven Ways".
Share this article on social media to read it anytime.
2. Upgrade from Monterey to Ventura with App Store
If you're experiencing errors while updating from System Preferences, you can also upgrade from Monterey to Ventura via the App Store, following these steps:
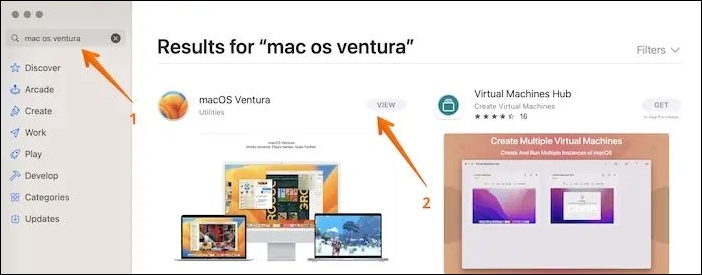
Step 1. Go to the App Store.
Step 2. Search for macOS Ventura.
Step 3. Click on the "Get" button and you will see 'Get' instead of 'View'.
Step 4. If asked, enter your Apple ID and password.
Step 5. Select "OK".
Step 6. Allow some time for the download to complete.
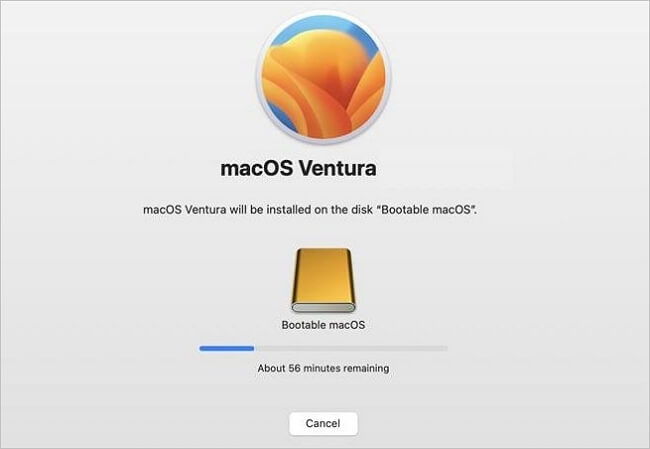
Step 7. Open the macOS Installer.
Step 8. Follow on-screen instructions to update Ventura.
If the upgrade process is stuck or you cannot upgrade to macOS Ventura, try the following solutions:
If you're experiencing issues with upgrading to macOS 13 Ventura, here are 7 potential solutions to help you resolve the problem. First, try restarting your Mac and running the update again. If that doesn't work, check for any software updates in the App Store, as sometimes a newer version of the operating system is required to install the Ventura update.
If your Mac failed to upgrade to macOS Ventura, there are still ways to resolve the issue. You can try restarting your Mac, checking for software updates, booting in safe mode, running the System Configuration utility, resetting the System Management Controller, using the Terminal to reset the System Management Controller, or reinstalling macOS. These methods can help you troubleshoot and potentially fix the upgrade issue.
3. Upgrade from Monterey to Ventura with Bootable Installer
To upgrade from Monterey to Ventura, you can use a bootable installer, such as a bootable USB drive, but the process is complicated and should be considered only if other methods fail.
To create a macOS Ventura bootable USB, you'll need to follow these steps:
Step 1. Download macOS Ventura from the App Store.
Step 2. Now, click on the option "Quit Install macOS".
Step 3. Open "Terminal".
Step 4. Connect the USB to the system.
Step 5. Type the command below, replacing "MyVolume" with the name of your USB drive: `diskutil list` and `diskutil unmountDisk /dev/rMyVolume` and `diskutil eraseDisk -volumeName MyVolume -type MS-DOS HFS+ /dev/rMyVolume` and `diskutil unmountDisk /dev/rMyVolume` and `diskutil mountDisk /dev/rMyVolume` and `diskutil info /dev/rMyVolume` and `diskutil list` and `diskutil unmountDisk /dev/rMyVolume` and `diskutil mountDisk /dev/rMyVolume` and `diskutil info /dev/rMyVolume` and `diskutil list` and `diskutil unmountDisk /dev/rMyVolume` and `diskutil mountDisk /dev/rMyVolume` and `diskutil info /dev/rMyVolume` and `diskutil list` and `diskutil unmountDisk /dev/rMyVolume` and `diskutil mountDisk /dev/rMyVolume` and `diskutil info /dev/rMyVolume` and `diskutil list` and `diskutil unmountDisk /dev/rMyVolume` and `diskutil mountDisk /dev/rMyVolume` and `diskutil info /dev/rMyVolume` and `diskutil list` and `diskutil unmountDisk /dev/rMyVolume` and `diskutil mountDisk /dev/rMyVolume` and `diskutil info /dev/rMyVolume` and `diskutil list` and `diskutil unmountDisk /dev/rMyVolume` and `diskutil mountDisk /dev/rMyVolume` and `diskutil info /dev/rMyVolume` and `diskutil list` and `diskutil unmountDisk /dev/rMyVolume` and `diskutil mountDisk /dev/rMyVolume` and `diskutil info /dev/rMyVolume` and `diskutil list` and `diskutil unmountDisk /dev/rMyVolume` and `diskutil mountDisk /dev/rMyVolume` and `diskutil info /dev/rMyVolume` and `diskutil list` and `diskutil unmountDisk /dev/rMyVolume` and `diskutil mountDisk /dev/rMyVolume` and `diskutil info /dev/rMyVolume` and `diskutil list` and `diskutil unmountDisk /dev/r
- sudo /Applications/Install\ macOS\ Ventura.app/Contents/Resources/createinstallmedia --volume /Volumes/MyVolume.
Step 6. Hit the "Return" button.
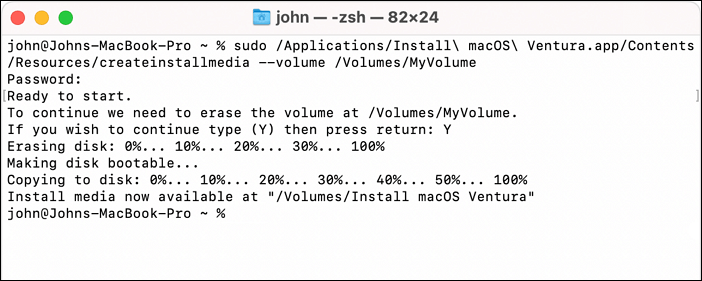
Step 7. Enter your password.
To upgrade to Ventura, you can create a bootable USB using the installation media. The process varies depending on your Mac model, but you can use this bootable USB to perform the upgrade.
Note: The application path may change depending on the OS you plan to upgrade, as different operating systems have different paths for accessing applications. For example, in Windows, the path for accessing an application might be "C:\Program Files\MyApp", while in macOS, it might be "/Applications/MyApp.
To upgrade from macOS Monterey to Ventura on Apple Silicon Macs, follow these steps:
Step 1. Connect the bootable USB to the system.
Step 2. Turn your Mac on.
Step 3. Press the power button and hold it.
Step 4. When the startup window appears, release the key.
Step 5. Select the bootable drive.
Step 6. Click on "Install macOS Ventura".
Step 7. Now, choose "Continue".
Step 8. Follow the on-screen instructions.
To upgrade from macOS Monterey to Ventura on Intel-based Macs, follow these steps:
Step 1. Connect the bootable USB to the system.
Step 2. Turn your Mac on.
Step 3. Press the "Option" key and hold it.
Step 4. When the startup window appears, release the key.
Step 5. Select the bootable drive.
Step 6. Click on "Install macOS Ventura".
Step 7. Now, choose "Continue".
Step 8. Follow the on-screen instructions.
How to Retrieve Lost Files After macOS Upgrading?
When upgrading from Monterey to Ventura, there's a risk of data loss. To avoid this, consider using a professional data recovery tool like Deep Data Recovery for Mac, which is specifically designed for hassle-free data restoration and can help recover deleted files on macOS Ventura.
Deep Data Recovery
- Recoverit is a powerful tool that can recover lost or deleted files, including photos, even after a macOS Ventura update. It can help retrieve other types of files as well.
- The software supports recovery of various types of data from different storage devices, including SD cards, formatted hard drives, flash drives, digital cameras, and more.
- If you've lost files due to a macOS Monterey update, sudden deletion, formatting, or hard drive corruption, there are still ways to recover them. Start by stopping any activity on the affected drive to prevent further data loss.
Regardless of the data loss situation, your data can be recovered. The process is straightforward and can be completed in just a few steps, making it easy for users to get back their lost data.
Note: To create a backup, click on "Disk Backup" on the left side, which allows you to recover data from a backup image in case of disk damage or accidental data loss.
Step 1. Select the location
After updating to macOS Sonoma/Ventura/Monterey/Big Sur, select the disk where the lost data was located, then click "Search for lost files" to initiate the recovery process.

Step 2. Find lost data after the scan
Deep Data Recovery for Mac scans the selected disk volume, displaying the results on the left pane, allowing users to find specific data using file type and file path.

Step 3. Recover data after macOS update
Select the target files that were unknowingly lost during or after the update, and click the "Recover" button to retrieve them all.

Conclusion
To upgrade from Monterey to Ventura, ensure your system meets the minimum requirements for the update, which include a compatible processor, sufficient RAM, and enough free storage space. Additionally, back up your data to prevent any potential losses during the upgrade process. Once you've confirmed your system's compatibility and backed up your data, you can proceed with the upgrade.
Upgrading from Monterey to Ventura can be done through the App Store or by downloading the Software Update. However, during the process, data loss may occur, and to recover lost data, Deep Data Recovery for Mac can be a reliable and user-friendly tool to try.
Upgrade from Monterey to Ventura FAQs
Have you tried upgrading from Monterey to Ventura? However, it is advisable to know more, so take a look at these questions and answers:
1. How to install macOS Ventura on an unsupported Mac?
To install macOS Ventura on an unsupported Mac, you will need the installer and the OpenCore-Patcher app. The installation process is complex and requires careful following of steps.
2. Is macOS Ventura better than macOS Monterey?
macOS Ventura is a significant improvement over macOS Monterey, offering numerous new features, including Spotlight, Freeform, and Stage Manager, making it a great successor to the previous operating system.
3. Can I downgrade from Ventura to Monterey?
You can downgrade from Ventura to Monterey by entering Recovery Mode and selecting the "Reinstall macOS" option, which will allow you to reinstall the older Monterey version.
4. What's new in macOS Ventura?
macOS Ventura has introduced several new features, including smart search corrections, notifications for missing recipients and attachments, image search capabilities, extension syncing, and support for passkeys, as well as resizable windows, among many others.
Related Articles
- macOS Ventura Won't Boot? 4 Effective Solutions Are Here
- [3 Solutions] Fix Corrupted USB on Mac Without Losing Data
- How to Open Google Drive on My Computer [Updated 2023]
- How to Change Your IP Address on Computer
- Solve System Reserved Partition on Wrong Drive: Everything You Should Know
Fix a System Reserved partition on the wrong drive. Learn why it happens and how to move or repair boot files safely. - What Is System Restore Command and How to Use It on Windows 11/10
Struggling to find the answer what is a system command prompt? This guide has all the answers and steps you need to perform a system restore from the command prompt.