How to Repair a Mac Disk with Disk Utility [Official Method]
What Is Disk Utility and When Will You Need It
Disk Utility, a built-in macOS tool, can help solve common disk issues on Mac. It includes a feature called Disk First Aid, which checks the health of the disk and volume. You can use Disk Utility to repair your disk in various situations.
- Mac crashes frequently.
- Mac or MacBook won't turn on after macOS Ventura.
- Files or folders on Mac disappear unreasonably.
- USB flash drive or SSD not showing up on Mac.
The next part will discuss how to repair a Mac disk with Disk Utility. Before that, you can get information about how to repair a Mac disk with Disk Utility in Recovery Mode in the following video, which provides an overview of the process.
- 00:12 Recovery Mode introduction
- 00:41 How to run Disk Utility
- 00:57 Use Disk Utility to solve the disk problem
How to Open Disk Utility on macOS Ventura
To repair a Mac disk on a working Mac, you can open Disk Utility using either the Finder or the Launchpad. On a working Mac running macOS Ventura, you can access Disk Utility by opening the Finder, navigating to Applications > Utilities, and then double-clicking on Disk Utility. Alternatively, you can use the Launchpad by searching for "Disk Utility" and clicking on the icon that appears.
Method 1. Use the Finder to Open Disk Utility:
Step 1. Open the Finder on macOS Ventura.
Step 2. Click "Go" and then choose "Utilities" on macOS Ventura.
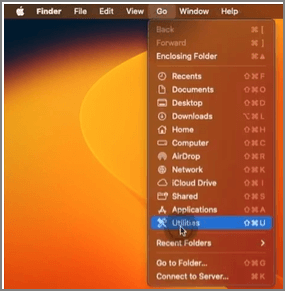
Step 3. To open Disk Utility, scroll down until you find it in the Utilities folder, then double-click to open it.
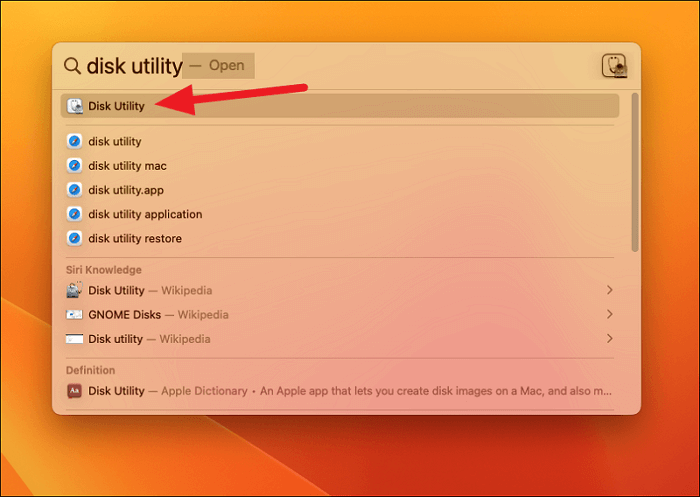
Method 2. Use the Launchpad to Open Disk Utility:
Step 1. You can click the macOS Launchpad in the Dock.
Step 2. In Disk Utility, click the icon to open it.
How to Repair a Mac Disk with Disk Utility in 2 Ways
To repair a Mac disk with Disk Utility, start by opening the program. If your Mac can boot, follow detailed tutorials for repairing a Mac disk with Disk Utility. If your Mac fails to boot, you can also use Disk Utility to repair the disk.
How to Repair a Mac Disk with Disk Utility When Your Mac Can Boot
To repair disk errors on macOS, open Disk Utility using Launchpad or the Finder, and follow these steps:
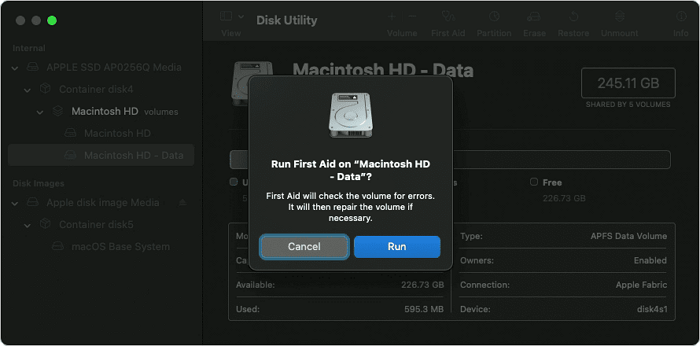
Step 1. Choose "View" and click "Show All Devices".

Step 2. All the available disks on a Mac will be displayed in the sidebar.
Step 3. Select a Mac disk you want to repair.
Step 4. Click the First Aid button, and then choose "Run".
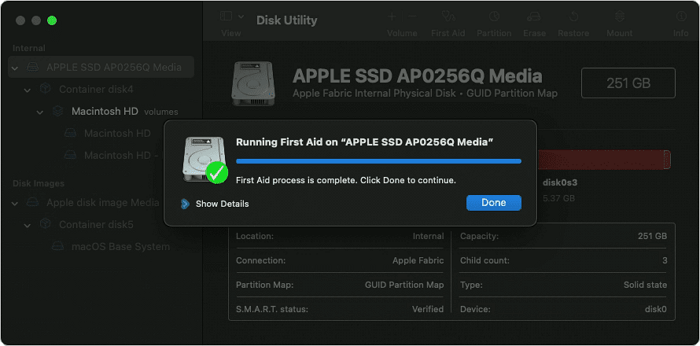
Step 5. You can click "Done" when the process is finished.
How to Repair a Mac Disk with Disk Utility When Your Mac Fails to Boot
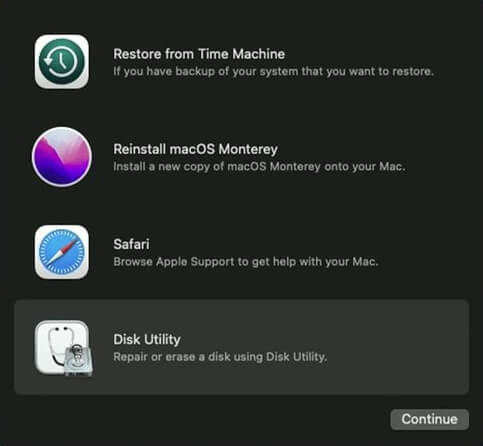
If your Mac encounters serious disk errors, causing it to not boot normally, you can repair the disk using Disk Utility in Recovery Mode. If macOS Ventura Recovery Mode is missing, you may need to reinstall macOS Ventura first.
Step 1. Make sure your Mac or MacBook has shut down already.
Step 2. To boot a Mac into Disk Utility, follow these steps: for Apple Silicon Macs, turn on the Mac and hold the power button, while for Intel-Based Macs, turn on the Mac and hold down the Command and R keys.
Step 3. Release the key until you see the Recovery Mode window.
Step 4. Choose "Disk Utility" and continue.
Step 5. Choose "View" and click "Show All Devices".
Step 6. You can access the sidebar by clicking on the "Go" dropdown menu in the top left corner of the Finder window. From there, you can select "External disks" to view all available external disks connected to the Mac.
Step 7. Select a Mac disk you want to repair.
Step 8. Click the First Aid button, and then choose "Run".
Step 9. You can click "Done" when the process is finished.
Note: If your macOS can't repair the disk, you can restart the Mac, use the FSCK command, or reformat the disk to solve the problem.
Rescue Data from a Corrupted Mac Disk with Software
When your Mac disk is damaged or corrupted, you can recover data from it with the help of professional recovery software, such as Deep Data Recovery for Mac.
Deep Data Recovery
- Support is available for recovering data from a corrupt SD card on a Mac, as well as corrupted or damaged Mac disks and external hard drives.
- Support for recovering various types of files on a Mac disk, including graphics, videos, music, documents, and emails.
- Mac video repair, photo repair, audio repair, and document repair services are offered.
Step 1. Select file types
Launch Deep Data Recovery software, select file types, and click "Next" to initiate the recovery process.

Step 2. Select the drive to be scanned
Select the drive you need to recover lost/deleted files from, and click the "Search for lost files" button in the main Deep Data Recovery window.

Step 3. Select your lost data/files
Deep Data Recovery for Mac will immediately scan your selected disk volume and display the scanning results on the left pane, allowing you to sort the results to find specific files if needed.

Step 4. Recover lost/deleted data
Once you have found the desired files, preview them and then click "Recover" to initiate the recovery of your deleted/lost Mac files.
Repair a Mac Disk with Disk Utility FAQs
If you're looking to repair your Mac's disk with Disk Utility, you might have some questions. Do you want to know more about the process, or perhaps how to use the tool to fix common issues? Maybe you're curious about the different options available in Disk Utility or how to troubleshoot problems with your Mac's disk.
How to repair bad sectors on an external hard drive on Mac with Disk Utility?
You can fix bad sectors on an external hard drive using the Disk Utility First Aid option or by restoring the target external hard drive to replace the failing one.
Is Disk Utility available in macOS recovery?
You can boot your Mac into macOS Recovery Mode and use Disk Utility to fix disk errors. To do this, turn off your Mac, then press the power button and immediately hold down the Command (⌘) + R keys. This will boot your Mac into Recovery Mode.
- 1. Make sure your Mac or MacBook has shut down already.
- 2. To boot in Recovery Mode on a Mac, turn on the device and hold the power button on Apple Silicon Macs or the Command and R keys on Intel-Based Macs.
- 3. Release the key until you see the Recovery Mode window.
- 4. Choose "Disk Utility" and continue.
Can I recover data from a Corrupted Mac disk?
With Deep Data Recovery for Mac, you can recover data from a corrupted Mac disk.
- 1. Install and launch the recovery software on Mac.
- 2. Scan the Mac disk to find lost files.
- 3. Filter and preview the files lost on the Mac disk.
- 4. Then, you can recover data from the corrupted Mac disk.
How to repair a Mac disk if my Mac cannot boot?
To boot your Mac into Disk Utility, you'll need to restart your computer and immediately hold down the 'Command (⌘) + R' keys. This will boot your Mac into the Recovery Mode, where you can access Disk Utility to repair your disk.
- 1. Make sure your Mac or MacBook has shut down already.
- 2. To boot into the Recovery Mode on a Mac, hold the power button on an Apple Silicon Mac or the Command and R keys on an Intel-Based Mac while turning it on.
- 3. Release the key until you see the Recovery Mode window.
- 4. Choose "Disk Utility" and continue.
- 5. Choose "View" and click "Show All Devices".
- 6. All the available disks on Mac will show up in the sidebar.
- 7. Select a Mac disk you want to repair.
- 8. Click the First Aid button and choose "Run ".
- 9. You can click "Done" when the process is finished.
Related Articles
- 4 Proven Ways to Fix Zsh Permission Denied in Terminal on macOS Ventura/Monterey
- How to Solve OneDrive Sync Pending Error in Every Possible Way
- Solved: CMD.exe/CMD Keeps Popping up in Windows 10
- How to Load Old Cyberpunk 2077 Saves on Xbox
- What Is SMB? Server Message Block Protocol Explained
SMB (Server Message Block) is a protocol that allows devices to communicate and share resources over a network. It enables file and printer sharing, as well as other services, and has been widely used for decades. CIFS (Common Internet File System) is essentially a variant of SMB, but with some differences. - What Is SMTP? Everything You Need to Know about Simple Mail Transfer Protocol
SMTP is one of the key protocls in emailing systems today. So, what exactly is it and how does it work? This article will help you answer these questions and explore the key traits of SMTP.