Windows 10 File History Backup, Everything You Should Know
Do you know there is a built-In Windows 10, you can use the built-in backup program, File History, to back up your files. This article provides a guide on how to perform a Windows 10 File History backup, allowing you to learn and utilize this feature to safeguard your important files.
Introduction
Windows File History is the primary backup tool in Windows 10, first introduced in Windows 8. While its name suggests it's mainly for restoring previous file versions, it serves a broader purpose. However, its effectiveness as a backup solution is a matter of debate, with some questioning whether it's a good backup option.
Is Windows File History A Good Backup?
Users can use File History to back up specific files, including Documents, Pictures, Videos, Music, or offline OneDrive files, making it a convenient backup option without the need for third-party tools.
How Does Windows 10 File History Backup Work?
File History is a built-in Windows 10 feature that automatically backs up files by taking snapshots of them over time, storing past versions in a designated location, allowing for quick recovery.
File History backups are stored on an external drive or network location designated by the user. This allows for automatic backups of files and folders to a secondary location, providing a safeguard against data loss in case of a system failure or other disaster. The backups are typically stored in a folder named "File History" on the designated drive or network location, and can be accessed and restored as needed.
Where Will File History Save Files?
Windows will store File History backups by default on the C drive in the "File History Backups" folder, but users can also choose to save them on a local drive, network drive, or external hard drive.
If you have questions about the provided information, you can find helpful links that address topics such as what File History backs up, where to store backups, and how to restore files.
We've learned a lot about File History, but now let's move on to the next part and find out how to actually perform a Windows 10 File History backup.
How to Perform Windows 10 File History Backup?
File History is an easy backup program built-in Windows 10, but using it to complete a backup plan can be tricky if you're not familiar with it. Fortunately, this guide provides a detailed explanation of how to use File History, making it easier to get started with your backup plan.
Now, let's see the specific steps of performing a Windows 10 File History backup.
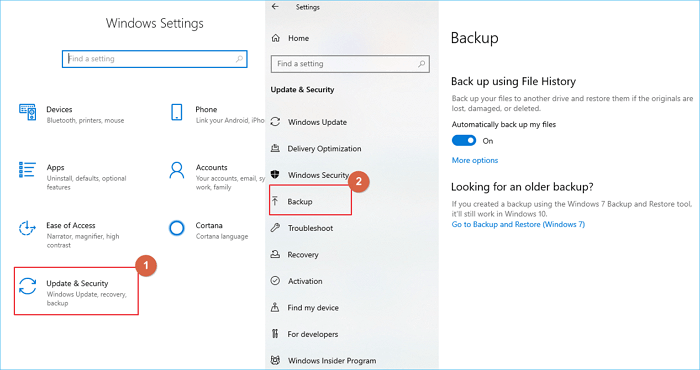
Step 1. Click "Update & Security" and select "Backup Using File History".
Step 2. Choose the content you want to back up.
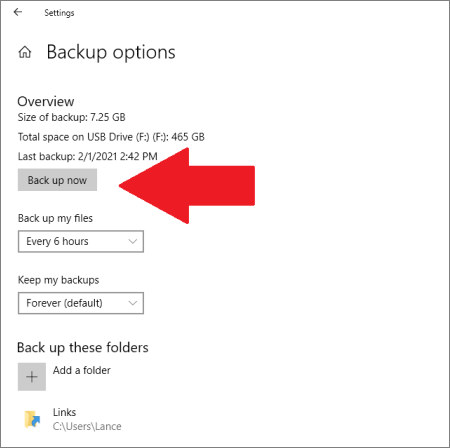
Step 3. Choose a location for your backups, and if you have more backup requirements, click the "More option."
Step 4. Start to back up by clicking "Back up now".
To restore File History, you can follow these steps: Go to the File History settings, select a backup date and time, and then choose the files you want to restore. You can also use the "Restore PC" option in the System Restore settings to restore your entire system to a previous state. Additionally, you can use the File Explorer to browse and restore individual files and folders. Make sure to select the correct backup date and time to ensure you're restoring the correct version of your files.
How to Restore A Windows 10 File History Backups?
You can restore files from Windows 10 File History by following a full guide, which also provides options for users to restore files. File History not only backs up files but also allows users to restore them, giving you a way to recover lost or deleted files.
Now, let's see how to restore backups from File History.
Step 1. To restore personal files, click on File History in the Start menu and select the "Restore personal files" option.
Step 2. In this window, choose the content you want to restore.
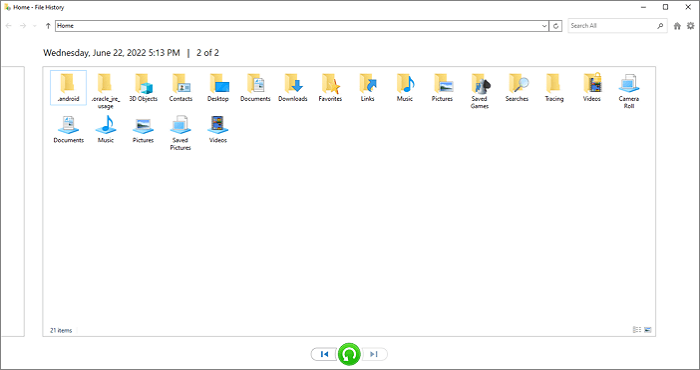
Step 3. To restore your backups, click the green button to initiate the process, which will return your backups to their original position.
Step 4. To restore backups to a different location, click the "Restore to" option and select a new location.

File History provides easy file backup and restoration, but its limitations include inability to back up programs, settings, or a comprehensive backup system. This may prompt users to consider a professional backup tool like Qiling Backup Home.
Try Windows 10 Backup Software to Replace Windows 10 File History Backup
To back up files without using File History, consider using Qiling Backup Home, a simple and efficient alternative. This tool allows users to keep their data safe while backing up data efficiently, and offers full, incremental, and differential backup modes. It's easy to use and eliminates the need for complex backup steps, making it a convenient option for users.
To back up files with Qiling Backup Home, you can follow these steps: First, download and install the software from the official website. Once installed, launch the program and click on the "Add" button to select the files and folders you want to back up.
Step 1. When using Qiling Backup for the first time, select File backup on the home screen to choose the types of files to back up, such as pictures, videos, documents, and more.

Step 2. To back up files, folders or directories, first locate the paths to the items you want to back up, and then select them all.

Step 3. To select a backup location, click on the "Select Backup Location" button. A list of available drives and folders on your computer will be displayed.

Step 4. Qiling Backup allows users to save backup files to various devices, including local hard drives, external USB drives, SD cards, network drives, NAS drives, and cloud drives, specifically Qiling's cloud drive, which is recommended for its accessibility, flexibility, and safety.

Step 5. To set up an automatic and intelligent backup schedule for the next file backup task, go to the "Options" setting. There, you can customize various settings, such as encrypting confidential files, compressing the backup image size, or defining a backup scheme, including specifying the time to start the next backup.

Customize an advanced and automatic backup task here:

Step 6. Click "Proceed" to start the file backup process, and your completed backup files will be visible in a card style on the left area.

After this process, you can back up files with Qiling Backup Home, which offers additional features that will be discussed in the next paragraph.
What Can Qiling Backup Home Do?
Qiling Backup Home has many features beyond file backup, including a list of specific functions that can be viewed to understand its capabilities.
- Scheduled and automatic backup
- Multi-path storage
- Disk and system clone
- Folder, partition, system, and disk backup
- Automatic and scheduled backups are available
- Backup an external hard drive to another external hard drive
Qiling Backup Home can automatically backup all user files, including system files, program files, and other data, while File History only backs up user files, such as documents, pictures, and videos. This means Qiling Backup Home provides more comprehensive protection for your computer's data. Additionally, Qiling Backup Home can backup and restore system files, which is not possible with File History. This feature is particularly useful for troubleshooting and recovery of system issues. Overall, Qiling Backup Home offers more advanced and robust backup capabilities compared to File History.
What Makes Qiling Backup Home Different from File History?
Qiling Backup Home and File History are both backup tools, but they have different functions and capabilities. Qiling Backup Home is a more comprehensive backup solution that can back up files, folders, and even entire partitions, while File History is a more limited tool that only backs up files and folders from the user's desktop and documents folders. Additionally, Qiling Backup Home has more advanced features such as automatic backups, scheduling, and encryption, whereas File History is more basic and requires manual backups.
| Features | Qiling Backup Home | File History |
|---|---|---|
| Backup Speed |
|
|
| Space Occupied |
|
|
| Backup Content |
|
|
| Backup Destination |
|
|
The table reveals that Qiling Backup Home is a professional backup utility that can replace File History and perform safer backups. This raises the question of what sets it apart from Backup and Restore, a feature that many users are familiar with. To clarify the difference, we can continue reading to learn more about the two features and how they compare.
Bonus Tip: Windows 10 File History VS Windows 10 Backup and Restore, Which One Is Better?
Windows 10 has two built-in backup programs: File History and Backup and Restore. The main difference between them is that File History focuses on backing up personal files, such as documents, photos, and music, to an external drive, while Backup and Restore creates a system image, which is a snapshot of the entire system, including installed applications, settings, and drivers. This allows for a complete recovery of the system in case of a failure or hardware change. In contrast, File History is primarily used for recovering individual files or folders that have been lost or deleted.
| Features | Backup and Restore | File History |
|---|---|---|
| Backup Content |
|
|
| Backup Destination |
|
|
After reading this table, I believe you can better understand the two backup programs in Windows 10.
Knowing how to back up and restore data is crucial in today's digital age. This page provides step-by-step guides on performing Windows 10 File History backups and restoring them, as well as introducing a reliable backup tool, Qiling Backup Home, which can help simplify the backup process. If you're tired of tedious backup schedules, consider downloading Qiling Backup Home to make backing up and restoring your data easier and more efficient.
FAQS About Windows 10 File History Backup
If you're interested in learning about Windows 10 File History backup, you can find three questions related to it in this section. Just continue reading to find out more.
1. Can I restore backups to a new PC with File History?
File History does not allow users to directly restore files to a new PC, but it does allow users to restore backups to an external hard drive or a network drive.
2. How often does File History backup by default?
File History allows users to configure backups to occur as frequently as every 10 minutes, or as infrequently as once daily, depending on their specific needs.
3. Does Windows 10 File History backup subfolders?
File History can back up files saved on user folders and subfolders, but not system files.
Related Articles
- Fix WD External Hard Drive Not Showing Up/Recognized Error [2022 Tutorial]
- External Hard Drive Takes Forever to Load
- Steam Deck SD Card Format | What's It & How to Format [Ultimate Solution]
- How to Reset NVRAM/PRAM on Your MacBook Pro/Air [2022 Fresh Guide]
- Do I Need a Heatsink for My M.2 SSD [2023 Full Guide]
Learn whether your M.2 SSD needs a heatsink. Compare SSD temperature, workload, motherboard design, and cooling needs before buying one. - Do I Need to Backup OneDrive? [Why & How-to Guide]
OneDrive users should be cautious as the platform is not always secure, and data breaches can occur. To mitigate this, users can create a backup of their OneDrive data using a professional tool like Qiling Disk Master, ensuring their files are safe in case of emergencies.