Windows Update Troubleshooter Not Working in Windows 10/11 [Fixed Quickly]
Quick navigation to the fixes for Windows Update Troubleshooter not working problem:
| Workable Solutions | Step-by-step Troubleshooting |
|---|---|
| Fix 1. Run SFC & DISM Scan | DISM and SFC are two command-line tools that can be used to repair corrupted system files...Full steps |
| Fix 2. Clear DNS Cache | A bulked-up DNS cache might lead to Windows Update Troubleshooter not working...Full steps |
| Fix 3. Change Local Group Policy Settings | Local Group Policy Editor can stop Windows Updates and Update Troubleshooter. Edit a particular setting...Full steps |
| Fix 4. Update Windows to the Latest Version | Upgrading Windows to the latest version might solve the Windows Update Troubleshooter not working...Full steps |
| Fix 5. Perform a System Restore | Open Control Panel on Windows 10. Go to Recovery and click on Open System Restore...Full steps |
| Fix 6. Reset Your PC | Running the Windows Reset option is a good way to ensure that your PC is returned to its original settings, without causing any issues. This option is useful when you want to remove all installed applications and return your PC to its factory settings, which can help resolve problems with your computer.Full steps |
Windows Update is a service that provides the latest upgrades, security patches, and stability for computers, keeping them safe and secure.
When Windows Update Troubleshooter fails to resolve issues, users may encounter persistent problems with Windows updates, such as failed downloads, incomplete installations, or error messages. In such cases, further troubleshooting steps are required, which may involve checking for corrupted system files, resetting Windows Update components, or even reinstalling Windows. Additionally, hardware-related issues, such as faulty network adapters or outdated drivers, can also prevent Windows updates from working properly, requiring manual intervention to resolve these underlying problems.
Unfortunately, the Windows Update Troubleshooter is not working, and you're looking for ways to resolve the issue. This article will explore alternative solutions to help you deal with the problem and get your Windows updates running smoothly again. Let's get started.
What Is Windows Update Troubleshooter
The Windows Update Troubleshooter is a utility that helps identify and fix problems with Windows updates, analyzing the system and recommending fixes for any issues it finds, aiming to resolve issues that might hinder Windows Updates.
When Windows Update encounters an issue while downloading the latest update, the Troubleshooter kicks in to troubleshoot the problem. It identifies what's preventing the update from being downloaded or installed, which could be due to various reasons such as internet connectivity issues, corrupted system files, or other unknown problems.
- Bad internet connection or slow internet connectivity
- Hardware or driver issue
- Computer viruses or malware
- Issues like outdated or inactivated Windows
The Windows Update Troubleshooter runs and checks if any of the issues it knows about are getting in the way. If it finds one, it tries to fix it. However, there are times when it won't work, and we need to find out why.
How to Run Windows Update Troubleshooter in Windows 10/11
Windows Update Troubleshooter is the same in Windows 10 and 11, and accessing it is not difficult, with the same steps to get to it, making it easily accessible.
To run the Windows Update Troubleshooter, ensure your PC is connected to the internet. If your update is failing, go to additional settings to run the Troubleshooter, which can help resolve any issues and complete the update process.
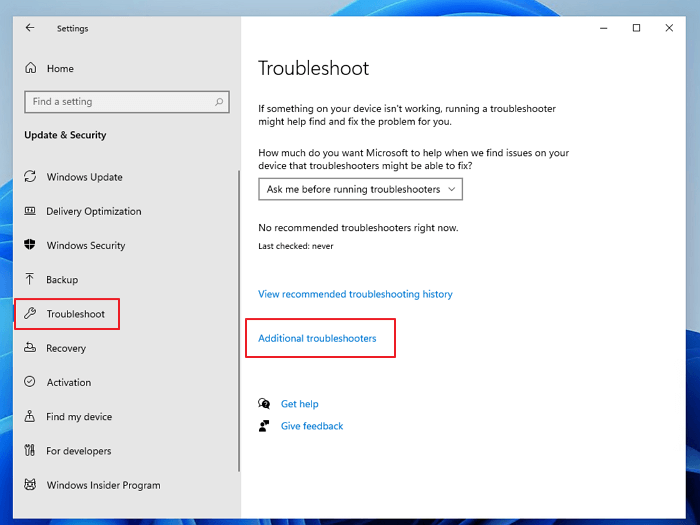
Step 1. Head into System "Settings". Go to the troubleshooting menu
Step 2. Go to "Update & Security" > "Troubleshoot" >"Additional troubleshooters".
Step 3. To resolve the issue, you can run the Windows Update troubleshooter by searching for Windows Update, clicking on it, and then selecting the "Run the troubleshooter" option.
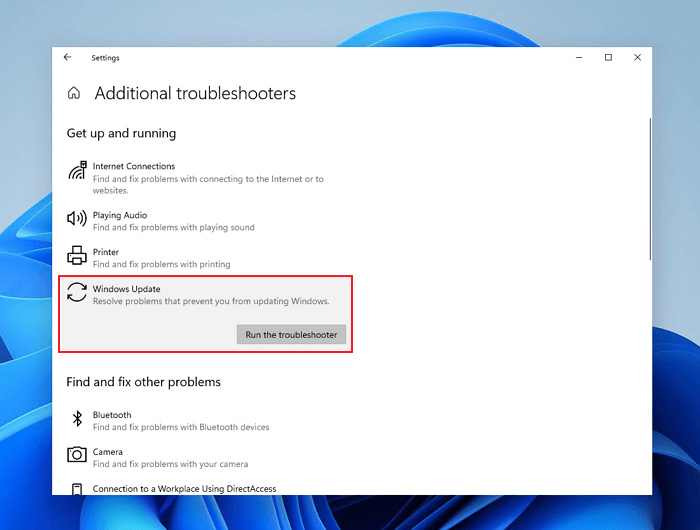
Step 4. Click on "Run the troubleshooter".
The Windows Update Troubleshooter utility will start and run on your PC, taking a while to complete depending on the issue Windows might be facing, and then display the results after a few minutes.
Microsoft suggests that you should try running your updates again after restarting your PC, as the Troubleshooter has likely fixed your issue.
Windows Update Troubleshooter Not Working Windows 11/10 [Solved in 6 Ways]
The Windows Update Troubleshooter not working issue can be caused by various factors, including internet connectivity problems, simple driver issues, or underlying Windows problems. To resolve this issue, you can try troubleshooting your internet connection, updating drivers, or addressing any Windows-related issues.
To resolve the issue, we'll explore six fixes that address the potential reasons behind the problem. Each fix will guide you through simple steps, so try to follow each step and stop at the one that works for you. Let's get started.
Fix 1. Run SFC & DISM Scan
To troubleshoot Windows issues, you can try running SFC and DISM scans to identify and fix corrupted system files. These command-line tools, SFC and DISM, can service Windows images by installing, uninstalling, configuring, and updating features, packages, drivers, and international settings.
SFC is a command-The DISM & SFC scan tool is a utility that scans and repairs issues in the installed image of Windows, helping to resolve problems and maintain system integrity.
- Install new features from the Windows Features node in the DISM GUI.
- Uninstall unwanted or unneeded features from the same node
- To enable or disable international settings from the DISM GUI, open the Command Prompt as an administrator and type `dism /online /get-international /set-international`. Navigate to the "International" node, select the "Enable" or "Disable" option for the setting you want to configure, and click "OK" to save your changes.
To improve your Alexa experience, you can either reset your Alexa or unplug and replug your Alexa device. If you're still experiencing issues, you may need to reset your Alexa to its factory settings. To do this, press and hold the microphones off and mute button on your Alexa device for 20 seconds.
DISM command:
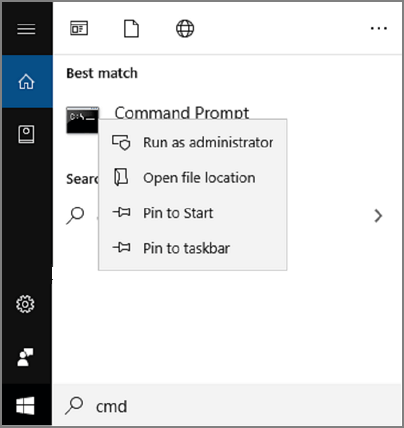
Step 1. Open CMD as administrator on your PC.
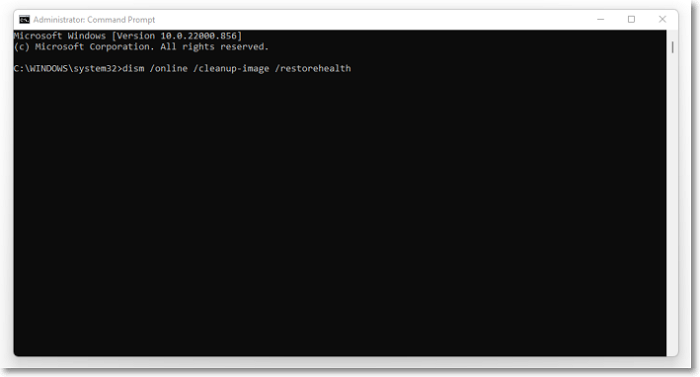
Step 2. Type `DISM /online /cleanup-image /ScanHealth` and press Enter. Wait for the scan to complete.
Step 3. Now type DISM /Online /Cleanup-image /RestoreHealth.
Step 4. Wait for it to finish and restart your PC.
Run the Windows Update Troubleshooter, then follow it up with the SFC Command. You can try to run the Windows Update Troubleshooter after this step, but it's better to follow it up with the SFC Command: Run the Windows Update Troubleshooter, then follow it up with the SFC Command.
Step 1. Open CMD as administrator again.
Step 2. Type SFC /ScanNow and press Enter.
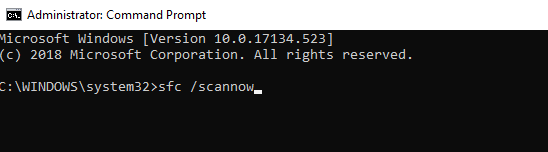
Step 3. Let it finish.
After running the Troubleshooter, restart your PC and run it again. This should resolve the issue.
Fix 2. Clear DNS Cache
Windows Update Troubleshooter requires an active internet connection to function properly, and a full DNS cache might be hindering its performance.
To clarify the issue, you can follow these steps:
Step 1. Open CMD as administrator on your PC. Type ipconfig /flushDNS.
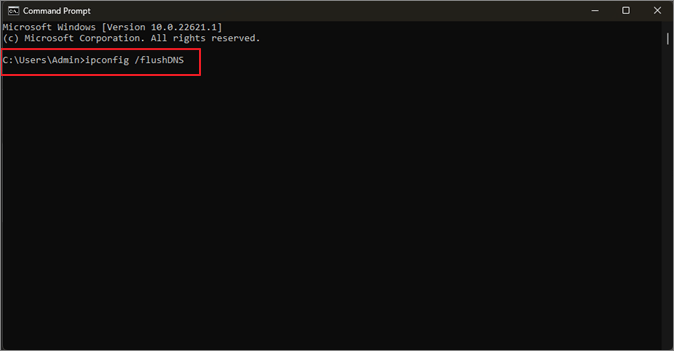
Step 2. Wait for it to finish.
Once you've flushed the DNS, try running the Windows Update Troubleshooter again to see if it resolves the issue. Flushing the DNS typically restores internet connection to its optimal quality, making it a likely solution to the problem.
Fix 3. Change the Local Group Policy Settings
To resolve the issue of Windows Updates and Update Troubleshooter being stopped by wrongly configured settings in Local Group Policy Editor, it's essential to locate and modify a specific setting. This setting can be found in the Local Group Policy Editor, and editing it will resolve the issue.
To disable any safeguards that might be preventing Windows Update or the Troubleshooter from working, you can edit the `HKEY_LOCAL_MACHINE\SOFTWARE\Policies\Microsoft\Windows\WindowsUpdate\AU` registry key. However, please note that editing the registry can potentially cause system instability if not done correctly, so it's recommended to back up the registry before making any changes. If you're not comfortable with editing the registry, you can try running the Windows Update Troubleshooter or using the built-in Windows Update Troubleshooter to resolve the issue, or seek assistance from a qualified IT professional if you're still experiencing issues.
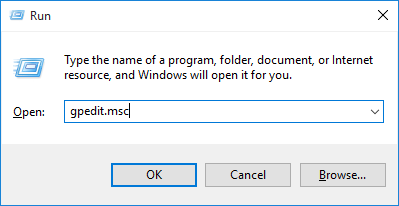
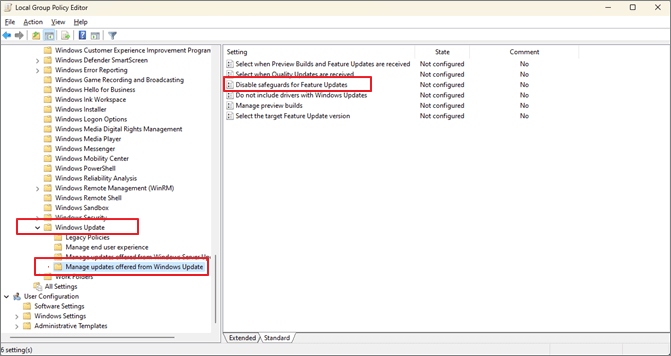
Step 1. Type GPEdit.msc in the Run command.
Step 2. Head into "Computer Configuration"> "Administrative Templates" > "Windows Components".
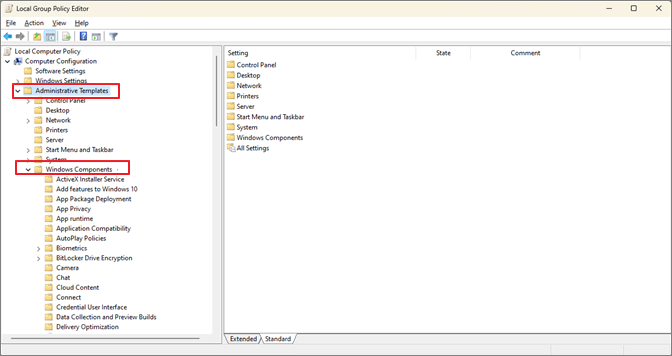
Step 3. To access the Windows Update settings, scroll down and select "Windows Update", then choose "Manage updates offered from Windows Update".
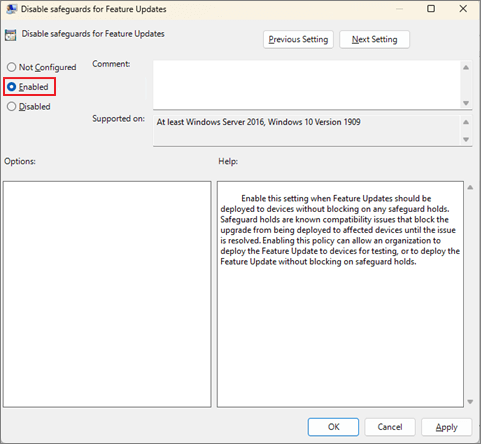
Step 4. Find & double-click "Disable Safeguards for Feature Updates".
Step 5. Under configurations, select "Enabled", then click "Apply" and "OK".
Step 6. Exit the group policy editor. Restart your PC.
To resolve the issue, restart your PC after updating the Windows Update service, and then try running the Troubleshooter again. If it still doesn't work, proceed with the next fix.
Fix 4. Update Windows to the Latest Version
Sometimes, the simplest and easiest fix is the most convenient, and updating Windows to the latest version can resolve issues without requiring extraordinary steps.
Microsoft is notorious for launching overnight upgrades and updates, which can sometimes leave users with outdated versions of Windows. In this case, it's possible that your Windows is simply outdated. To resolve this issue, you can try checking for updates and installing the latest version of Windows. This should resolve any compatibility issues and ensure that your system is running with the most recent security patches and features.
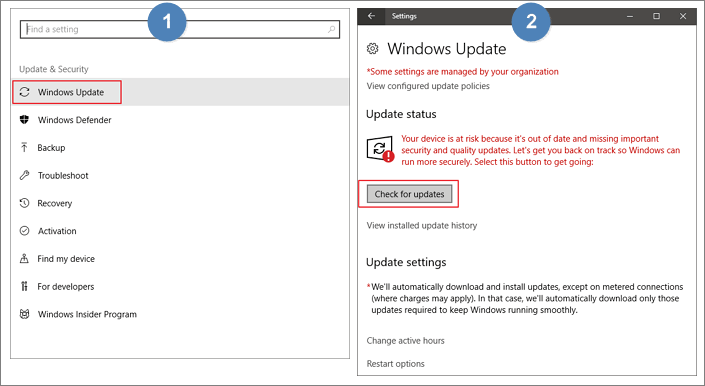
Step 1. To start the process, press the Start button on your keyboard, then type "Settings" in the search bar and click on it.
Step 2. Go to the bottom of the side panel and click on "Windows Update".
Step 3. Click on "Check for updates".
Fix 5. Perform a System Restore
Installing software, drivers, or updates can sometimes cause issues with your PC. In such cases, it's often best to revert to normal settings or a previous restore point where everything was working properly. This can help resolve problems and get your PC back to its previous state.
NOTICES:
Before attempting this method, it's recommended to create a recovery point or make a backup to ensure you can recover lost data. If you restore your system without a backup and lose important data, you can still resort to a professional data recovery tool like Deep Data Recovery to retrieve your files.
This efficient data recovery software can restore lost files and even recover data from a hard drive that won't boot.
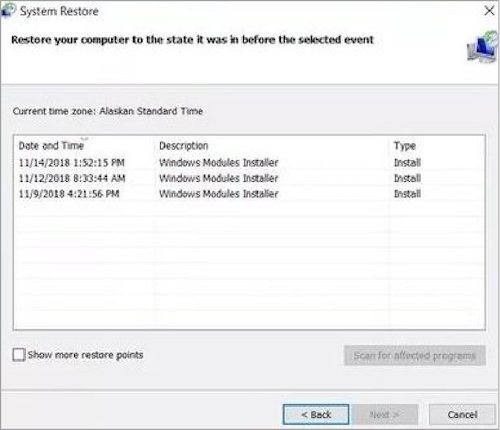
To perform a system restore in Windows 10 or Windows 11, follow these steps:
Step 1. Open Control Panel on Windows 10.
Step 2. In the top-right corner, search for Recovery options, open Recovery, and under these options, find and click on Open System Restore.
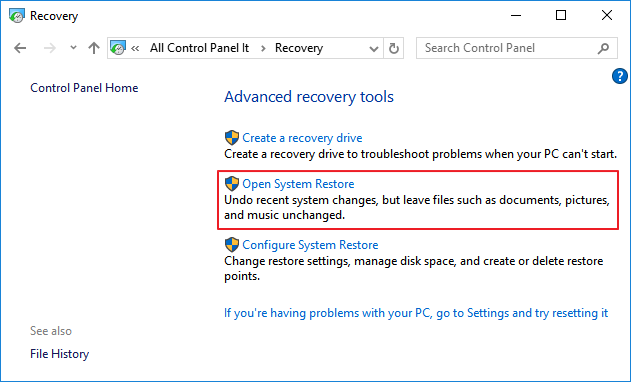
Step 3. Once you're within the System Restore options, click on "Choose a different restore point".
Step 4. Go to Settings > Update & Security > Recovery, select the "Get started" button next to "Reset this PC", then choose the restore point from a few days ago - or when things worked normally, and follow the on-screen instructions to complete the reset.
To resolve the issue where the Windows Update Troubleshooter is not working, you can try running the System File Checker (SFC) and DISM tools to scan and replace corrupted system files, then create a System Restore point to revert your PC to a previous state where Windows Update worked. This will ensure that the Troubleshooter can function properly again.
Fix 6. Reset Your PC
To avoid any issues with your PC when running the Windows Update Troubleshooter, you can run the Windows Reset option, which requires rebooting your PC into a recovery environment.
To reset your PC, go to Settings > Update & Security > Recovery, and click on "Get started" under the "Reset this PC" section. Next, choose whether you want to keep your files or remove them, and select the type of reset you want to perform. You can choose to keep your files and remove apps and settings, or remove everything and start from scratch.
Step 1. To restart your computer, go to the Start menu, click on the Shutdown options, and while holding down the Shift key, click on Restart. This will initiate the restart process.
Step 2. Before restarting, Windows will prompt a few options. Click on "Troubleshoot".
Step 3. Press the "Reset this PC" button.
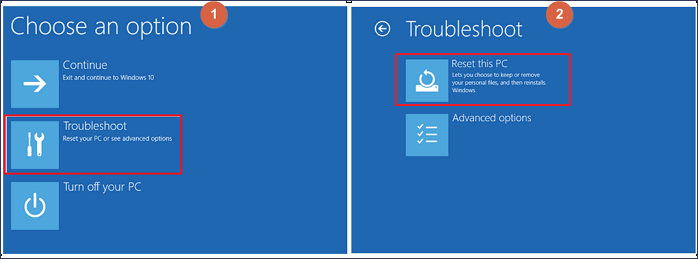
Step 4. Then press "Keep my files".

Step 5. Once you enter your password, Windows will ask for confirmation. Press "Reset" to confirm.
This process will completely reset your PC, removing all installed software, including any secondary programs. It's essential to secure your data beforehand to avoid any potential loss.
Conclusion
If your Windows Update Troubleshooter has stopped working, try resetting Windows Update components, disabling and re-enabling the Windows Update service, running the System File Checker (SFC) tool, running the DISM tool, checking for corrupted system files, and running a full system scan with an anti-virus software. These steps will implement a variety of fixes to get your Windows Updates back up and running once more.
Be aware that some of the steps to recover deleted files might result in losing them permanently, so it's crucial to use a professional utility like Deep Data Recovery to restore your files efficiently and quickly.
Windows Update Troubleshooter FAQs
If you have further queries, then you'll find their answers here.
1. Why is troubleshoot not working on Windows 10?
The problem might be due to bad internet or a hardware issue, but if that's not the case, resetting your PC to ensure the operating system is up and running normally again is the solution.
2. How do I run the Windows Update Troubleshooter?
To run the Windows Update Troubleshooter in Windows 10 and 11, go to Settings > Update & Security > Troubleshoot > Additional troubleshooters, then select Windows Update and click Run the troubleshooter. You can also search for "Windows Update Troubleshooter" in the Start menu to find it.
Step 1. Click "Start", go to "Settings", and choose "Update & Security".
Step 2. Click"Troubleshoot" and select "Additional troubleshooters".
Step 3. Click "Windows Update" and "Run the troubleshooter".
3. What do I do if Windows Update Troubleshooter is not working?
We examined six different fixes that are known to work in resolving the Windows Update Troubleshooter issue, making them viable options to get it up and running again.
- Fix 1. Run SFC & DISM Scan
- Fix 2. Clear DNS Cache
- Fix 3. Change the Local Group Policy settings
- Fix 4. Update Windows to the latest version
- Fix 5. Perform a System Restore
- Fix 6. Reset PC
4. How do I fix a corrupted Windows 10 Update?
To resolve the issue, go to System Restore and restore your PC to an early point before the Windows update, or reset your PC to reinstall Windows without losing files, but you'll lose installed software and drivers.
Related Articles
- HDD Low Level Format Tool, Which Is the Best [Full Comparison]
- 5 Best Free DVD Backup Software/DVD Ripper[Windows&Mac&Linux]
- How to Fix Mac Startup Issues [6 Excellent Solutions Provided for Mac Users]
- NTFS VS Share Permissions, What's the Difference and How to Set Them?
- 4 Ways to Factory Reset ASUS Laptop Without Password
Are you looking to learn how to factory reset an ASUS laptop without a password? This comprehensive guide outlines four effective methods to reset your laptop. - How to Factory Reset HP Laptop Without Password
Are you unable to login to your HP Laptop? Do you need to get back your data? Then follow this easy guide to factory reset your HP laptop without password. If nothing else works, you can always recover data using professional software.