File History Keeps Asking to Turn On: Fix Lost Settings
Quick Navigation:
- Why the Setting Does Not Stick
- Check the Drive and Its Letter
- Rebind the Drive Safely
- Back Up Files Without It
- Frequently Asked Questions
You turn File History on, pick a drive, close the window, and the next time you open it the same prompt is back with the switch in the off position. Nothing is broken in Windows; the feature simply cannot reach the drive it was bound to, so it falls back to the setup state. The file versions that were already written usually still sit on the disk, which means the fix is about restoring the binding rather than starting over.
Why the Setting Does Not Stick
File History does not store a simple on or off flag. It records the target drive together with a volume identity, and it checks that identity every time the feature starts. When the drive is missing, unplugged at boot, or reformatted, the check fails and the interface resets to the prompt.
A drive letter change is enough to break it. Windows hands letters out in the order devices appear, so a card reader or a new USB stick can take the letter your backup disk used to have, and File History then looks at an empty volume with the right name.
The two entry points make the confusion worse. Windows 11 keeps File History in the Control Panel, while older builds also expose a backup page in Settings. The Settings page shows a plain toggle that reports the current state, so it can look off even when the feature is configured and merely waiting for its drive.
Sleep and power settings add the same symptom on laptops. An external drive that spins down at logon, or that is connected through a hub that powers up late, is not ready when File History checks, so the feature reports that it needs to be turned on again.
Check the Drive and Its Letter
Plug the drive directly into the machine and confirm that it appears in File Explorer with the letter File History expects. If the letter moved, note both the current one and the one shown in the File History window before changing anything.
Open Disk Management, which is a Windows built-in tool, and read the state of the volume. A disk that shows as unallocated, RAW, or without a letter cannot host the history folder, and reformatting it at this point would erase the versions you are trying to keep.
If the drive is healthy but the letter is unstable, give it a fixed letter high in the alphabet so no card reader can take it. That single change stops the prompt from returning after the next reboot.
A drive that disconnects during the check has a hardware cause, not a settings cause. Test another cable and port, and treat a drive that keeps dropping as a USB drive that Windows 11 cannot keep online before you trust it with the only copy of your files.
Rebind the Drive Safely
Open the Control Panel entry for File History rather than the Settings toggle, because the Control Panel page shows the drive, the last run time, and the option to select a different target. The full path is System and Security, then Save backup copies of your files with File History.
Click Select drive and choose the same disk, not a new folder on another disk. When the drive already holds a FileHistory folder, Windows recognises the previous set and continues from it, so the timeline keeps the versions you had instead of starting an empty history.
If the folder is not recognised, check that its name was not changed and that the drive is not mounted read-only. Renaming the folder back or clearing the read-only attribute is enough in most cases, and the old versions reappear once the drive is selected again.
Finish by opening Advanced settings and confirming that the retention rule still matches what you expect, since a reformatted or replaced drive returns the feature to its defaults. Run the job once with the button for an immediate backup, then reopen the window a minute later; a state that survives that test will usually survive a reboot.
Back Up Files Without It
File History only covers known user folders, and the list of what it leaves out explains why a second tool is still needed. Qiling Disk Master stores the backup as a task with its own schedule and destination, so a missing drive produces a failed task you can see instead of a silently disabled feature.
Step 1. Open File Backup
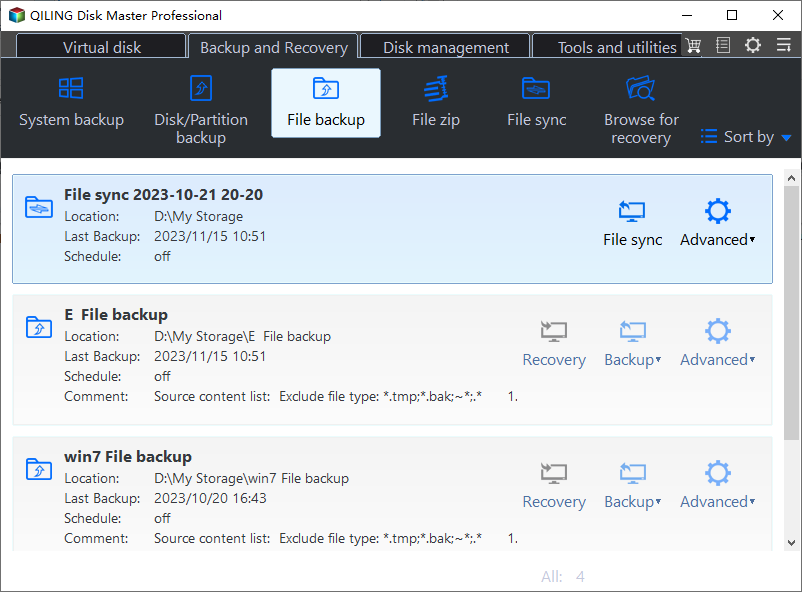
On the Backup and Recovery tab, click File Backup. Existing tasks appear as cards with their location, last backup time, and schedule, so you can see at a glance whether the drive was reachable.
Step 2. Select the Files
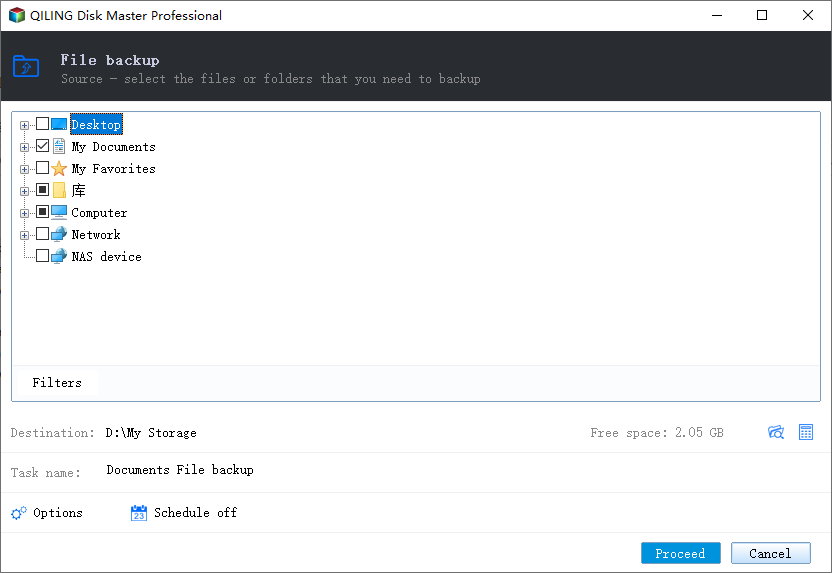
Expand Desktop, My Documents, or Computer on the left and tick the folders you want. Unlike File History, the selection can include any folder on any local or network path, and filters keep temporary files out of the set.
Step 3. Choose the Destination
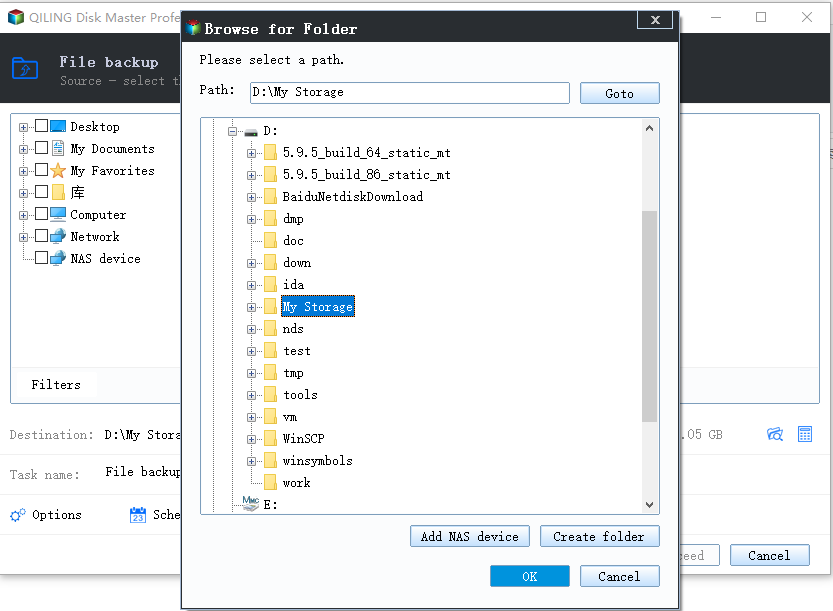
Pick a folder on the external disk and check that the path matches the letter the drive has now. If the drive is a network share or NAS, add it from the same browse window so the task keeps the full path.
Step 4. Start the Backup
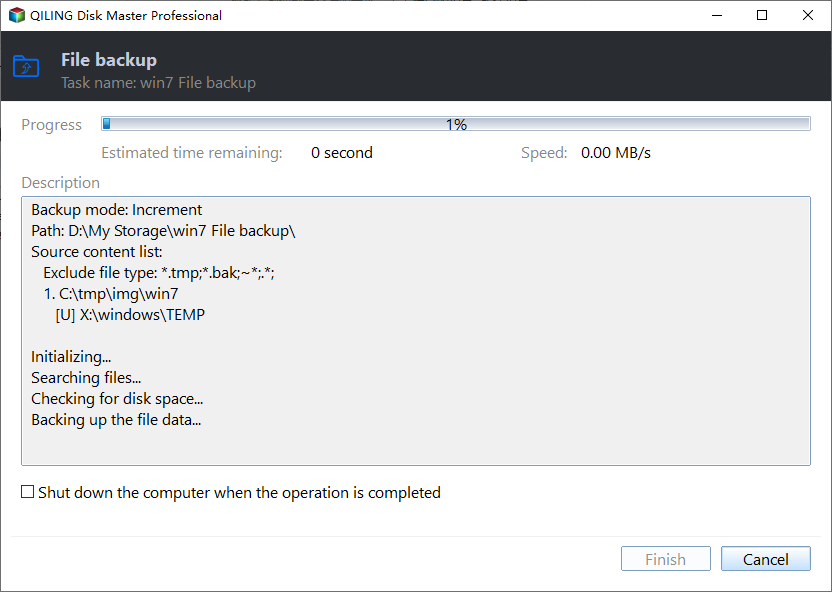
Set a schedule in Options, then click Proceed. The progress window lists the source folder and the destination path, and the finished task is saved so the next run does not depend on a setting that can be reset.
Frequently Asked Questions
Does turning File History off delete my old versions?
No. The versions stay in the FileHistory folder on the target drive. Turning the feature off only stops new copies from being written.
Why does the prompt return after a Windows update?
An update can change device enumeration, which shifts drive letters and makes the recorded target unreachable. Fixing the letter is usually enough to restore the binding.
Can File History use a network folder?
Yes, if the share is online and the credentials are saved. The feature still asks to be turned on when the share is unreachable at logon, which is common on laptops outside the office.
Related Articles
- File History Error 0x80070006: The Handle Is Invalid
- Windows 11 File History: Create File Backups
- How to Use File History in Windows 10
- Does Windows File History Backup Everything?
- Windows 10 File History vs. Time Machine
Products
Articles & Tutorials
- Data Recovery
- Data Backup
- File Recovery
- File Backup
- System Backup and Restore
- Disk and Partition Clone
- Technical articles
- Mobile articles
- Disk Master Help
- Windows Data Recovery Tutorials
- Windows Secure Delete Tutorials
- Windows Partition Management Tutorials
- Windows File Backup and Restore Tutorials
- Windows System Backup and Restore Tutorials
- Windows Disk Backup and Restore Tutorials
- Windows Clone Tutorials