File History Not Recognizing the External Drive
Quick Navigation:
- Drive Letter vs. Volume ID
- NTFS and exFAT Behave Differently
- Rebind the Disk Safely
- Back Up Without File History
- Frequently Asked Questions
File History opens with an empty drive list even though the external disk is plugged in and visible in File Explorer. The feature is not looking for a letter; it is looking for a volume it recognises, and the disk in front of it no longer matches the record it saved. The old versions are usually still sitting on that disk.
Drive Letter vs. Volume ID
File History stores its target as a volume identity plus a folder path. The letter is only how Explorer displays the volume, while the binding uses the identity, so a disk that keeps its identity is recognised even after the letter moves.
The drive list is filtered before it is shown. A volume that is offline, read-only, unformatted, or mounted without a letter is skipped, and so is a disk the current account cannot write to. That is why the picker can look empty while Explorer still shows the drive.
A letter change remains the most common trigger. A card reader, a phone, or a new USB stick can take the letter the backup disk used to hold, and File History then checks an unrelated volume that fails the identity test. This is also why the feature can ask to be turned on again after a reboot.
NTFS and exFAT Behave Differently
File History needs an NTFS volume for a local target because it relies on features that exFAT and FAT32 do not provide. An exFAT disk appears in Explorer, accepts files without complaint, and still never appears in the File History drive list.
Network locations are the exception. A share on a NAS can be selected even when the NAS runs a different file system, because Windows sees an SMB path rather than a local volume with its own identity.
Reformatting a disk to NTFS fixes the picker but erases what it holds. Copy the FileHistory folder to another disk first, format the target, copy the folder back under the same name, and only then rebind it.
A disk that disconnects during the check has a hardware cause rather than a settings cause. Test another cable and port, and treat a drive that keeps dropping as a USB drive that Windows 11 cannot keep online before trusting it with your only copy.
Rebind the Disk Safely
Connect the disk directly to the machine without a hub, then give it a fixed letter high in the alphabet so the same collision does not repeat. After that, open the Control Panel entry for File History instead of the Settings toggle; this is a Windows feature, not part of the backup software described in the next section, and its page exposes the drive, the last run time, and the selection control.
Click Select drive and choose the same physical disk. When the disk already contains a FileHistory folder, Windows recognises the previous set and continues the timeline instead of starting an empty history.
If the folder is ignored, confirm that its name was not changed, that the volume is not mounted read-only, and that your account still has full control of the folder. Restoring those attributes is enough in most cases, and the older versions reappear as soon as the disk is selected.
The first run after rebinding is a full scan. Expect it to take from tens of minutes to several hours depending on file count, disk speed, and USB version, so leave the machine awake until it finishes; later runs copy only changed files.
Back Up Without File History
File History covers known user folders and keeps versions on a single target, so a disk that drops offline can stop the protection without a clear warning. Qiling Disk Master stores each job as a task with a visible destination and last result, and it can write to a second internal disk, an external drive, or a share.
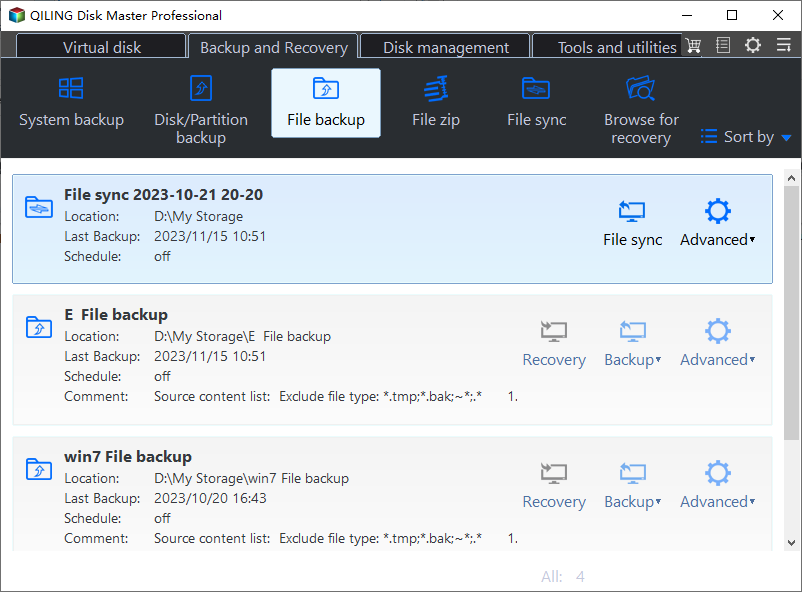
Step 1. Open File Backup
On the Backup and Recovery tab, click File Backup. Existing tasks appear as cards with their destination, schedule, and last backup time, so a drive that was unreachable is visible at a glance.
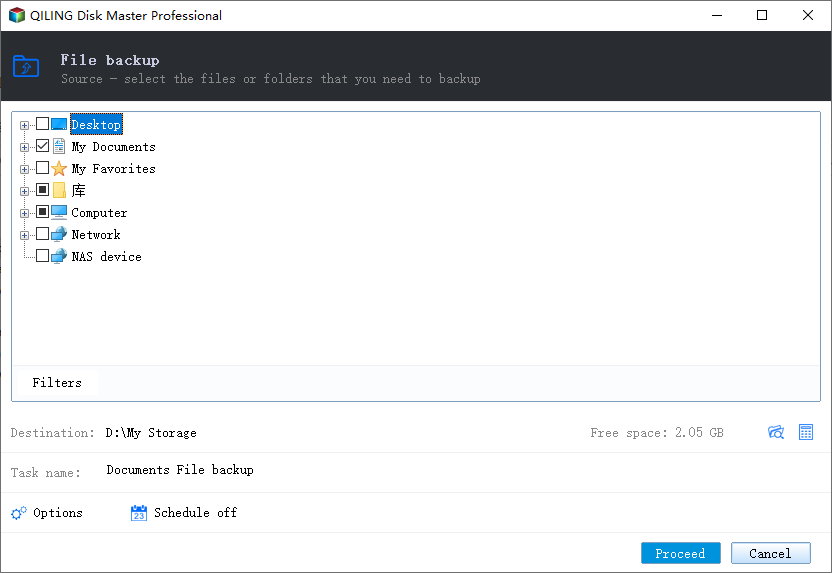
Step 2. Select the Files
Expand Desktop, Documents, or Computer on the left and tick the folders you need. The selection can include any local or network folder, which goes beyond the fixed libraries that File History watches.
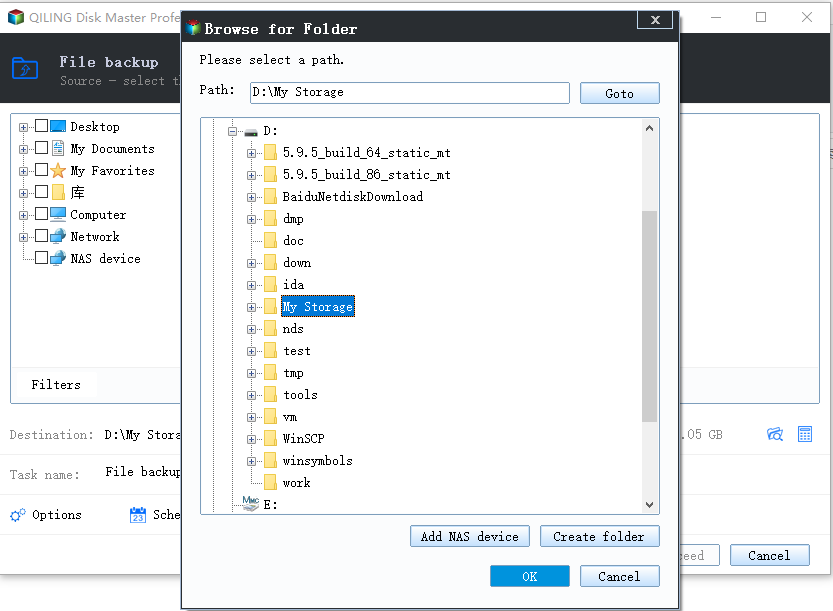
Step 3. Choose the Destination
Browse to a folder on the external disk and check that the path shows the letter the drive has now. For a NAS, add the share from the same window so the task records the full network path.
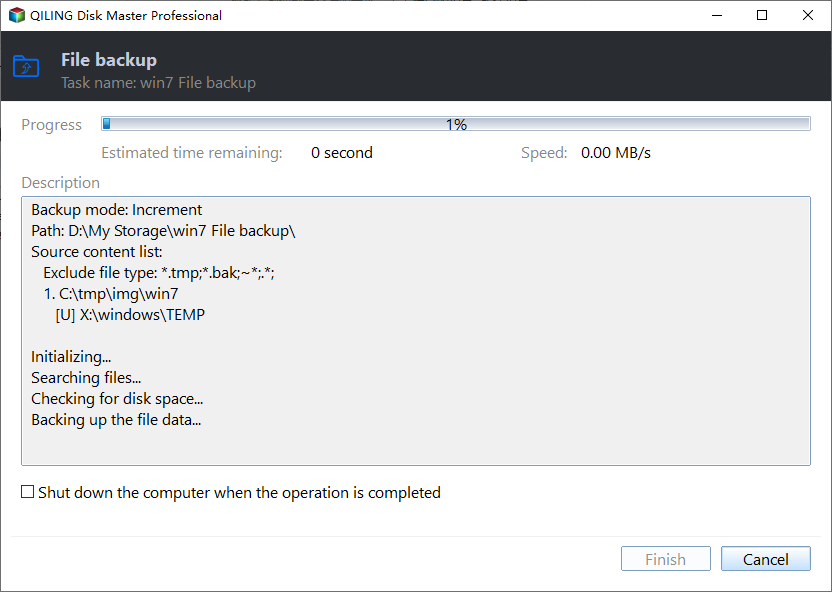
Step 4. Start the Backup
Set a schedule in Options, then click Proceed. The progress window lists the source folders and the destination, and the finished task is saved so the next run does not depend on a setting that Windows can reset.
Frequently Asked Questions
Why does File History show no drives when the disk is connected?
The volume is probably exFAT or FAT32, offline, or missing a letter. File History only lists a local target that is online, writable, and formatted as NTFS.
Can I use one disk for File History and another backup?
Yes, if the disk has room and stays connected. Keep the two jobs in separate folders and avoid cleanup tools that delete files by age without checking what they are.
Does rebinding erase the versions I already have?
No. Selecting the same disk continues the existing set. Only a format, a renamed FileHistory folder, or a different disk starts a new history.
Related Articles
- File History Keeps Asking to Turn On: Fix Lost Settings
- File History Error 0x80070006: The Handle Is Invalid
- How to Use Windows 11 File History for Backups
- Use File History in Windows 10 for File Backup
- Does Windows File History Backup Everything
Products
Articles & Tutorials
- Data Recovery
- Data Backup
- File Recovery
- File Backup
- System Backup and Restore
- Disk and Partition Clone
- Technical articles
- Mobile articles
- Disk Master Help
- Windows Data Recovery Tutorials
- Windows Secure Delete Tutorials
- Windows Partition Management Tutorials
- Windows File Backup and Restore Tutorials
- Windows System Backup and Restore Tutorials
- Windows Disk Backup and Restore Tutorials
- Windows Clone Tutorials