Easy! How to Transfer Files from OneDrive to SharePoint
PAGE CONTENT
1. Things about OneDrive and SharePoint
2. Transfer Files from OneDrive to SharePoint Manually
3. Transfer Files from OneDrive to SharePoint via Power Automate
4. Transfer Files Between PCs
Transfer Files from OneDrive to Another Location
OneDrive and SharePoint offer a secure platform for storing files and other important data, allowing you to utilize their free cloud storage space to store documents, photos, personal information, videos, and more.
You can manually or automatically transfer files from OneDrive to SharePoint, and this article will show you how to do it. We'll also demonstrate how to transfer OneDrive between PCs using Qiling Disk Master.
Things about OneDrive and SharePoint
OneDrive and SharePoint are cloud-based storage services created by Microsoft to store, share, and synchronize files between different devices. While they share similarities, OneDrive is primarily a personal cloud storage service for individual users, allowing them to store and access their files across various devices, whereas SharePoint is a more comprehensive platform designed for teams and organizations to collaborate and manage content, including documents, sites, and applications.
OneDrive
OneDrive is a cloud storage service that lets you save and access files and photos across multiple devices, edit and share them, and keep them safe even if your device is damaged or stolen.
The service enables you to stay connected with loved ones and share important files by sharing a link that gives them access to your photos, files, and folders.
SharePoint
SharePoint enables users to store, distribute, and manage files with varying access permissions, facilitating collaboration across different users through a shared internal website accessible on computers or mobile devices. It also allows for customization based on individual preferences.
For example, you can:
- Add capabilities using apps.
- Perform integrations outside Microsoft using app store tools.
- Develop websites using web design tools.
- Customize sites to specific users.
Why Transfer Files from OneDrive to SharePoint?
Moving files to SharePoint is important because it enables effortless collaboration and communication among team members, allowing multiple people to access one file simultaneously, unlike OneDrive.
SharePoint enables team collaboration by allowing multiple members to work on a single project simultaneously, making individual contributions. It also serves as a workspace where you can store and share content, schedule tasks, and manage projects. Additionally, SharePoint facilitates on-site file management, allowing you to set permissions for members to access specific file sections.
As a team leader, SharePoint enables you to manage access to files, preventing unauthorized users from viewing sensitive information. Additionally, it allows you to create an internal intranet, where team members can access web pages and files specific to their team, promoting collaboration and minimizing external visibility.
Transfer Files from OneDrive to SharePoint Manually
The manual method is the first and most common method to move files from OneDrive to SharePoint. This enables you to share files with various members of your team. You can apply this technique by following these steps:
1. Open OneDrive.

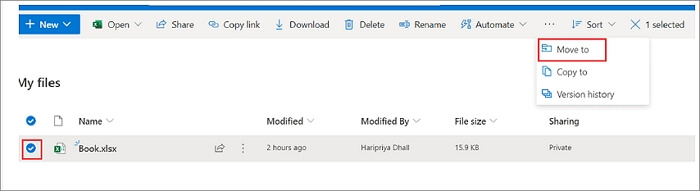
2. Select the files you want to move to SharePoint under "My Files" in the list of files.
3. Next, click "More options" and then "Move to."
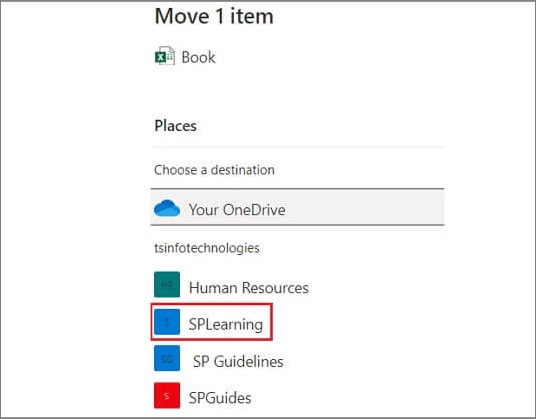
4. To transfer files to a SharePoint site, select a site from the list of available sites within your access.
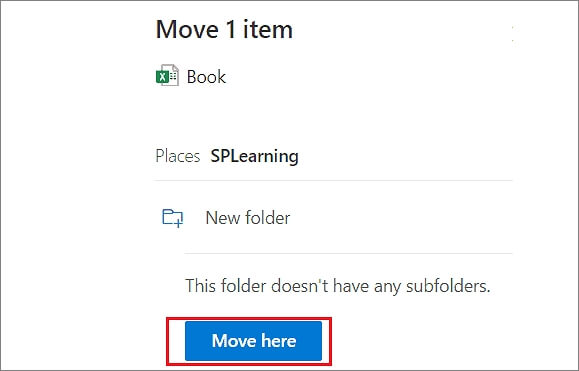
5. To transfer files from OneDrive to SharePoint, click on the "Move here" option. This will move all the selected files to SharePoint. Alternatively, you can create a new folder in SharePoint and move the files into it.
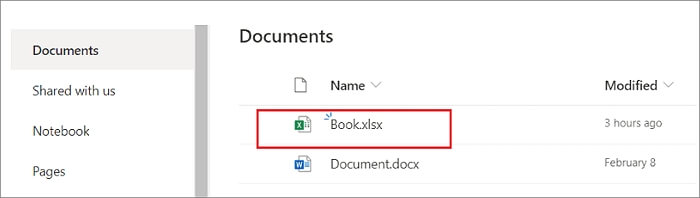
6. After moving all the files to your chosen SharePoint site, you can access them under "Documents."
Transfer Files from OneDrive to SharePoint via Power Automate
To move files from OneDrive to SharePoint using Power Automate, follow these steps: you can create a flow that triggers when a file is uploaded to OneDrive, then use the "Get file content" action to retrieve the file, followed by the "Create file" action in SharePoint to upload the file, and finally, use the "Delete file" action in OneDrive to remove the original file. This process automates the file transfer between the two platforms.
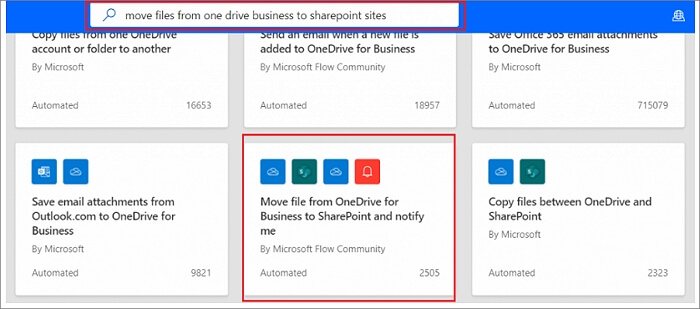
1. Go to https://flow.microsoft.com to open Power Automate.
2. Click on "Template."
3. To move files from OneDrive for Business to a SharePoint site, follow these steps:
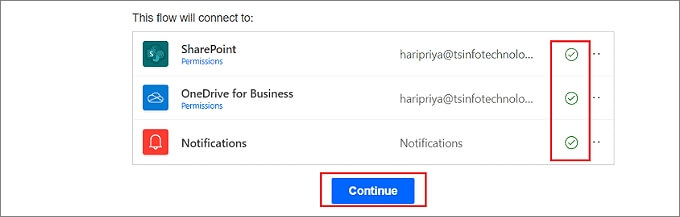
4. Add your email ID under "This flow will be connected to."Next, click on Continue.
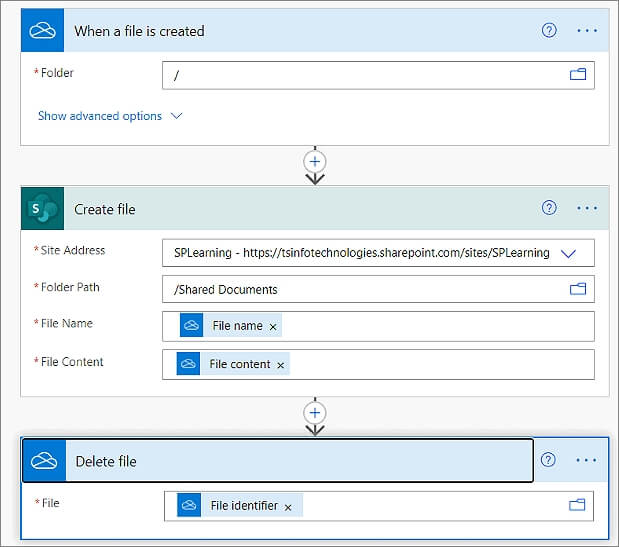
5. Once the flow page opens, you'll see the first two flows: "When a file is created" and "Create a file in SharePoint", which are the default flows provided by Power Automate.
6. Place your OneDrive folder under "When a file is created."
7. To create a file, select the preferred SharePoint site address, such as SP learning, and click on the folder path to store the moved file. Then, type a file name and select the file content.
8. To delete a file from OneDrive and move it to SharePoint, select the file you want to delete from OneDrive and transfer it to SharePoint.
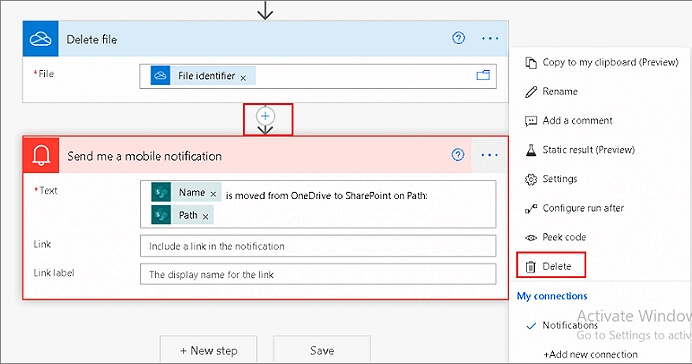
9. You can delete the "Send me a mobile notification" trigger and add a new one based on your preference.
10. Click on Save.
11. When the notification "your flow is ready to go. We recommend you test it" appears, click on the "Test" button. You can choose to test the flow automatically or manually, selecting "Manually" and then clicking "Save and test."
12. I've added a file from OneDrive to the flow to see if it works. Here's the updated flow:
13. If everything goes smoothly, the flow's status will change to "Succeeded." Your file will then be saved in the SharePoint library.
Bonus Tip: Transfer OneDrive between PCs
Transferring OneDrive folders from one PC to another creates multiple copies and data backups. To do this, the recommended software tool is Qiling Disk Master, which provides a safer and faster way to move programs and settings across computers.
Qiling Disk Master is a software that can run on various Windows devices, including Windows 11, 10, 8, and 7. It's particularly useful for those who have purchased a new PC and want to transfer data from their old one, making it a convenient solution for data migration needs.
Features of Qiling Disk Master
- Migrate user accounts and settings. Qiling Disk Master allows for a seamless transfer of custom settings to a new PC, eliminating issues related to personalization and power settings.
- Transfer via PC to PC. Qiling Disk Master enables the transfer of OneDrive files and data directly from one computer to another, allowing for a seamless migration of system applications and user accounts using PC to PC transfer, resulting in no delays.
- Efficient Data Migration. Qiling Disk Master simplifies data transfer between PCs, ensuring no data loss or damage, and saving time and effort by automating the process of loading files.
Advantages of Qiling Disk Master
- Enables automatic transfer of programs between PCs.
- Provides a faster way to migrate files and settings.
- Can recover data from a damaged PC.
- Doesn't require any technical knowledge before getting started.
- Access to free technical support.
To transfer OneDrive between two PCs, start by opening the OneDrive app on both computers. On the old PC, go to the "Settings" icon in the top right corner, click on "Account," and select "Sync your content.
Step 1. Run Qiling Disk Master on both PCs
On the source PC, select "File sync" on the main screen of Qiling Disk Master and proceed.

Step 2.Connect two computers
1. Connect to your target PC by selecting it from the list of available devices using either its IP address or device name, and then clicking the "Connect" button.
2. To log in to the target PC, enter the login password and click "OK" to confirm.
If the target PC is not listed, you can manually add it by clicking "Add PC" and inputting its IP address or device name.

Step 3. Select apps, programs, and software and transfer to the target computer
1. You can choose what to transfer from the current computer to the target PC.
2. After selecting the desired applications and programs, click "Proceed" to initiate the transferring process.

Transfer Files from OneDrive to Another Location
| Solutions | Contents | Get it |
| Transfer Onedrive to Google Drive | Transferring files from OneDrive to Google Drive can be a straightforward process. Firstly, you need to download the files you want to transfer from OneDrive. | Read More |
| Transfer Files from Onedrive to iCloud on iPad | Transferring files from OneDrive to iCloud Drive is a straightforward process that can be completed on both Mac and PC. On a Mac, you can drag and drop files from OneDrive to iCloud Drive, or use the "Move to iCloud Drive" option in the Finder. | Read More |
| Move Files from Onedrive to Another Onedrive | To move files from one OneDrive to another, you can manually copy files, sync the two accounts, or use Power Automate. You can also use the OneDrive settings to change the default account for saving new files, and then manually copy files from the old account to the new one. | Read More |
| Move Files from OneDrive to Local Drive | Moving files to your local or hard drive can be done in a few easy steps. First, select the files you want to move by clicking on them while holding the Ctrl key (or Command key on a Mac). | Read More |
Conclusion
OneDrive and SharePoint allow users to store, share, and sync files across devices, and also enable moving files from OneDrive to SharePoint, facilitating team collaboration and setting permissions.
Transferring files from OneDrive to SharePoint can be done manually using Power Automate, or by using a software tool like Qiling Disk Master, which is recommended for moving OneDrive between PCs. This tool enables faster transfer of programs across computers and is compatible with Windows 11/10/8/7.
The software tool allows for effortless data migration, user account transfer, and PC settings synchronization. To access the trial version of Qiling Disk Master, simply click on this link.
Related Articles
- Does Windows 11 have Easy Transfer?
- Transfer MSXML 4.0 to Another Computer
- How to Transfer TurboTax to New Computer with Windows 11, 10, 8, 7
- Can I Share Apps Between Two Laptops Using Nearby Share? Yes or No
- Backup Windows XP and Create a Windows XP System Image [Full Guide]
Windows XP is still used on many computers today, and if you're one of them, you're likely wondering if you can create a backup or system image. The good news is that yes, you can, and this article will explore the three main ways to do so. - Best Commercial Backup Software for Window(2022 Thorough Review)
Go through the detailed review of the best commercial backup software available. Learn about the Qiling Backup, its main features, compatibility, etc. The different versions of Qiling Backup ensure you get the best for your professional backup.