[Fixed] Windows 11 Virus Protection Keeps Turning Off
Quick Navigation:
- 1. Why Windows 11 Virus Protection Keeps Turning Off
- 2. Solutions to Windows 11 Defender Keeps Turning Off Problem (6 Solutions - Easy and Quick!)
- 3. Ensure Data Security Even Windows 11 Defender Keeps Turning Off
Windows 11's virus protection, Windows Defender, keeps turning off, but fixing this issue is possible. Windows Defender offers real-time protection against spyware, viruses, ransomware, and malware, and provides various scan options like custom scan, quick scan, and full scan.
Windows 11 virus protection can sometimes crash and fail to function properly, resulting in the issue of Windows 11 Defender turning off. This problem is common and can occur at any time. This article aims to provide detailed information about the issue and offers 6 different methods to resolve the problem of Windows 11 Defender not working or keeping turning off.

Why Windows 11 Virus Protection Keeps Turning Off
Windows 11 users may experience Windows Defender turning off unexpectedly, compromising their online security. Various reasons contribute to this issue, including system file corruption, malware infections, and configuration issues. This can put users' data and devices at risk, making it essential to troubleshoot and resolve the problem promptly.
Software conflicts
That built-Windows 11 may shut down or decline to run virus protection due to software conflicts, possibly caused by another antivirus software installed in the background.
Bug in the current Windows system
Windows 11's virus protection may be turned off due to a buggy system that hinders the Windows Defender from functioning properly.
For the best virus protection for your PC in 2022, consider top picks like Avast Free Antivirus, Kaspersky Anti-Virus, and Norton AntiVirus Plus. These options offer robust features such as real-time protection, password management, and online backup, with Avast and Norton also providing a free version for those on a budget.
In the age of the internet, it's more important than ever to have good virus protection software on your computer, as cyber threats and malicious software can cause significant damage to your digital life.
Solutions to Windows 11 Defender Keeps Turning Off Problem
If your Windows 11 security feature gets automatically disabled, you can try restarting Windows Defender, but if that doesn't work, you can also try running a System File Checker scan, enabling the Windows Defender service, or checking for and removing any malware that might be causing the issue. If none of these methods work, you can also try resetting Windows Defender to its default settings or seeking help from a professional.
- Method 1. Reset Windows Defender
- Method 2. Disable AntiSpyware
- Method 3. Update Windows Defender Firewall
- Method 4. Uninstall Third-Party Antivirus Software
- Method 5. Disable "Turn off Windows Defender" via Group Policy
- Method 6. Restart/Refresh Windows Defender Firewall Service
Method 1. Reset Windows Defender
If Windows 11's threat and virus protection keeps turning off or the Windows Defender won't start, resetting it to its factory default state is the best course of action.
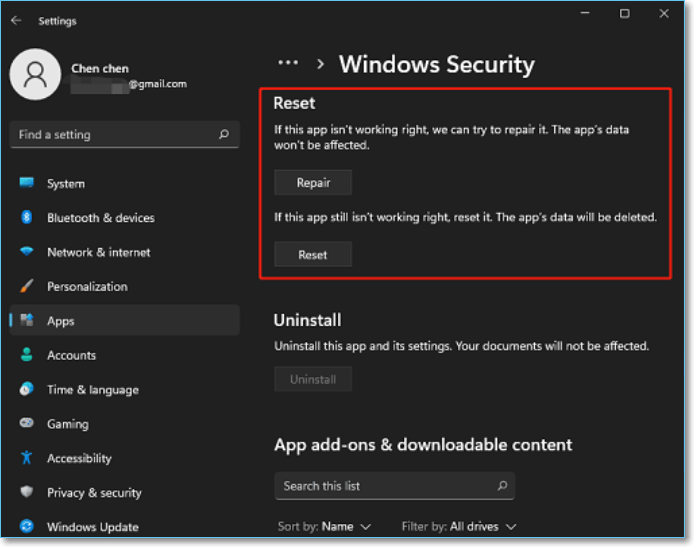
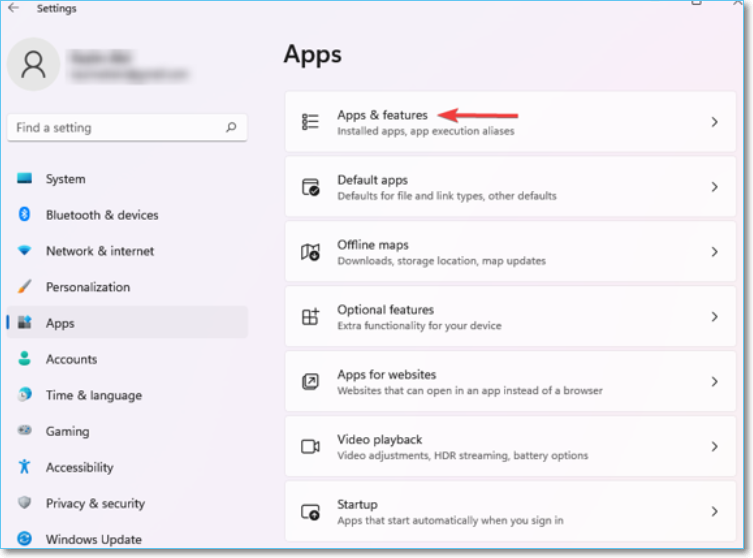
Step1. Navigate to the Windows 11 settings by pressing Win + I, then select Apps and click on App and features.
Step 2. To access Advanced options in Windows Security, click on Windows Security, then click the ellipsis (three dots) in the top right corner, and finally select Advanced options from the dropdown menu.
Step 3. To fix the issue, go to the Reset section and click on the Repair button. If that doesn't work, try clicking on the Reset button.
Method 2. Disable AntiSpyware
You can disable the AntiSpyware service file, which has long been a barrier to Windows Defender, by modifying its registry value. Although it's impossible to uninstall AntiSpyware from your Windows PC, you can disable it by following a specific set of steps.
Step 1. To open the Run dialog box quickly, use the Windows + R shortcut keys. This will instantly open the Run dialog box, allowing you to access various system functions and tools.
Step 2. To open the Registry Editor, simply type the "regedit" command in the Command Prompt and press the Enter button. This will launch the Registry Editor application, allowing you to view and edit the Windows Registry.
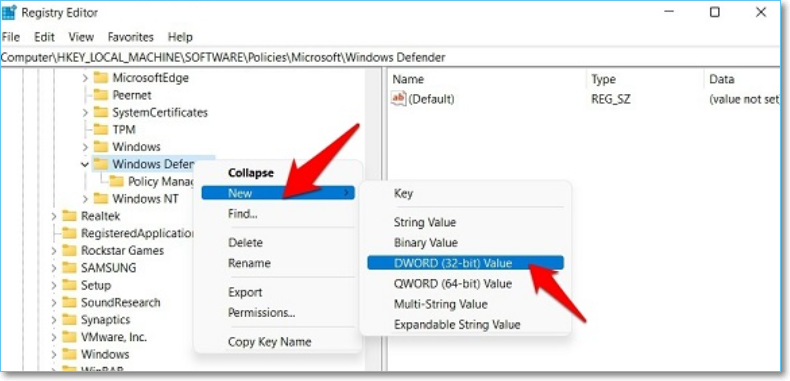
Step 3. To copy-paste the "Computer\HKEY_LOCAL_MACHINE\SOFTWARE\Policies\Microsoft\Windows Defender" location into the address bar, right-click on the "Computer" key, select "Copy" from the context menu, and then paste it into the address bar. This will navigate you to the correct registry key.

Step 4. To create a new DWORD (32-bit) value in the Windows Defender folder, right-click on the folder and select "New" followed by "DWORD (32-bit) value" from the context menu. This action will create a new registry entry with the specified value type.
Step 5. To disable the Windows Defender AntiSpyware feature, create a file named DisableAntiSpyware, double-click on it to open, and type 0 in the Value Data section.
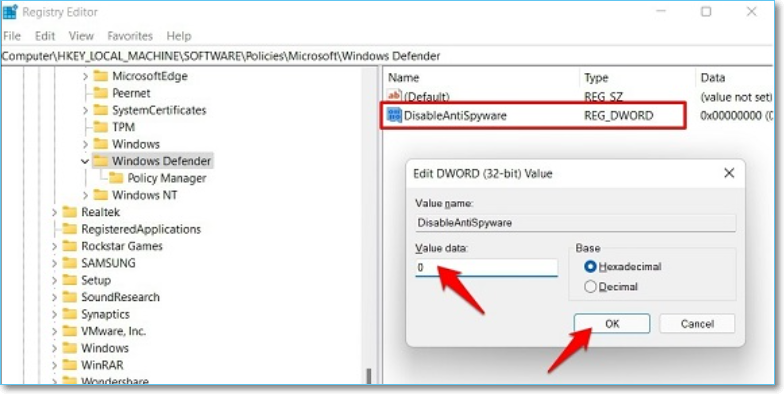
Step 6. To save the preferences and restart your Windows 11 PC, click on the "OK" button.
Step 7. Once your PC boots up, check if the Windows 11 virus protection turned off issue has been resolved. If it has, then the troubleshooting process is complete.
Method 3. Update Windows Defender Firewall
Microsoft released a Windows Security Intelligence update that broke Windows Defender, followed by another update that fixed the issue of Windows 11 virus protection being turned off.
To crosscheck that Windows Defender isn't the issue, upgrade it to the latest version by following these steps. First, open the Start menu and type "Windows Defender" in the search bar. Click on the "Windows Defender" app to open it.
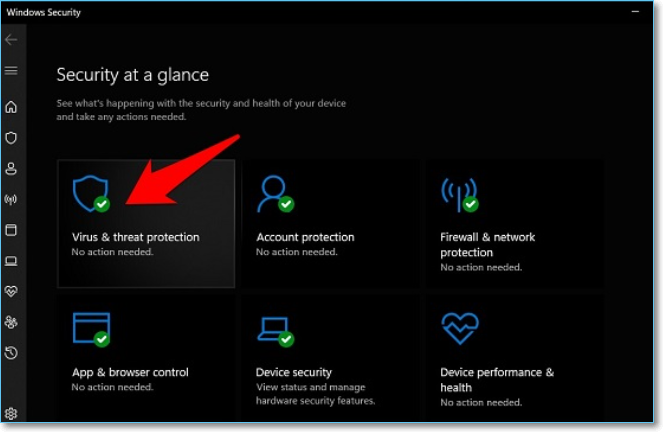
Step 1. To access the Virus and Threat Protection settings, start Windows, navigate to Windows Security, and then click on Virus & threat protection.
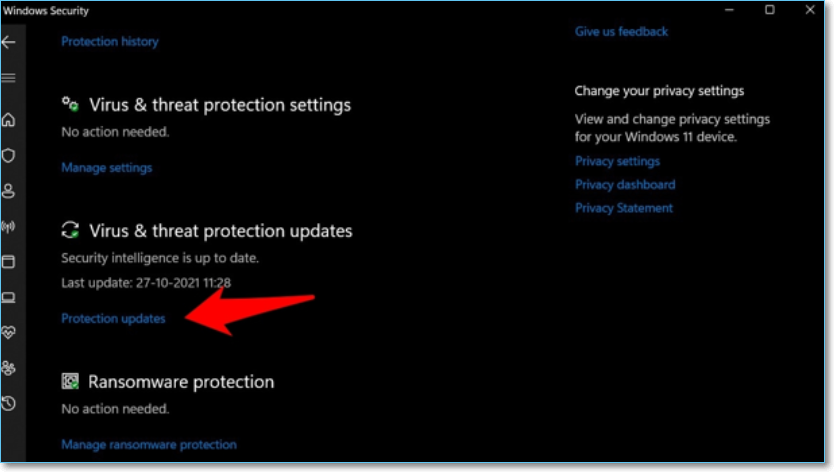
Step 2. After that, scroll down to Virus and Threat Protection updates and hit on Protection Updates.
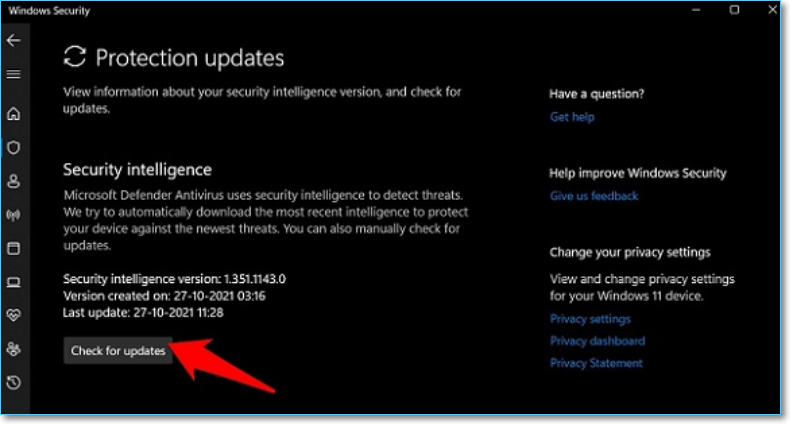
Step 3. To ensure your system is up-to-date, check for any pending updates. If there are any, download and install them immediately.
Step 4. Once you have checked for updates, restart your Windows 11 PC and then check if it fixed the issue or not.
Method 4. Uninstall Third-Party Antivirus Software
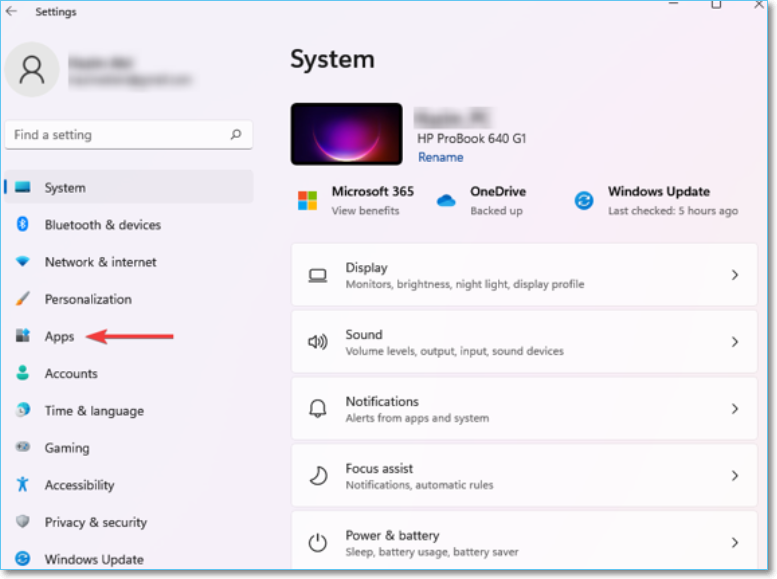
Step 1. To access the Apps tab in the Settings app on Windows, press the Windows key + I to open the Settings app, and then select the "Apps" tab from the left-hand side of the window.
Step 2. Choose Apps and features.
Step 3. To uninstall the antivirus, click on the ellipsis next to it and select Uninstall from the dropdown menu.
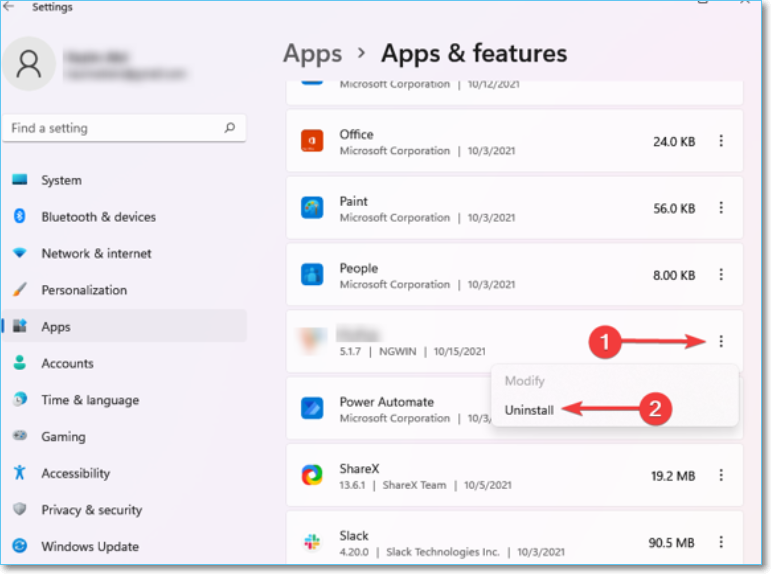
Step 4. Hit the "Uninstall" option quickly.
Having a third-Party antivirus software installed on your Windows 11 PC might interfere with the built-in virus protection features.
Method 5. Disable "Turn off Windows Defender" via Group Policy
To successfully install a Windows 11 Quality update, you should first disable the "Turn off Windows Defender" policy, which is enabled by default after installing the update. To do this, follow the necessary steps to disable the policy, allowing the update to be installed without any issues.
Step 1. To quickly open the Run dialog box on a Windows computer, press the Windows key + R shortcut keys simultaneously. This will open a small window where you can type in commands or file paths to execute specific actions, such as opening a program or folder, or running a command-line command.
Step 2. To open the Group Policy Editor, simply type "gpedit.msc" and press enter. This will launch the Group Policy Editor, allowing you to configure and manage local group policies on your Windows computer.
Step 3. To configure Windows Defender, navigate to the Local Computer Policy > Administrative Templates > Windows Components, and select the Windows Defender folder.
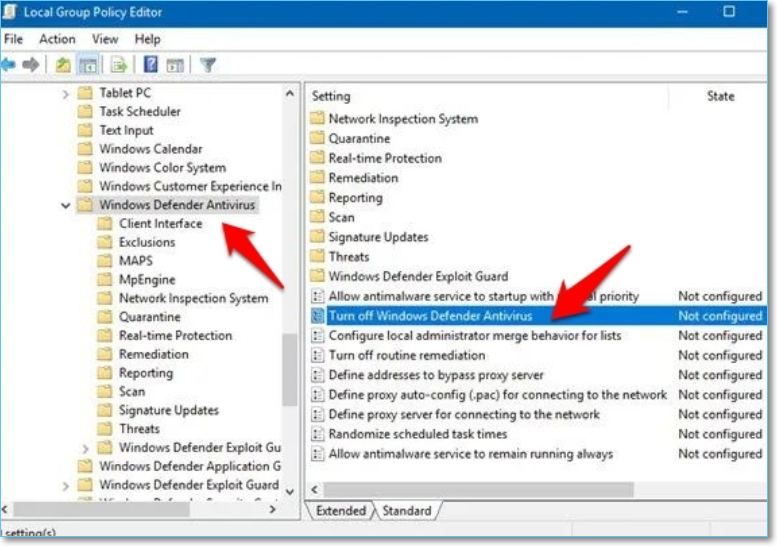
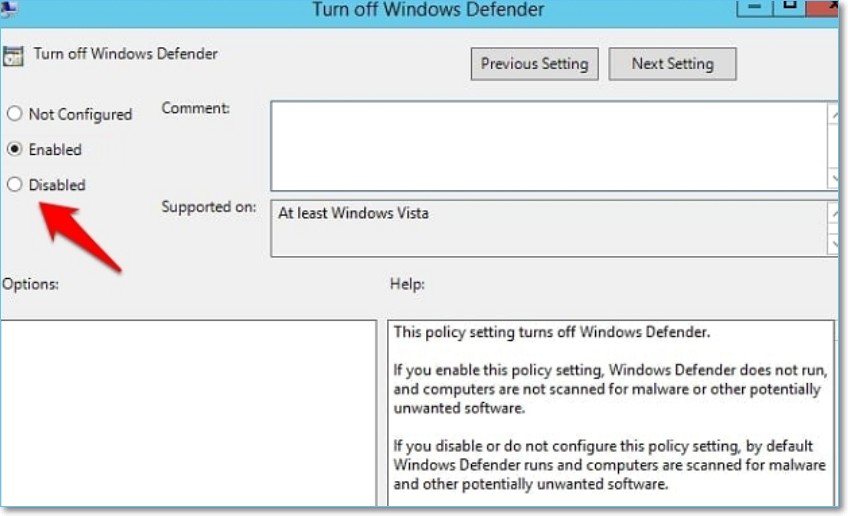
Step 4. You will see the "Turn off Windows Defender Policy" file on the right-hand side. Double-click on it to open.
Step 5. To save your preference to use the Disabled option, go to the top left menu bar, choose Disabled, and then click on Apply > OK.
Step 6. Once you've followed the process of running the Windows Update Troubleshooter, resetting Windows Defender, and resetting the Windows Security app, reboot your Windows 11 PC to see if the issue has been resolved.
Method 6. Restart/Refresh Windows Defender Firewall Service
The Windows Defender Firewall Service is crucial for keeping Windows Defender running smoothly in both the foreground and background. If there are any major issues with this service, Windows Defender may be severely impacted. To resolve any problems, you can try restarting or refreshing the Firewall service by following the necessary steps.
Step 1. To open the Services menu, go to the Start menu, click on the Run application, type "services.msc" and press OK. This will open the Services menu where you can view and manage the various system services.
Step 2. To refresh the Windows Defender Firewall service, navigate to the Windows Defender Firewall service, right-click on it, and select Refresh from the context menu.

Step 3. If the option is blurred or greyed out, it's likely already running in the background, so you might want to try refreshing the page instead.
Step 4. To confirm if Windows 11 Defender is working as scheduled, check the Windows Security app for any updates or alerts. You can also check the Windows Defender logs to see if any threats have been detected and removed. Additionally, you can run a full scan of your system to ensure that Windows Defender is functioning correctly.
Ensure Data Security Even Windows 11 Defender Keeps Turning Off
Windows Defender is a robust security tool that effectively detects malware, blocks network-based attacks, prevents exploits, and flags phishing sites, also protecting against ransomware. Additionally, it provides detailed PC performance and health reports, parental controls with usage limits, content filtering, and location tracking features.
To prevent data loss and keep your files intact, it's essential to back up your Windows 11 PC, disks, and other crucial files regularly. This can be easily done using the Qiling Backup software, which allows you to securely store your data in a protected zone, safeguarding it from viruses and other threats, even if your PC is compromised or destroyed.
Qiling Disk MasterBac
- Offer a free cloud backup storage of 250GB, allowing users to back up their OS, disks, partitions, and other devices without any downtime.
- A simple backup management system can enhance efficiency and security by allowing users to password-protect their backups and store them across multiple paths. This approach ensures that data is safely stored and easily accessible in case of a loss or system failure.
- Scheduled backup, differential and incremental backup, and enabling the image reverse strategy are just a few features that can be used in conjunction with each other to create a robust backup plan. This can include features like encrypted backup, which adds an extra layer of security to protect sensitive data.
If you want to use this powerful tool, you may follow the steps below:
Step 1. Launch Qiling Backup and choose "System Backup" on the home page to start backing up.

Step 2. The system partition will be automatically selected, so you only need to choose the installation location.

Step 3. You can save the backup file to your Local Drive, Cloud, or NAS, or even connect an external hard drive to preserve the system backup files.

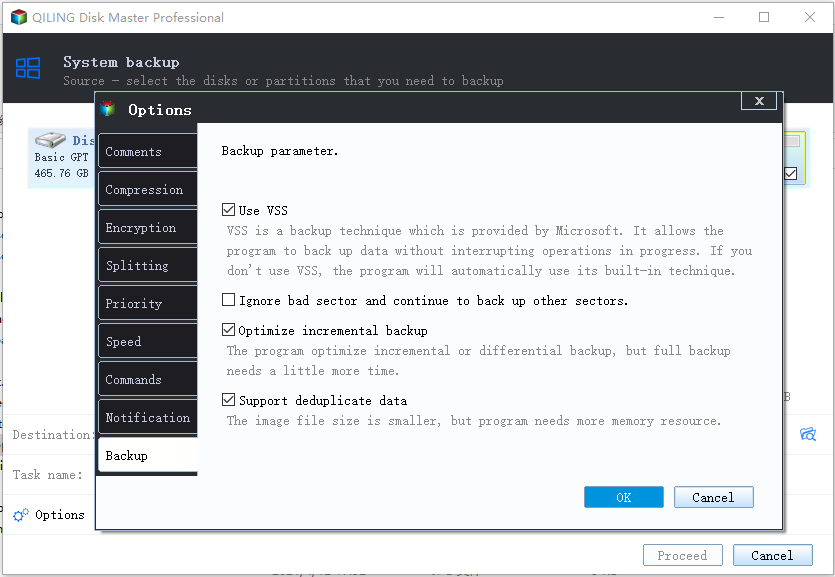
Step 4. You can customize the settings in "Options" at the left bottom. After that, click "Proceed" and the process will begin.
After completing the backup process, you can verify the backup status, restore, launch, or erase the backup by right-clicking the backup task in the left panel.
Conclusion
If the Windows 11 virus protection turned off issue persists, you can try the provided solutions to see if they resolve the problem. If not, Qiling Backup is a comprehensive PC protection solution that can provide complete protection for your computer. You can share and subscribe to the content for future updates.
Related Articles
- Solution: Windows Could Not Find the Recovery Environment
- Step-by-Step Guide: How to Turn Off Windows Backup
- Why Is OneDrive Not Syncing on Windows PC? Answers and Fixes Are Here!
- How to Fix the Task Image Is Corrupted or Tampered With (4 Ways)
- Samsung Data Migration Software Download and Perform
If you want to move your HDD or SSD to a Samsung SSD, Samsung data migration software download is an easy-to-use and efficient utility. However, it also has some restrictions. If you want a program to not only use on samsung products, this guide will introduce a free alternative to help you. - Samsung M.2 SSD Migration Software for Windows[2022 Choice & Guide]
If you're looking to migrate data from an M.2 SSD, Samsung Data Migration software is an option, but it's limited to Samsung brand devices. A more versatile alternative is Qiling Backup, which supports cross-brand HDD/SSD copy and clone, making it a suitable choice for those looking to transfer data between different devices.