How to Clone a Failing Drive with ddrescue
A healthy drive gives up its data at full speed. A dying drive stops for ten seconds on a single sector, then continues, then stops again, and a conventional clone can sit at nineteen percent for hours while the platters wear out.
ddrescue is built for that situation. It reads the easy blocks first, records what it managed to save, and lets you retry the difficult areas later without starting over.
PAGE CONTENT
- When a Normal Clone Keeps Stalling
- Measure the Drive Before You Image
- Use the ddrescue Options That Matter
- Clone the Healthy Copy with Qiling Disk Master
- Verify the Copy and Recover What Is Missing
- FAQs About ddrescue
- Back Up Before the Drive Dies
When a Normal Clone Keeps Stalling
- Retries look like freezes. Firmware re-reads a bad sector several times before it reports an error, so the progress bar appears to hang at random.
- Every retry costs life. Each extra pass over a weak area can widen the damage, which is why a rescue tool collects the healthy data first.
- Watch the SMART counters. Rising reallocated, pending and CRC error counts during a copy mean stop and image the drive instead of cloning it.
- Listen and feel. Clicking, buzzing or a drive that drops off the bus is a hardware fault; power it down and work from an image, not the original.
- Do not repair first. chkdsk, defrag and firmware updates all write to the media and can finish off a marginal drive before the data is safe.
ddrescue ships in most Linux rescue environments, including the Ubuntu and GParted Live images, so a spare USB stick is usually the only hardware you need to add.
Measure the Drive Before You Image
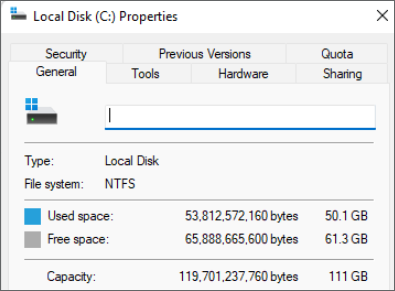
- Image the whole device. A rescue image follows the disk, not the files, because ddrescue copies sectors and knows nothing about folders.
- Leave enough room. Reserve free space equal to the drive's capacity, or use sparse output so only written areas take real space.
- Used space still matters. Windows may report 180GB used on a 1TB drive, but the image still covers the full 1TB address range unless it is sparse.
- Record the geometry. Note the sector size, 512 bytes or 4096 bytes, and the partition layout before the drive stops responding.
- Pick a healthy host disk. Never write the image to the failing drive, and avoid a USB stick of unknown quality for a file this large.
Two copies beat one. Write the image to an internal disk, then copy it to an external drive before anything is written to the replacement SSD.
Use the ddrescue Options That Matter
- First pass with -n. The -n flag skips splitting and retrying, so the tool pulls every readable sector as fast as the drive allows.
- Second pass with -r. Run again with -r3 to retry bad areas three times; more retries cost hours and recover very little extra data.
- Match the sector size. Use -b 512 for 512e drives and -b 4096 for 4Kn drives, because a wrong value misaligns every read.
- Direct access helps. The -d flag bypasses the kernel cache, which is useful when the drive returns cached garbage or times out.
- Force the write. When copying an image onto a new disk, -f allows ddrescue to overwrite an existing partition table.
Always pass a mapfile, for example rescue.map. It records which sectors succeeded, so an interrupted run resumes where it stopped instead of reading the whole drive again.
Clone the Healthy Copy with Qiling Disk Master
Once the image is safe, the failing drive can stay unplugged. Writing the image to the new SSD, or cloning the restored disk, is a normal copy that a guided tool can finish in a few clicks.
Watch the video tutorial below to clone the drive step by step with Qiling Disk Master.
Step 1. Open Qiling Disk Master, choose Clone, and then select Disk Clone.

Step 2. Attach the new SSD and select the disk that holds the rescued copy as the source.

Step 3. Select the new SSD as the destination and confirm that its capacity is at least the size of the source.

Step 4. Use the intelligent mode and keep every partition selected so the copy stays bootable.

Step 5. Click Proceed, wait for the finish message, then shut down before you remove the USB bridge.

Verify the Copy and Recover What Is Missing
- Read the mapfile. The finished map marks rescued, bad and untried areas; a bad block near the start matters far more than one inside free space.
- Test the new disk. Run a SMART short test on the SSD and confirm there are no reallocations before you trust it with the only copy.
- Mount read-only first. Use mount -o ro on Linux, or attach the disk on Windows and copy files before you write anything to it.
- Repair the copy, not the original. Run chkdsk /f on the new disk only, then compare key folders against the mapfile notes.
- Recover individual files. If some folders refuse to open, point PhotoRec or Recuva at the image file rather than the dying hardware.
Keep the failing drive unpowered once the image is verified. An offline drive cannot degrade further, and the image can be written to another SSD later at no risk.
FAQs About ddrescue
Is ddrescue better than dd for a failing disk?
Yes. dd slows or stops at the first error, while ddrescue skips bad areas, logs them in a mapfile and resumes from that point on the next run.
Can I write the image to a smaller SSD?
Not directly. Image the whole disk, write it to an equal or larger SSD, then shrink the partition on the copy with a partition tool.
What does the -n option change?
It performs one fast pass without retrying bad sectors, so you capture the readable data before the drive has a chance to fail completely.
How long does a rescue take?
A healthy drive images in hours. A drive with many bad sectors can take days, and every added retry pass makes the total longer.
Can I clone a failing drive from Windows?
Not safely. Boot a Linux live media for ddrescue, or use a Windows PE clone tool that can skip bad sectors and report them afterwards.
Back Up Before the Drive Dies
A rescue image is not a backup until it exists in two places. Keep a second copy of the image and a system backup of the PC you use for the recovery, so one bad disk does not take both copies with it.
Watch the video tutorial below to back up Windows and restore it if the clone fails.
Step 1. On the PC that receives the rescued data, open Qiling Disk Master and choose System Backup.

Step 2. Write the image to a drive other than the one holding the rescue image, so a single failure cannot destroy both.

Step 3. Click Proceed and let the backup reach completion before you start the long rescue run.

Step 4. If the rescued copy will not boot, restore the backup on the recovery PC and write the image to a second SSD.

Conclusion
When a drive is failing, stop cloning and start imaging. Run ddrescue with -n to capture the readable sectors, retry with -r3 using the same mapfile, then write the image to a healthy SSD and verify the copy before the original is retired.
For more on cloning from outside Windows and handling damaged media, see How to Clone a Hard Drive Without Booting Windows, How to Fix Acronis Clone Disk Failed Error, How to Clone a Disk with a Different Sector Size, and 4K Alignment When Cloning to an SSD: Why It Matters.
Related Articles
- How to Clone a Failing HDD Before It Dies
Act on the first signs of a mechanical failure. - How to Clone a Failing SSD Before It Dies
Move data off flash that is losing cells. - How to Clone a Hard Drive with Bad Sectors
Copy around damaged areas instead of stalling. - How to Clone an SSD That Shows SMART Warnings
Read the warning before the drive disappears. - How to Clone a Hard Drive with the Linux dd Command
Compare a plain dd copy with a rescue run.
Products
Articles & Tutorials
- Data Recovery
- Data Backup
- File Recovery
- File Backup
- System Backup and Restore
- Disk and Partition Clone
- Technical articles
- Mobile articles
- Disk Master Help
- Windows Data Recovery Tutorials
- Windows Secure Delete Tutorials
- Windows Partition Management Tutorials
- Windows File Backup and Restore Tutorials
- Windows System Backup and Restore Tutorials
- Windows Disk Backup and Restore Tutorials
- Windows Clone Tutorials