Cloning an SMR HDD Takes Forever: Why and What to Do
Quick Navigation:
- Why SMR Drives Crawl
- Slow or Dying
- Image in One Pass
- Clone the Stable Copy
- Frequently Asked Questions
A two-terabyte drive should cross to a SATA SSD in a couple of hours. On a shingled drive the same job can show fifteen hours remaining, drop below 20 MB/s, and sit there overnight without failing. Nothing is broken in the usual sense, and that is what makes it hard to diagnose: the drive is working exactly as designed, just far more slowly than the progress bar suggests.
Why SMR Drives Crawl
Shingled magnetic recording overlaps tracks the way roof tiles overlap, which raises density and lowers cost. The trade is that a single track cannot be written without disturbing the track beneath it, so the drive rewrites a whole band at once and keeps the new data in a small conventional cache area until it can merge the band.
While that cache has room, writes look normal. Once it is full, every new write forces a band merge, and the merge reads and rewrites far more data than the user asked for. Throughput falls to a fraction of the rated speed, and it stays there until the drive catches up, which can take hours on a drive that has been written heavily.
Reads suffer too, indirectly. A drive that is still merging bands in the background answers requests between merges, so a sequential read that should stream at 150 MB/s delivers 15 to 25 MB/s. A clone is read-heavy, which is why the copy crawls even though the tool is not writing to the source at all.
Drive-managed SMR makes this invisible. The operating system sees an ordinary hard disk and has no way to ask whether the cache area is full, so the only symptom is speed.
Slow or Dying
A shingled drive that is merely busy delivers a steady, low rate. Watch the progress percentage for ten minutes: if it advances at a consistent pace, even a slow one, the drive is working rather than failing.
A failing drive behaves differently. The rate collapses to zero, jumps back, collapses again, and the tool may report a read error at a specific percentage. Listen for repeated head movement and check whether the activity light stays solid for minutes at a time.
Health counters settle it. Reallocated sectors, pending sectors, and a rising load cycle count point at hardware; a clean report with a slow but steady transfer points at shingling. A surface read test gives the same answer in a more direct form, because it shows exactly which areas answer slowly.
If the drive is both shingled and unhealthy, stop treating the clone as a copy job and treat it as a rescue. Cloning a failing HDD before it dies explains how to read the data once and avoid a second pass.
Image in One Pass
An image is the better first move on a shingled source. It reads the disk from the first block to the last in one sequence, keeps the head moving in one direction, and writes the result to a healthy disk. A clone does the same read but also writes to the target at the same time, which doubles the work the machine has to schedule.
Image to a drive that is not the SSD you plan to use. Keep the image until the SSD boots and you have checked your files, because the image is the fallback if the clone is interrupted.
Keep the USB bridge out of the path when you can. Many 2.5-inch enclosures translate 4K sectors and drop the link under sustained load, and a bridge that reports the wrong capacity adds a second reason for a slow or stalled job. Use a direct SATA port, or an NVMe slot with an adapter, for the destination SSD.
Sector by sector mode makes an SMR source slower, not faster. It reads every block including empty ones, so reserve it for a drive with read errors and use the default intelligent copy for a healthy shingled disk.
Clone the Stable Copy
Once the image is verified, the source no longer matters. Qiling Disk Master can clone the disk while the machine is idle, and the steps below keep the job sequential and short: one source, one destination, no encryption, no scanning.
Close everything that writes to the source before you start. An indexer, a sync client, or a game launcher waking up mid-clone adds seeks that a shingled drive handles badly.
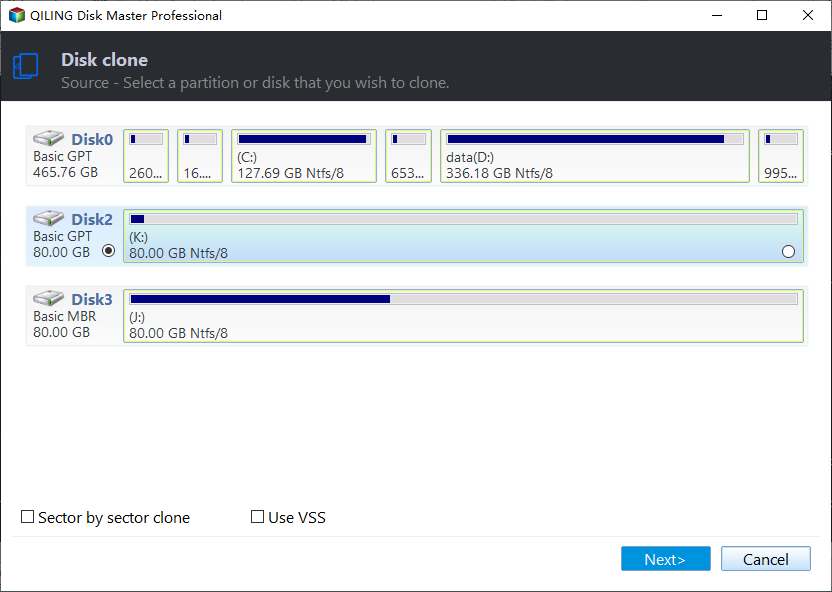
Step 1. Open Disk Clone and Select the Source
On the Tools and utilities tab, open Disk/Partition clone and select the shingled disk. Leave the sector by sector option clear unless the drive has reported read errors.
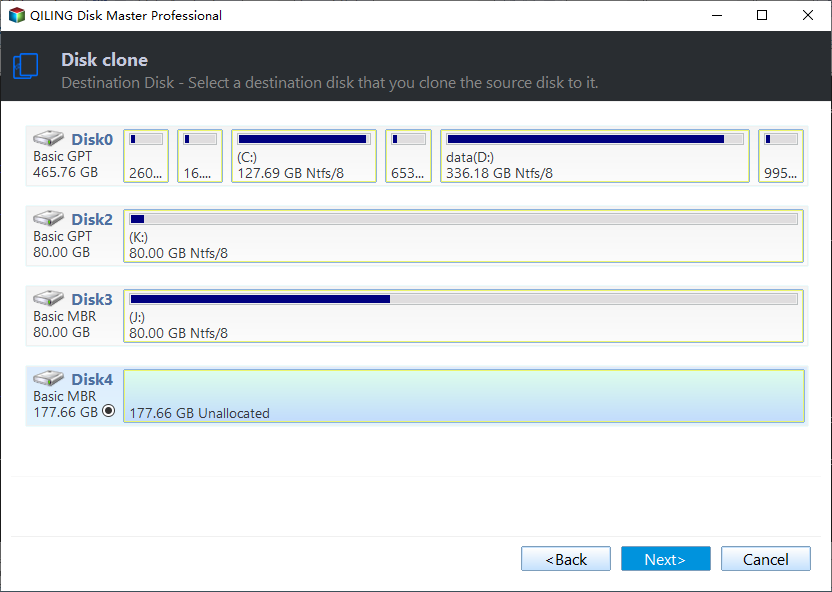
Step 2. Select the SSD as the Destination
Pick the SSD and check the capacity shown for it. A bridge that reports a size of zero or a fraction of the real capacity is visible here, before the copy starts rather than three hours into it.
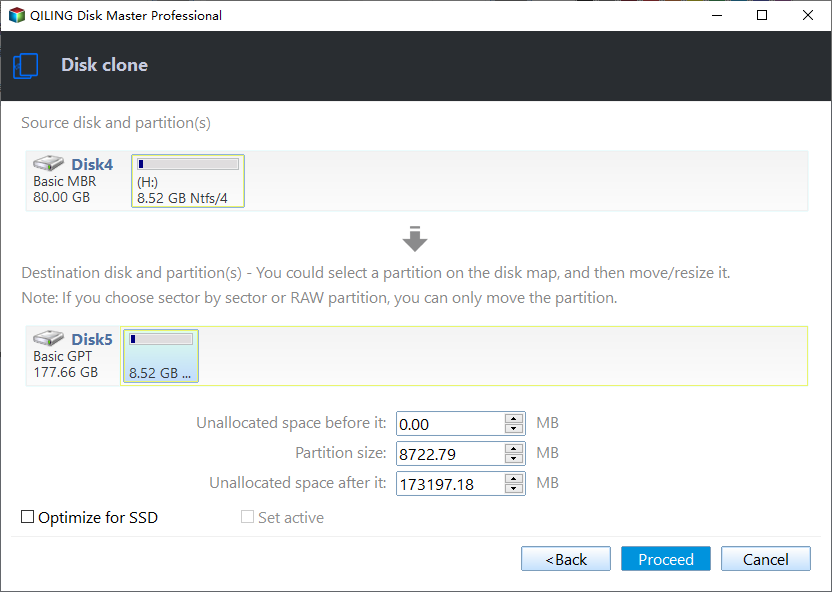
Step 3. Preview and Click Proceed
Preview the pending operation and click Proceed. Tick the SSD optimization so partitions land on aligned boundaries, and accept the overwrite warning only after you have confirmed the destination disk number.
Frequently Asked Questions
Will a USB 3 enclosure fix the slow clone?
No. The limit is inside the drive, not on the cable. A direct connection helps only when the bridge itself is dropping or misreporting the disk.
Can I speed up a shingled drive by defragmenting it first?
Rarely worth it. Defragmentation writes to the same drive and can leave the cache area fuller than it was, which makes the clone slower.
Is 15 hours normal for a 2 TB SMR drive?
It happens on a drive whose cache area is saturated. A clean, idle shingled drive usually finishes in three to six hours, while a healthy conventional drive needs about two.
For realistic numbers at each interface speed, see how long a disk clone takes.
Related Articles
- Clone Write Speed Drops Halfway Through
- How to Clone a Failing HDD Before It Dies
- How to Clone a Hard Drive with Bad Sectors
- How Long Does a Disk Clone Take?
- HDD to SSD Clone Stuck at Preparing
Products
Articles & Tutorials
- Data Recovery
- Data Backup
- File Recovery
- File Backup
- System Backup and Restore
- Disk and Partition Clone
- Technical articles
- Mobile articles
- Disk Master Help
- Windows Data Recovery Tutorials
- Windows Secure Delete Tutorials
- Windows Partition Management Tutorials
- Windows File Backup and Restore Tutorials
- Windows System Backup and Restore Tutorials
- Windows Disk Backup and Restore Tutorials
- Windows Clone Tutorials