Clone Stuck at 99 Percent: Why It Hangs and How to Finish
Quick Navigation:
- What the Last Percent Is Doing
- Wait or Stop: Read Disk Activity
- What a Forced Stop Leaves Behind
- Finish the Job with Qiling Disk Master
- Frequently Asked Questions
A progress bar that climbs to 99 percent and then stops is one of the most misleading screens a clone can show. The blocks themselves are already copied, the estimate has run out of work to average, and what is left is a short list of jobs the bar never displays: flushing the write cache of the target, closing the file system cleanly, and writing the boot records that let the new disk start. When one of those jobs stalls, the percentage stalls with it, so the real question is not how full the bar looks but whether the drives underneath still have work to do.
What the Last Percent Is Doing
A clone is measured in blocks rather than files, and the bar is an estimate built from the average speed of the blocks already written. On a slow source or a drive that slows down as it fills, the estimate drifts ahead of the actual work, which is why many jobs race to the high nineties and then appear to freeze while the remaining metadata is written.
Three operations sit behind that final number. The engine flushes the write cache of the target so every block is on the media rather than in the drive buffer, it may verify what it wrote, and it updates the partition table and the boot code so the copy can start on its own. None of these steps moves a large amount of data, but each of them can wait on hardware, and the percentage cannot advance until they return.
A failing source disk is the most common reason the wait becomes long. When a block cannot be read, the drive retries it internally, sometimes for several seconds, before it reports an error and the engine moves on. A handful of bad sectors near the end of the disk is enough to hold the bar still for minutes at a time, and the progress window gives no hint that a retry is in progress.
External targets add a second kind of delay. A USB enclosure keeps its own write cache, and a large buffer that has to drain over a slow bridge looks exactly like a hang. The same effect appears when the target has dropped off the bus and Windows is retrying the connection, or when an antivirus scan has opened the files the clone just wrote and is holding a lock on them.
Wait or Stop: Read Disk Activity
Before touching anything, look at what the drives are doing. Task Manager, on the Performance tab under each disk, and Resource Monitor, on the Disk tab, both ship with Windows and show active time, queue length, and throughput per drive. A target with high active time and steady writes is still working, even if the dialog has not changed; a target with no activity at all is not.
Read the two drives separately. Heavy activity on the source with very low throughput points at repeated read retries on damaged sectors, which means the job is progressing slowly rather than hanging. No activity on either disk for ten minutes or more points at a lock, a dropped USB connection, or an engine that is waiting on a message box hidden behind another window.
Time gives the answer a shape. The final percent of an ordinary SATA or NVMe clone should take seconds to a few minutes, because it moves metadata, not gigabytes. A shingled magnetic recording drive can stretch that to a much longer wait while it rewrites tracks, and a failing drive with retries can take an hour. If the activity lights are still blinking, give it that hour. If the drives have been idle for half an hour and the bar has not moved, the job is not going to finish.
Antivirus software is worth ruling out early. Real-time protection scans new files as they land, and a scan that opens a volume the clone is still finalizing can block the last write. Pausing real-time protection for the duration of the copy is enough in most cases, and it changes nothing about the data on either disk.
What a Forced Stop Leaves Behind
Stopping a clone at 99 percent does not leave a disk that is 99 percent usable. The data blocks may be present, but the partition table, the boot records, and the file system journal are written at the end, so a target abandoned at that point can show as RAW, refuse to boot, or mount with folders that open to errors. The copy is only valid once the completion window appears and the Finish button becomes available.
Treat the source as the only complete copy and keep it that way. Do not initialize the half-written target, do not format it to make it usable, and do not run a repair tool on it in the hope that it will rebuild what the clone never wrote. Each of those actions overwrites the blocks that a later retry would have replaced anyway, and none of them can recreate the missing metadata.
Before the retry, copy the files you cannot lose to a third disk, or take a full image of the source when there is room. Once the source is safe, the target can be reused, because a new job rewrites the partition table and every partition it copies from the start. There is no resume point to return to after a stop.
Finish the Job with Qiling Disk Master
Qiling Disk Master reports each stage separately, so a copy that is finalizing shows as finalizing rather than as a frozen percentage, and the preview page lets you confirm the layout before any block is written. Keep both disks attached and watch the target in Resource Monitor during the last stage.
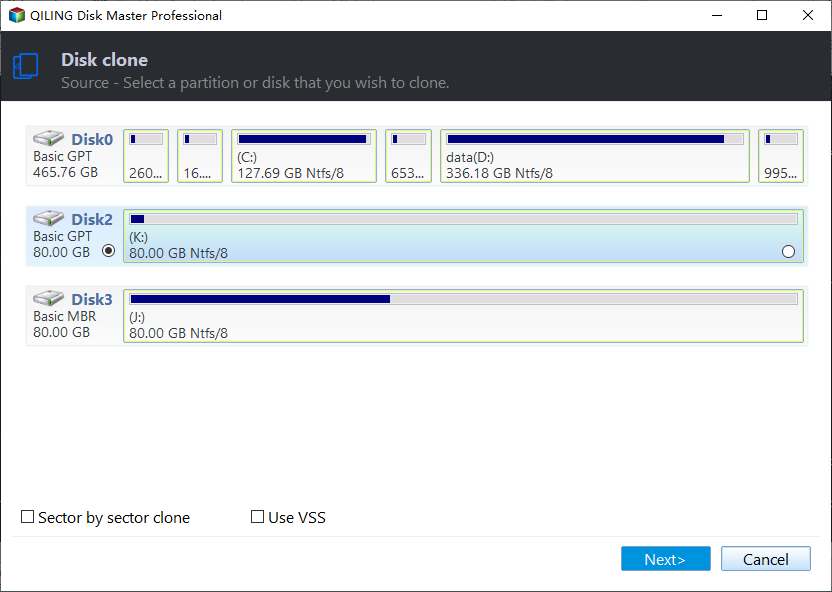
Step 1. Select the source disk. Open Disk/Partition clone from the Tools and utilities tab and choose Disk Clone for the whole disk. Tick the row of the disk that boots today, then check its model, capacity, and disk number against the label on the drive before you continue.
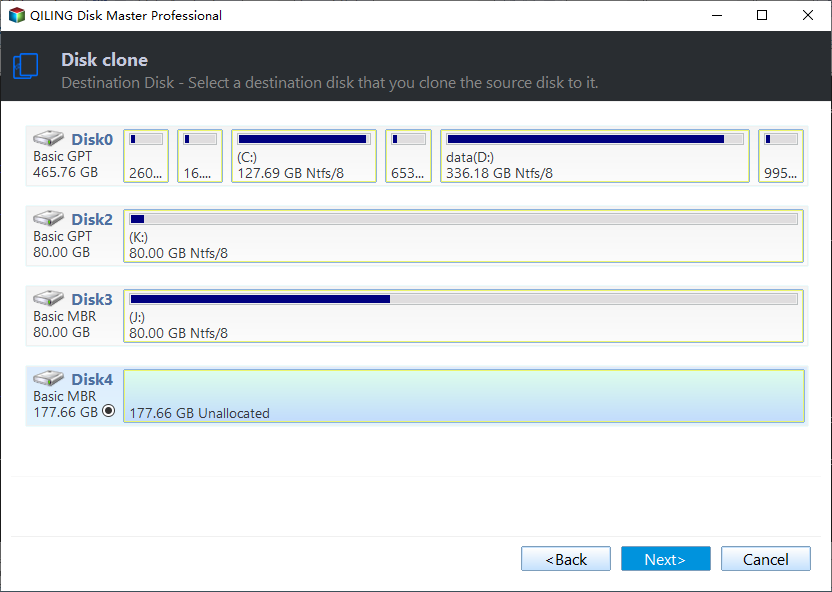
Step 2. Select the target disk. Read the model, the capacity, and the disk number of every destination row before you pick one, because the disk you choose loses its current partitions as soon as the job starts.
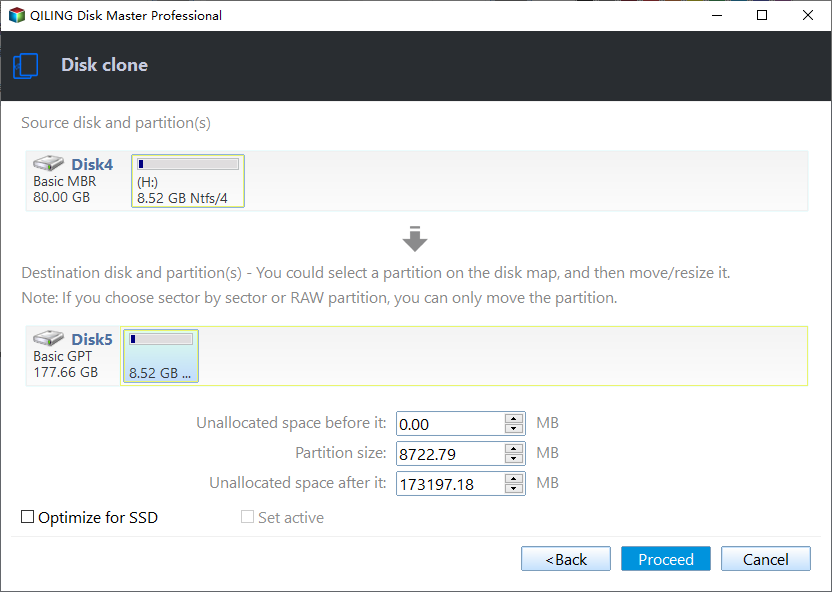
Step 3. Check the preview and enable SSD alignment. Confirm that every source volume, including the EFI system partition and the recovery partition, appears on the target side. Turn on SSD alignment when the destination is a solid state drive, and drag the end of the last partition when the target is larger than the source.
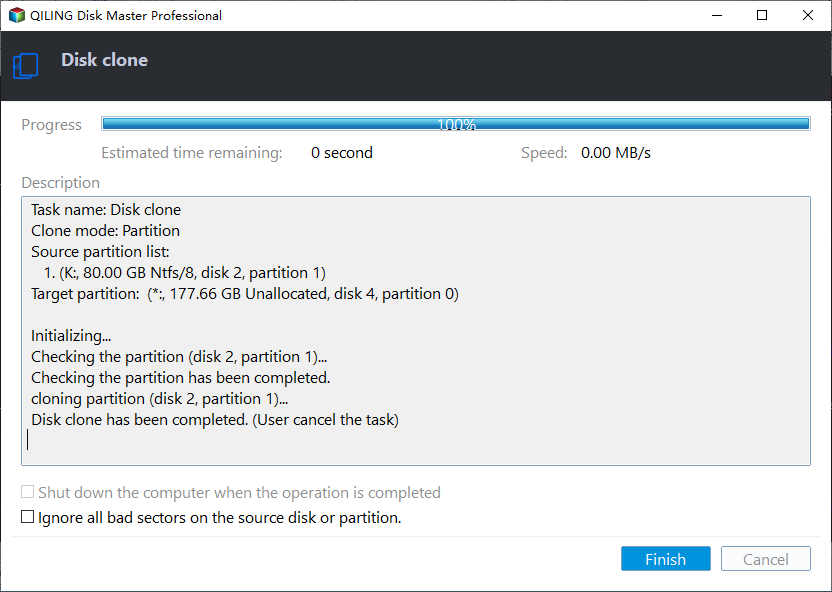
Step 4. Click Proceed and wait for the completion window. Enable Sector by Sector Clone only when the source reports bad sectors or an unclean file system, because it copies free space as well and takes far longer. Confirm the warning about the partitions on the target, then leave the machine alone: no sleep, no hibernate, and no unplugging an external target until Finish appears.
If the bar stops again, open Resource Monitor before doing anything else. A target that is still writing will finish on its own, and a target that has been silent for half an hour points at a bad sector or a dropped connection that a second attempt with a different cable, port, or enclosure usually clears.
Frequently Asked Questions
Is a clone at 99 percent almost finished?
The block copy is, but the metadata stage is not. The partition table and boot records are written at the end, so a target abandoned at 99 percent can be unbootable. Treat the copy as finished only when the completion window appears and the target opens normally.
How long should I wait before stopping the job?
Watch the disks rather than the bar. While the target shows steady write activity, let it run; the last percent can take an hour on a failing source or a shingled drive. If both drives have been idle for twenty to thirty minutes, the job is stalled and a restart is the faster route.
Can a stopped clone be resumed from where it left off?
No. Disk cloning writes sequentially and keeps no resume checkpoint, so a second attempt starts from the first block and rewrites the target. That is also why the target can be reused safely once the source has been backed up.
Related Articles
- Clone HDD to SSD Stuck at Preparing
- Target Disk Unallocated After Clone: Why and How to Fix
- Clone Fails Because Antivirus Blocks VSS
- Clone an SSD With Bad Sectors
- Clone Through a USB Hub Fails
Products
Articles & Tutorials
- Data Recovery
- Data Backup
- File Recovery
- File Backup
- System Backup and Restore
- Disk and Partition Clone
- Technical articles
- Mobile articles
- Disk Master Help
- Windows Data Recovery Tutorials
- Windows Secure Delete Tutorials
- Windows Partition Management Tutorials
- Windows File Backup and Restore Tutorials
- Windows System Backup and Restore Tutorials
- Windows Disk Backup and Restore Tutorials
- Windows Clone Tutorials