Cloning Through a USB Hub Fails or Disconnects Midway
Quick Navigation:
- A Clone Runs Longer Than a File Copy
- Power and Bandwidth Contention
- Chipset, UASP, and Front Wiring
- Clone Again with Qiling Disk Master
- Frequently Asked Questions
A hub that has copied photos and documents for years can still ruin a disk clone. The difference is duration: a clone holds the link open for an hour or more at full throughput, and one dropped transfer in that window ends the job. Most failures here come from power and protocol, not from the cloning software.
A Clone Runs Longer Than a File Copy
A folder copy fills the link for a few seconds and then stops, which is far too short to expose a marginal connector or a hub that overheats. A disk clone drives the same path continuously until every used sector has been written.
The destination has to stay enumerated for the whole run. When the bridge resets, the write cache empties and the commands in flight are lost, so the job stops at that byte and reports an error that looks like a disk fault.
The source disk is never written, so a failed clone leaves your data where it was. The damage is to the destination, which is left with a partial partition table and must be prepared again before it can be reused.
Power and Bandwidth Contention
A 2.5-inch drive in a bus-powered enclosure draws its spin-up current through the port, and the peak can exceed what a hub shares across all of its ports. A hub with no power adapter splits a fixed budget between a keyboard, a phone, and a hard drive.
When the voltage sags, the bridge drops off the bus and Windows reports the device as removed. The clone then fails at the same moment, and the log shows a write error rather than a full disk.
Bandwidth is shared on the same path. A webcam, a capture card, and an SSD behind one hub divide a single upstream link, so the SSD receives only what is left and the transfer stretches far beyond the expected time. A link that is capped this way also keeps the job running long past the point where the drive would normally settle, which is why a clone that slows down halfway is usually a port problem before it is a disk problem.
Chipset, UASP, and Front Wiring
The bridge chip inside the enclosure decides which protocol it uses. UASP queues multiple commands and reaches much higher throughput than the older bulk-only transport, and every hub in the path has to pass that protocol through.
Some hubs fall back to bulk-only for all devices behind them, which caps the link and raises the chance of a stall under sustained writes. Others share one transaction translator across all ports and cannot keep up when a single device writes without pause.
Front-panel ports add an internal cable, a header on the board, and often a passive splitter. That path is fine for a mouse and marginal for a drive that writes for two hours, especially on a case with thin wiring.
Device Manager reports whether the enclosure negotiated USB Attached SCSI or the older protocol. Device Manager is a Windows tool and not part of Qiling Disk Master; it only shows what the link agreed to, and a bulk-only negotiation explains a low ceiling on its own.
Clone Again with Qiling Disk Master
Qiling Disk Master writes the destination through the same port the system sees, so the fix is physical: remove the hub and use a port on the board. Run the job once with that direct connection before assuming the SSD itself is at fault.
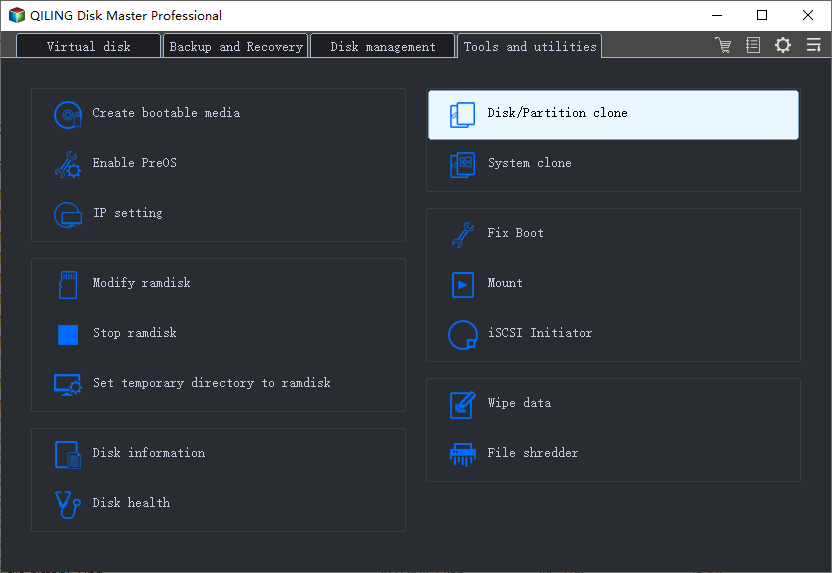
Step 1. Open Disk/Partition Clone
On the Tools and utilities tab, click Disk/Partition clone. The entry opens the full disk copy, which is the mode that will exercise the link for the longest time.
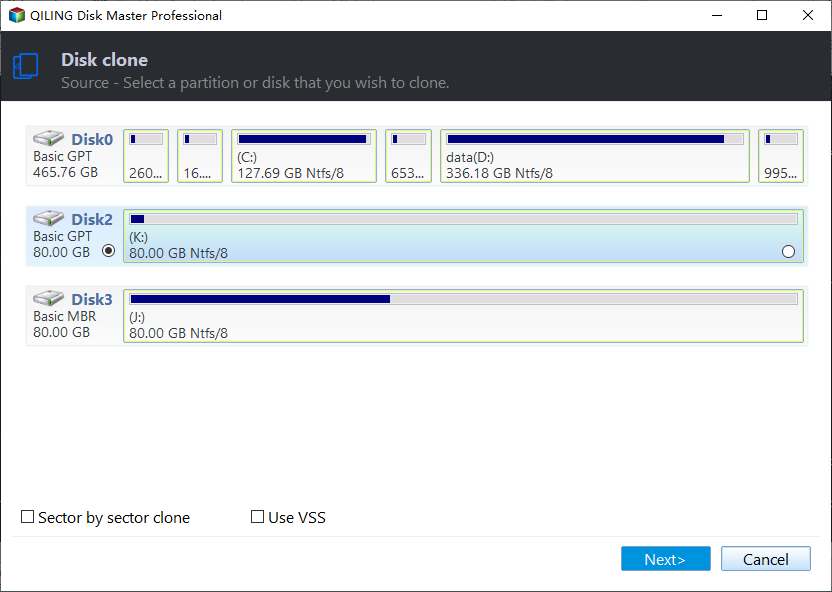
Step 2. Select the Source Disk
Choose the source and click Next. Keep the default copy for a healthy drive, since a sector-by-sector run adds hours of writing and gives the link more chances to fail.
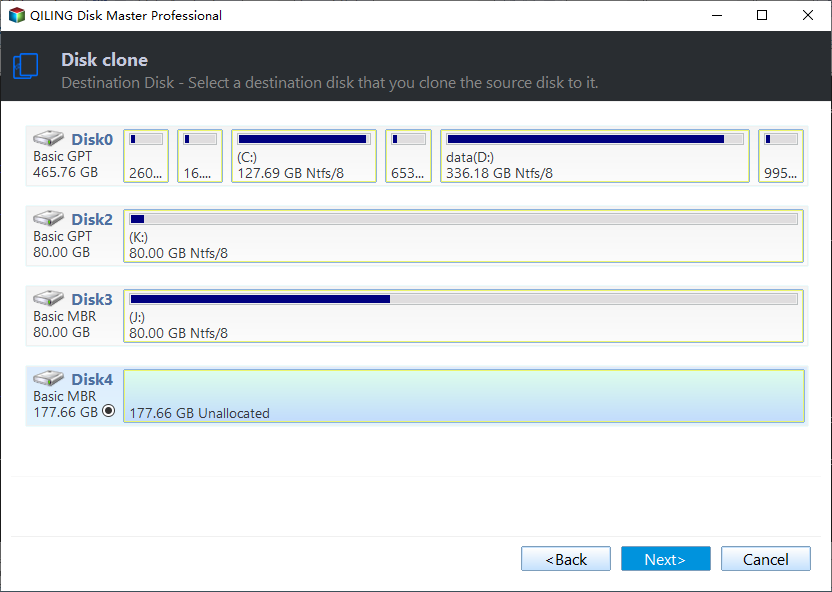
Step 3. Select the Destination Disk
Pick the destination and confirm that its capacity and model are listed once, not twice. A duplicate entry usually means the device re-enumerated while the page was open, which is the same fault that ends a clone.
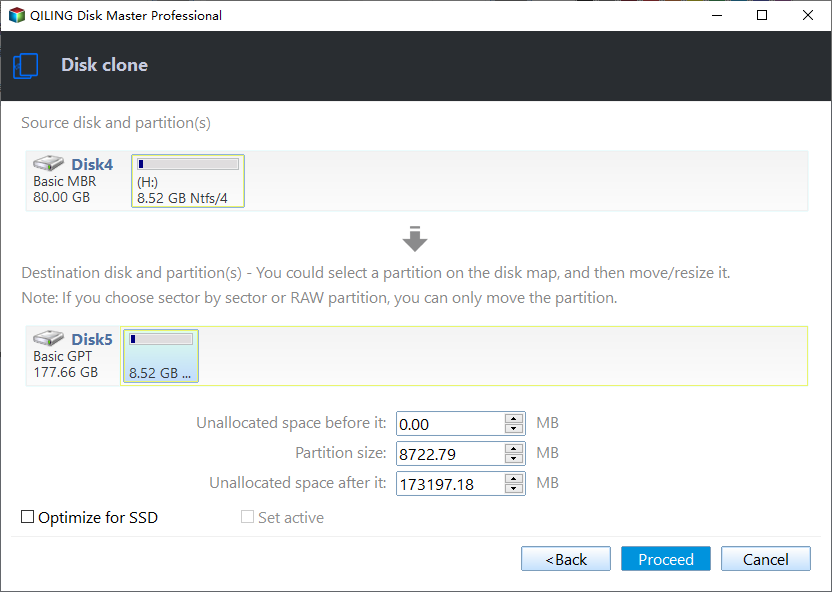
Step 4. Check the Preview and Click Proceed
Confirm the layout, choose Autofit the disk when the destination is larger, and click Proceed. Leave the machine alone while it runs, because plugging another device into the same controller can take bandwidth away mid-copy.
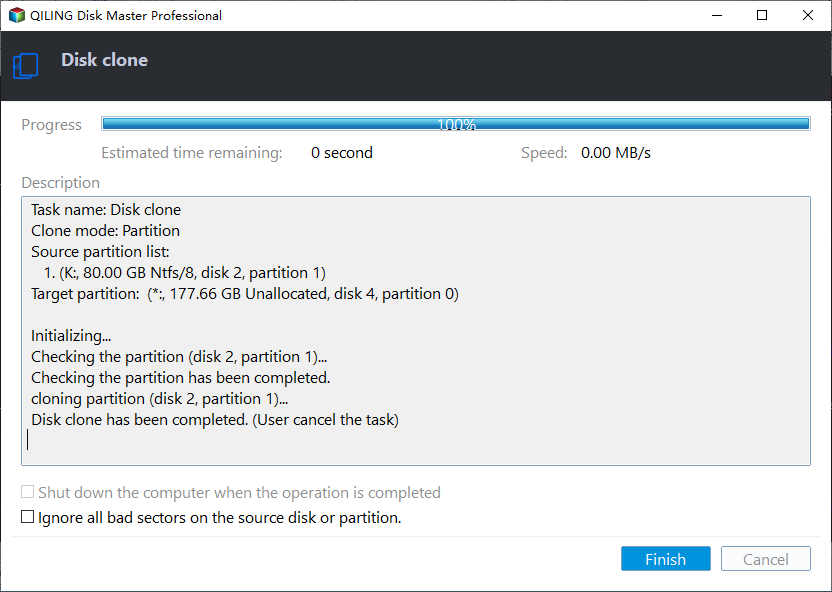
Step 5. Read the Finish Window
A completed job reports 100 percent and the line Disk clone has been completed. If the window names a write error instead, the destination was cut off mid-job and should be checked before another attempt.
If the destination is a portable drive that will keep living on a hub, read an external drive that disconnects during large copies before you trust it with backups.
Frequently Asked Questions
Will a powered hub solve the problem?
It solves the power half and leaves the rest. A powered hub still shares one upstream link and may still force bulk-only transport, so a direct rear port remains the reliable choice for a clone.
Can a failed clone damage the source disk?
No. A clone only reads the source, so an interrupted job leaves that disk unchanged. The destination is the only device that ends up in an inconsistent state.
Does the destination need to be initialized again?
Usually yes. The interrupted run leaves a partial partition table, and the tool may show the disk as uninitialized or as free space. Write a fresh layout to it before the next attempt, and confirm the full capacity appears first.
Related Articles
- How to Clone a Drive with a Docking Station
- Clone an HDD to an SSD with a USB Cable Only
- External Hard Drive Disconnects During Large File Copies
- SSD Not Detected After Cloning
- Disk Clone Stuck at 0% or 99%: Causes and Fixes
Products
Articles & Tutorials
- Data Recovery
- Data Backup
- File Recovery
- File Backup
- System Backup and Restore
- Disk and Partition Clone
- Technical articles
- Mobile articles
- Disk Master Help
- Windows Data Recovery Tutorials
- Windows Secure Delete Tutorials
- Windows Partition Management Tutorials
- Windows File Backup and Restore Tutorials
- Windows System Backup and Restore Tutorials
- Windows Disk Backup and Restore Tutorials
- Windows Clone Tutorials