UEFI Boot Entry Missing After Clone: Add It Back
Quick Navigation:
- Why the Firmware Does Not Offer the New Disk
- Back Up Before You Edit the Boot Configuration
- Confirm the EFI Partition, Then Write the Entry
- Clone Again with Qiling Disk Master
- Frequently Asked Questions
The clone completed, Disk Management shows the new SSD with an EFI system partition and a Windows volume, and the firmware boot menu still lists a single entry that starts the old disk. Nothing in the copy is damaged. What is missing is a boot variable, a small record in the non-volatile memory of the motherboard that tells the firmware which loader to run and on which partition to find it. A clone copies partitions and files. It does not write that record, so on a UEFI machine the new disk has to be announced to the board before it can start.
Why the Firmware Does Not Offer the New Disk
UEFI boot entries live in the firmware memory, not on any disk, and each one stores a device path to a loader file on a partition identified by a GUID. Windows setup creates an entry called Windows Boot Manager that points to the Microsoft loader inside the EFI system partition. A clone reproduces the loader file on a new partition with a new GUID, so the existing entry still resolves to the old disk, and nothing describes the copy.
Some boards fall back to a fixed path, the removable media loader inside the EFI partition, when no entry exists. Windows does not put its loader there, which is why a perfectly valid clone stays invisible in the menu. The disk is bootable in the technical sense and unusable in practice until an entry points at it.
A clone that skipped the EFI partition has a harder problem. System clone moves the Windows volume and the files needed to start it, but a partition-level copy of C: leaves the boot files behind. The same applies to a copy taken from a legacy disk and written to a GPT target without the supporting partition layout: there is no EFI loader on the disk, so no entry can be created.
Firmware settings hide entries as well. With CSM or legacy support enabled, the setup screen can show only the legacy devices, and a UEFI entry that exists is simply not displayed. Secure Boot with a loader that fails validation, or a board that silently removes entries it cannot start, produces the same empty list.
Back Up Before You Edit the Boot Configuration
Changing the boot configuration writes to the EFI partition and to firmware memory, and a mistake there can leave both disks unbootable at once. Treat the old disk as the rollback: keep it untouched, keep it connected while you work, and do not erase it until the new disk has started on its own several times.
Create an image of the source, or at least copy the folders you cannot lose to a third disk, before any repair tool touches the EFI partition. Keep a Windows installation USB within reach as well, because it is the only way back into the recovery environment when the boot files are gone.
Write down the firmware settings you find, boot mode and Secure Boot state included. A machine that was cloned in one mode and is being started in another has a second fault behind the missing entry, and notes make that visible before you change anything else.
Confirm the EFI Partition, Then Write the Entry
Open Disk Management and look at the start of the target disk. A healthy UEFI layout begins with a FAT32 partition labelled EFI System Partition, usually between 100MB and 500MB, followed by the reserved partition and then Windows. If that partition is absent, stop here: the clone has to be repeated with the full disk layout before any entry can point anywhere.
Restart into the firmware setup and read the boot page. Confirm that the machine boots in UEFI mode rather than legacy or CSM, note the Secure Boot state, and look for entries named Windows Boot Manager. One entry that names the old disk and none for the new one confirms the diagnosis used in this guide.
bcdboot is the Microsoft tool that copies the boot files from a Windows volume to an EFI partition and registers a matching firmware entry. bootrec, from the recovery environment, rebuilds boot records for the repair cases that bcdboot does not cover. diskpart only assigns a drive letter to the EFI partition so the other tools can reach it, and Disk Management is used to read the layout. All four ship with Windows. None of them is part of Qiling Disk Master, which performs the copy and never edits firmware entries or boot records.
The repair itself runs from the recovery environment on the Windows installation media: open a command prompt, give the EFI partition a temporary letter, run bcdboot with the path of the Windows folder and that letter, then remove the letter and restart. If bcdboot reports that it cannot find the boot files, the Windows volume on the target is incomplete, or the EFI partition is too small to hold them.
When the machine restarts, the new entry appears in the boot menu and can be moved to the top. Keep the old entry until the new disk has booted alone, then remove it so a failed disk cannot delay every start. A machine that reports no bootable device follows a different path and is worth checking when no entry can be created at all.
Clone Again with Qiling Disk Master
Qiling Disk Master copies the EFI system partition together with the Windows and recovery volumes in one job, which is what a UEFI board needs before an entry can be written. Use Disk Clone rather than System clone when the target is a bare disk, and check the preview for the small FAT32 partition before you start.
Operation 1: Select the Source and the Target
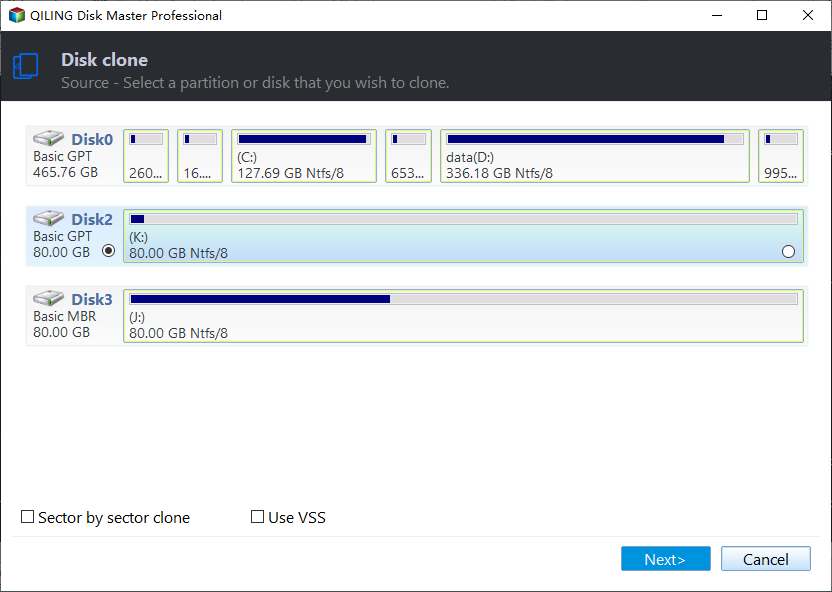
Step 1. Select the source disk or partition. Open Disk/Partition clone from the Tools and utilities tab and pick Disk Clone for a full copy. The disks attached to the machine appear in the list and are selectable directly: tick the disk that holds the current UEFI installation, with no separate step to add it. Leave Sector by Sector Clone off unless the source has bad sectors, since it copies free space as well.
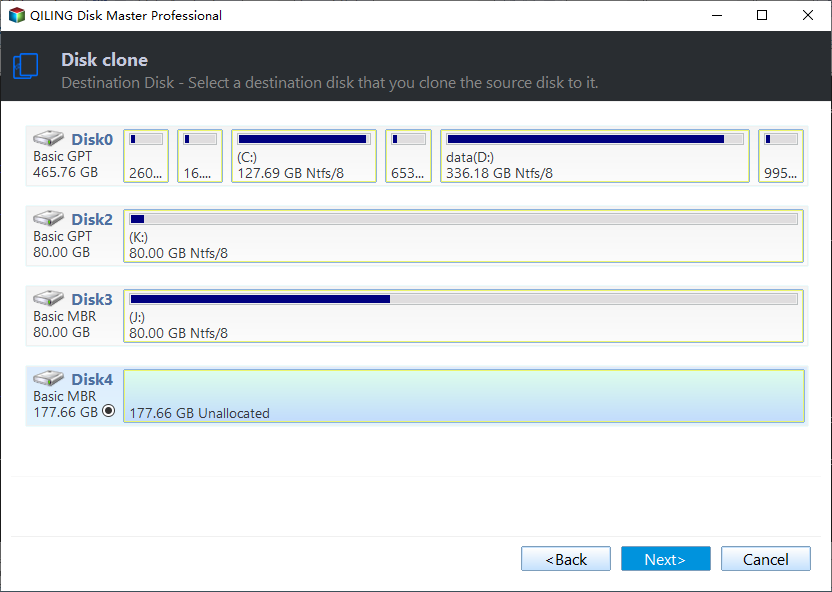
Step 2. Select the target disk. Choose the SSD that will receive the copy and check its number against the layout you read in Disk Management. The existing partitions on that disk are removed when the job starts, so a disk that still holds data is the wrong choice.
Operation 2: Preview the EFI Partition and the Windows Volume
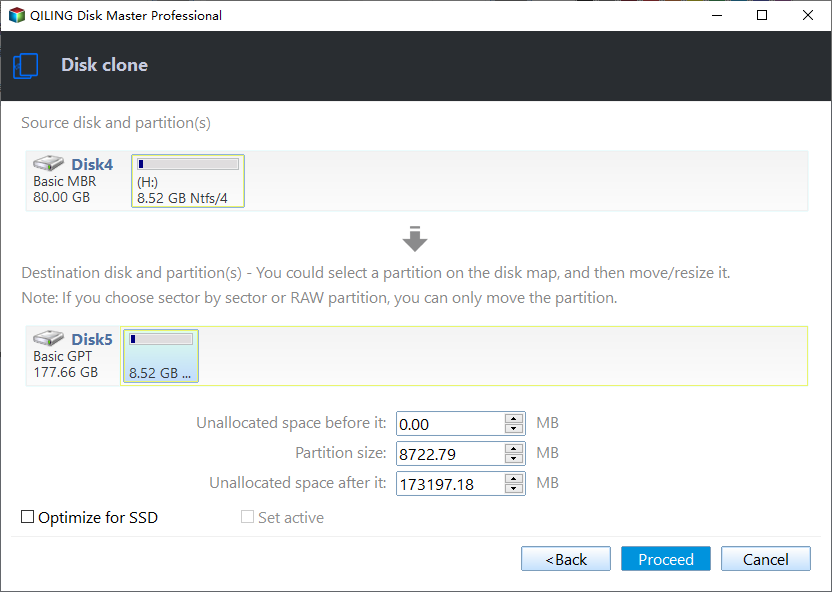
Step 3. Preview the layout, align the SSD, and adjust the partitions. The preview lists the source partitions on the left and the planned target on the right. Turn on SSD alignment, stretch the last partition into the free space when the target is larger, and confirm that the EFI system partition, the reserved partition, Windows, and the recovery volume are all present on the target side. A missing EFI partition here is the reason the firmware will have nothing to list later.
Operation 3: Proceed and Boot the Copy
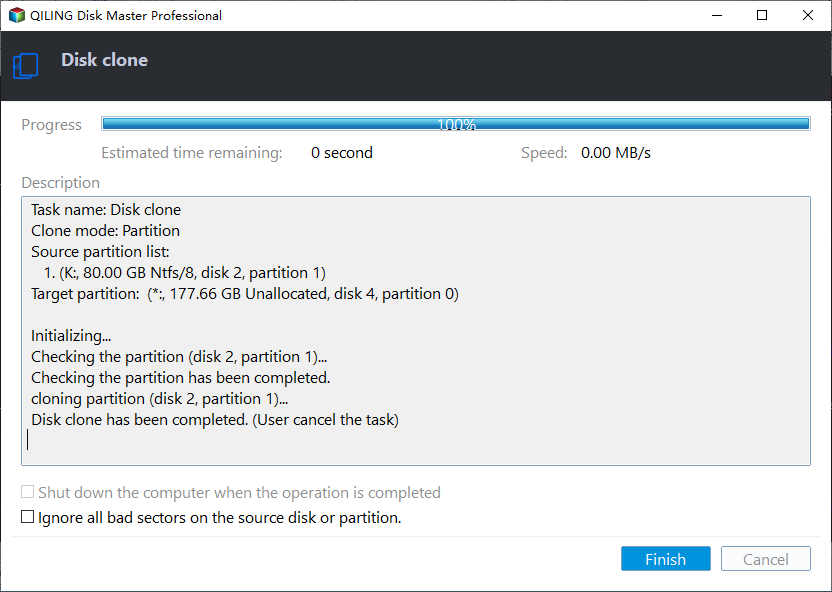
Step 4. Click Proceed and watch the progress to the end. Accept the overwrite warning and let the job run without sleeping, hibernating, or unplugging the target. Wait for the completion window with Finish enabled, then shut the machine down, disconnect the old disk, and start with only the new SSD attached.
If the board still offers no entry with the old disk removed, the firmware is not enumerating the new drive or the boot mode does not match the layout on it. Fix that before you look for a software fault, because an entry cannot point at a disk the board refuses to see.
Frequently Asked Questions
Why does Disk Management see the SSD while the boot menu does not?
Because the two lists are built from different sources. Disk Management asks Windows about attached hardware, while the boot menu lists firmware variables that point at a loader file. A disk can be fully visible in Windows and still have no entry, which is the normal state right after a clone.
Does adding a boot entry damage the old installation?
No. bcdboot copies boot files to the EFI partition it is pointed at and registers an entry for that volume, and the old entry stays where it was. Problems come from writing to the wrong partition, which is why the disk and partition numbers are checked first.
Can I clone again instead of repairing the entry?
Only when the EFI partition is missing or undersized. A second clone produces the same files and still leaves the firmware without an entry, so the entry has to be created or selected once the copy is bootable.
Related Articles
- No Bootable Device After Cloning
- Cloning a Boot Drive with Multiple EFI Partitions
- Clone a GPT Disk to MBR for Legacy BIOS Boot
- Cloned SSD Fails Update 0x800f0922 on the ESP
- Cloned SSD Still Boots From the Old Drive
Products
Articles & Tutorials
- Data Recovery
- Data Backup
- File Recovery
- File Backup
- System Backup and Restore
- Disk and Partition Clone
- Technical articles
- Mobile articles
- Disk Master Help
- Windows Data Recovery Tutorials
- Windows Secure Delete Tutorials
- Windows Partition Management Tutorials
- Windows File Backup and Restore Tutorials
- Windows System Backup and Restore Tutorials
- Windows Disk Backup and Restore Tutorials
- Windows Clone Tutorials