Cloned SSD Still Boots From the Old Drive: How to Switch
Quick Navigation:
- Why the Old Disk Still Starts
- Set the Firmware Boot Order
- Two Windows Boot Manager Entries
- Clone Again with Qiling Disk Master
- Frequently Asked Questions
A clone that reports success and a PC that still starts from the original disk is one of the most common results after an SSD upgrade. Nothing failed: the copy is complete, but the machine was never told to use it. The switch happens in the firmware boot list, and the test that proves it is to remove the old drive.
Why the Old Disk Still Starts
A disk clone copies the EFI system partition, the Windows partition, and the recovery tools, so the new SSD holds everything a boot needs. What it cannot copy is the firmware's list of boot entries, because that list lives in the memory of the motherboard, not on any disk.
On a UEFI system each entry stores a path to a boot loader on a specific partition of a specific disk. With both disks attached, the path recorded first still resolves to the old drive, so the board starts that drive even though a better copy exists beside it.
A legacy BIOS board behaves the same way through its hard disk boot order. The clone changes what is inside the disks, not the order in which the board looks at them, so the first position has to be changed by hand.
Set the Firmware Boot Order
Restart and press the key the board shows at power-on, usually Del or F2. Open the Boot tab and read the entry list from the top: the first item is what the machine will start on the next power cycle.
Two entries that both read Windows Boot Manager are normal after a clone. One belongs to the old disk and one to the new SSD, and most boards add the model name or the capacity after the label, which is enough to tell them apart.
Move the SSD entry to the top, save the change, and let the machine restart. If the board shows only one generic entry, use the one-time boot menu instead, typically F12 or F11, and pick the SSD by name for a single boot.
The firmware setup belongs to the motherboard and is not a feature of Qiling Disk Master. The clone tool fills the disk with the files the entry points to; it never edits the entry itself.
Two Windows Boot Manager Entries
Distinguish the entries by the disk label whenever the models differ, since a 1 TB Samsung and a 500 GB WD are easy to separate. Two drives of the same model look identical in the list, and the label alone will not help.
The reliable test is to remove the old disk. Power off, unplug the SATA cable or lift the M.2 drive that held the original system, and start the machine with only the clone attached. A PC that reaches the desktop is already booting from the new SSD, and only the entry order remains to be fixed.
A PC that reports no bootable device has a different problem: the clone skipped the EFI partition, the disk was cloned in legacy mode while the board boots in UEFI mode, or the firmware never enumerated the new drive. A cloned drive that will not boot walks through those checks in order.
Remove the stale entry only after the new disk boots on its own. Many boards allow deletion from the same Boot tab, and an entry that points at a disk you are about to erase will cause a failed start later, when the machine tries it first.
Clone Again with Qiling Disk Master
Qiling Disk Master copies the EFI system partition, the Windows partition, and the recovery partition as one job, which is what a bootable SSD needs. Check the preview before you start, because a missing EFI partition is visible there and is far cheaper to fix than after the copy.
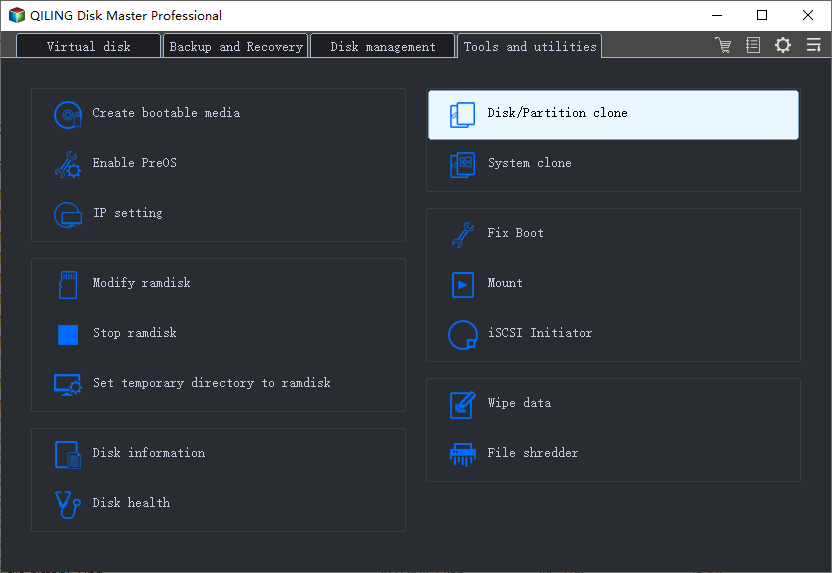
Step 1. Open Disk/Partition Clone
On the Tools and utilities tab, click Disk/Partition clone. Use this entry for a full disk copy; System clone copies only the Windows partition and leaves the boot files where they were.
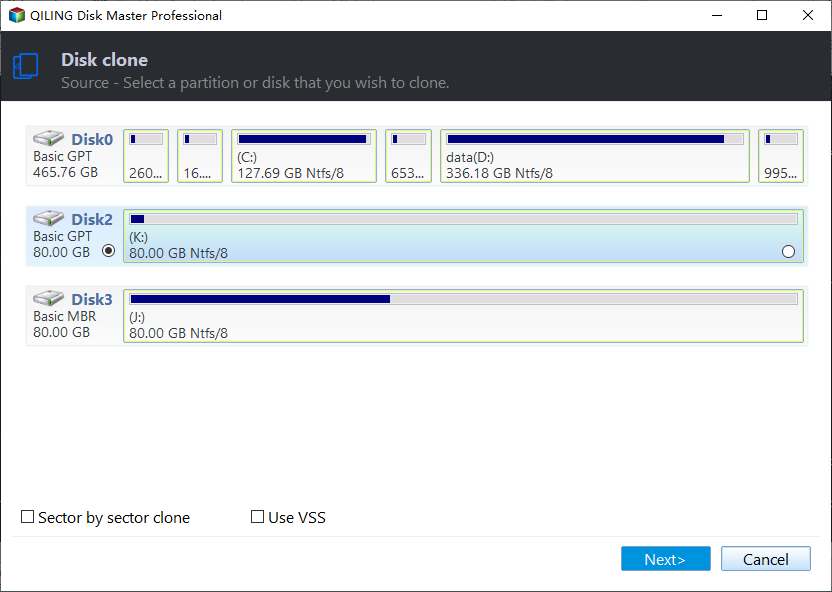
Step 2. Select the Source Disk
Choose the disk that currently boots and click Next. Leave the sector-by-sector option off for a healthy drive, since it copies free space as well and lengthens the job without adding a usable file.
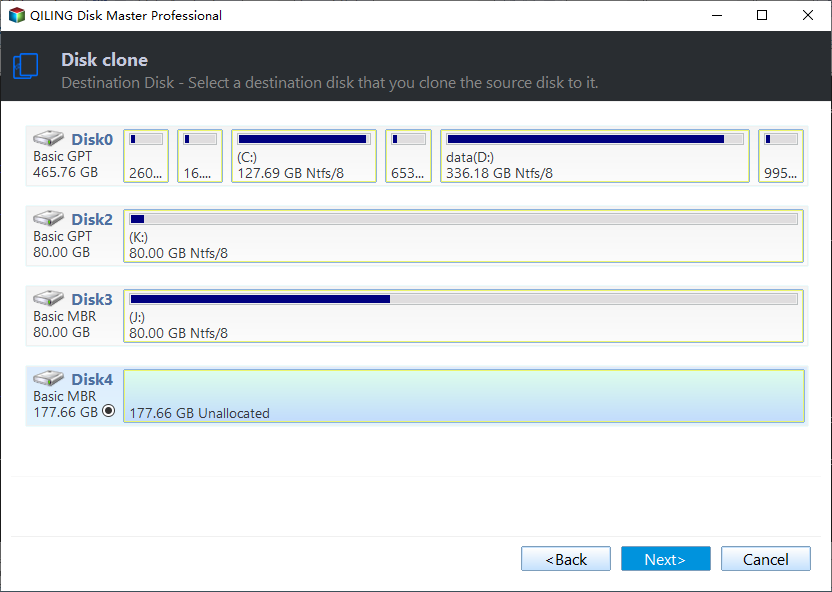
Step 3. Select the Destination SSD
Pick the new SSD and confirm that its capacity and partitions are listed correctly. A drive that reports zero capacity, or that appears twice, is a sign of a loose connection or a bridge that dropped the link, and the job should wait until that is fixed.
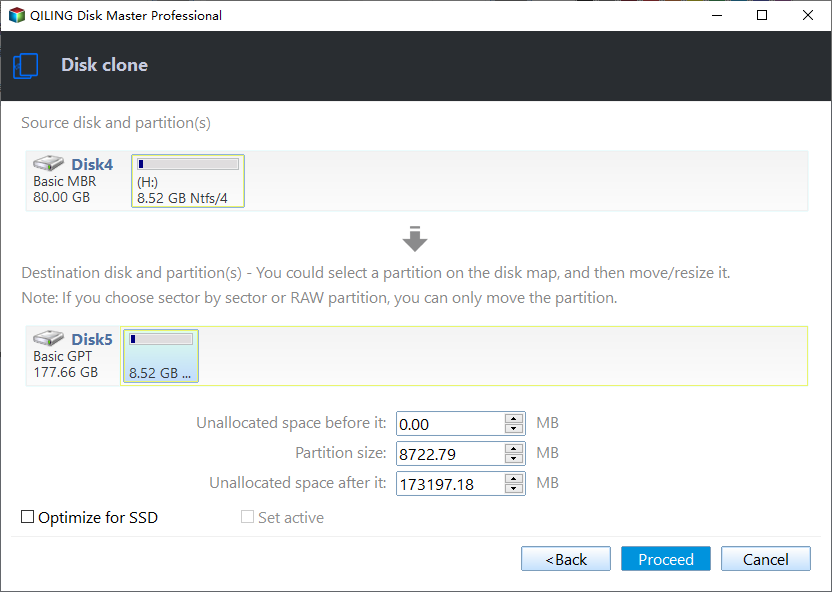
Step 4. Check the Preview and Click Proceed
The preview page shows the EFI partition, the Windows partition, and the recovery partition on the destination side. Tick the SSD option so the layout is aligned for solid state, choose Autofit the disk to use the full capacity, then click Proceed and accept the overwrite warning.
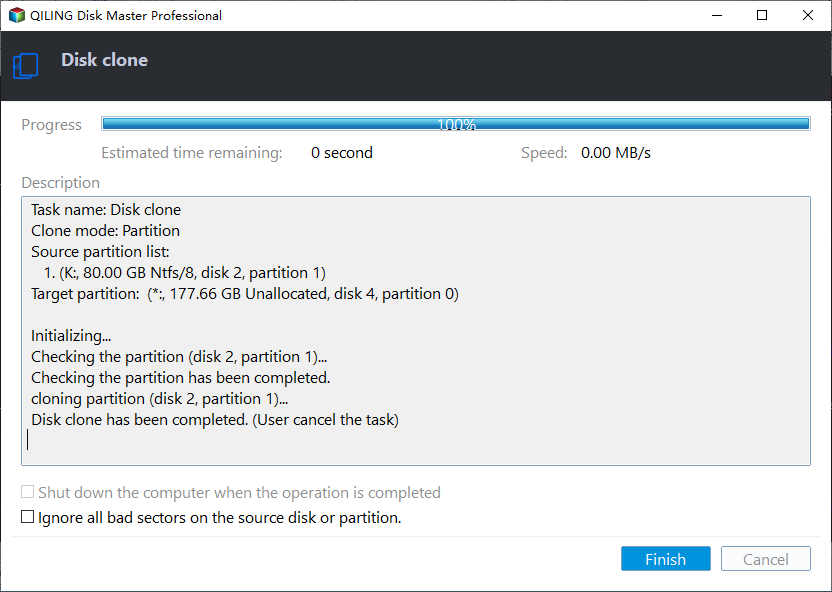
Step 5. Confirm the Finish Window
A complete run reports 100 percent and the line Disk clone has been completed, with the Finish button enabled. Start the machine with only the SSD connected, and if it reaches the desktop, move that disk to the top of the firmware boot list.
If the board still prefers the old disk, check that the clone included the EFI partition as described in cloning a boot drive with multiple EFI partitions.
Frequently Asked Questions
Why does the boot list still show the old disk first?
Because the order is stored in the motherboard, not on the disk. A clone copies files and partition structures; it does not write the non-volatile boot variables, so the first entry keeps pointing at the original drive until you change it.
When is it safe to erase the old disk?
After the new SSD has started on its own several times, with the old drive physically disconnected, and after you have opened your important folders from it. Keep the old disk untouched until then, because it is the only rollback you have.
The SSD does not appear in the boot list at all. Why?
Some M.2 slots share lanes with a SATA port and disable it when both are used, and a disk cloned in legacy mode is invisible to a board in UEFI mode. Confirm the drive shows its full capacity first, then check the boot mode before cloning again.
Related Articles
- Cloned Drive Won't Boot: Causes and Fixes
- No Bootable Device After Cloning
- Cloned Drive Gives 0xc000000e Boot Error
- Drive Letter Changed After Cloning
- SSD Not Detected After Cloning
Products
Articles & Tutorials
- Data Recovery
- Data Backup
- File Recovery
- File Backup
- System Backup and Restore
- Disk and Partition Clone
- Technical articles
- Mobile articles
- Disk Master Help
- Windows Data Recovery Tutorials
- Windows Secure Delete Tutorials
- Windows Partition Management Tutorials
- Windows File Backup and Restore Tutorials
- Windows System Backup and Restore Tutorials
- Windows Disk Backup and Restore Tutorials
- Windows Clone Tutorials