SATA Cable or Port Causing Disk Drops: How to Isolate It
Quick Navigation:
- Why a SATA Link Drops
- Copy the Data Before You Reseat Anything
- Isolate the Cable, the Port, and the Power
- Test, Back Up, and Move the Disk
- Frequently Asked Questions
The drive is listed one minute and gone the next, or it stays visible while the event log fills with controller warnings. A disk that keeps dropping offline is often blamed on the drive, yet the SATA cable, the port, and the power connector fail far more often than the platters do. The link is a chain of small mechanical contacts, and one marginal contact is enough to reset it. Work from the data outward: copy what you need, then change one part at a time until the drops stop.
Why a SATA Link Drops
A SATA data cable carries a high-frequency signal over thin conductors, and it is far more fragile than it looks. A cable that has been folded behind a drive cage, pinched by a side panel, or held at a sharp angle can still work at times and fail under heat or vibration. The connector latch breaks easily, and a plug that sits loose in its socket produces exactly the intermittent contact that shows up as a reset.
The port and the connector wear out as well. Contacts on the board oxidize slowly, a backplane socket loses tension after repeated drive swaps, and a hot-swap bay that was never designed for the vibration of a nearby fan can interrupt the link for milliseconds. The drive reports the interruption as a reset, and the controller may log a timeout even though the drive is healthy.
Power is the third part of the chain. A SATA power splitter, a daisy chain of adapters, or a marginal rail in an older power supply can drop below the current the motor needs at spin-up. The drive then restarts and renegotiates the link, which looks identical to a data cable fault from inside Windows.
The controller and its driver can also be responsible. Some boards disable a SATA port when an M.2 slot is populated, an outdated storage driver may reset a port under load, and a drive firmware bug can drop the link when the host issues a power state change. Rising values in the reallocated sector and media integrity attributes shift suspicion back to the drive.
Copy the Data Before You Reseat Anything
Every drop interrupts whatever write was in progress. Copy the important folders to another disk now, before cables are moved and before any repair is attempted, because a disk that is only marginally connected may not come back after the next power cycle. Do not accept an offer to initialize the disk if it returns without its partitions.
An image of the partition is better than a folder copy when the disk has already dropped several times. The image keeps the files that no longer open, and it can be mounted later on a healthy disk. Save it to a drive on a different controller so a single port fault cannot interrupt both the source and the destination.
Keep the original disk in place while the copy runs. Reseating a cable is part of the diagnosis, but it is safer to do that after the data exists in two places, not before.
Isolate the Cable, the Port, and the Power
Device Manager, Disk Management, Event Viewer, and PowerShell are Microsoft tools and are not part of Qiling Disk Master. They are used here only to read what the controller reported; the backup, surface test, and clone later in this guide are performed with Qiling Disk Master.
Start with Event Viewer and the System log. Note the time of each drop, the disk number, and whether the source is the disk or the controller. Two or three entries an hour during idle time point at a mechanical or power contact, while a burst of entries during a large copy points at heat, current, or a driver.
Disk Management answers a different question. If the disk disappears from the list entirely, the link itself was lost. If the disk stays listed but the volume shows an error or turns offline, the link held and the file system or the volume took the damage. Device Manager shows whether the storage controller logged its own errors at the same moment.
Then change one physical part at a time and test after each change. Replace the data cable with a new one that has a working latch, move the plug to another SATA port, connect the power directly to the power supply instead of through a splitter, and finally move the drive to another bay or another machine. Run a long read between changes, because a link that fails once an hour will not reveal itself in a five-minute test.
If another known-good drive also drops in the same bay, the bay, backplane, or power run is the fault. If the suspect drive drops in every bay and on every cable, the drive is the fault. That single swap decides where the rest of the work goes.
Test, Back Up, and Move the Disk
Qiling Disk Master cannot repair a cable, and it does not pretend to. It can read the disk while Windows still sees it, show whether the surface is clean, and move the data to a disk on a healthy port. The three operations are separate, and the backup is the one that has to finish first.
Operation 1: Test the Disk Surface
This operation applies when the link has been stabilized and you need to know whether the drive itself caused the drops. It reads every sector and writes nothing.
Step 1. Start the surface test on the suspect disk. Select the disk in the main window, open Disk Surface Test, and begin the scan. Leave the case closed and the cables untouched during the test, so a drop is not caused by the person running it.
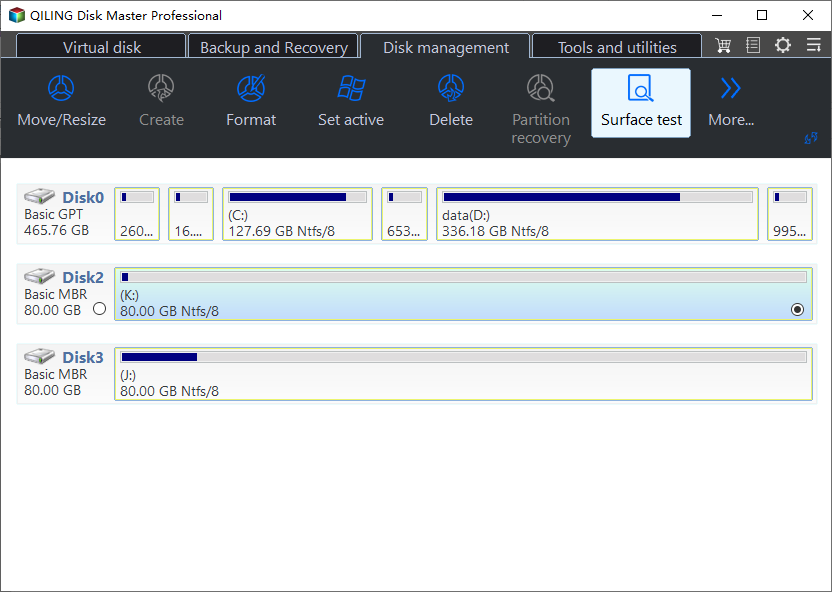
Step 2. Read the result in context. Unreadable blocks that cluster in one region indicate a failing drive. A completely clean scan after the cable and port were changed means the physical link was the cause and the drive can stay.
Operation 2: Back Up the Partitions
This operation applies as soon as the disk stays visible long enough to read, and it should be finished before the drive is moved to another bay.
Step 1. Select the partitions and a destination on another disk. Open Backup and Recovery, choose Disk/Partition backup, tick the partitions of the suspect disk, and set the destination to a disk connected to a different controller.
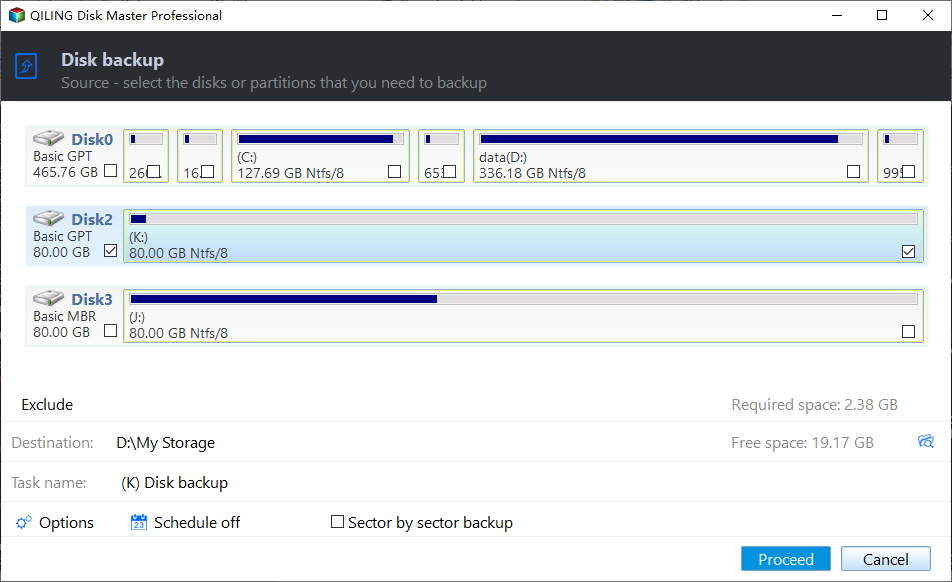
Step 2. Preview the task, click Proceed, and verify the image. Confirm the source and the destination in the preview, let the task finish, then open the image and copy a folder out of it. Verify before the drive is powered down for the cable swap.
Operation 3: Clone to a New Disk
This operation applies when the surface test found errors or when the drive is old enough that the data should not stay on it. The destination is overwritten.
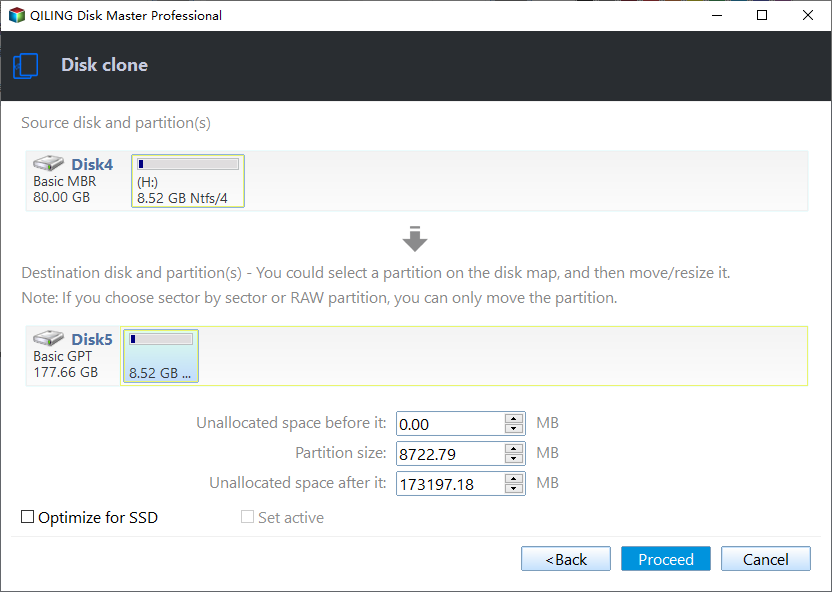
Step 1. Choose the failing disk as the source and the replacement as the destination. Open Disk/Partition clone, select the source disk, then the new disk on a healthy port. A larger destination leaves the extra space unallocated until you decide how to use it.
Step 2. Preview the task and click Proceed. Read the preview, start the clone, and keep both disks connected until it finishes. Boot or read from the new disk once before the old one is removed from the case.
Frequently Asked Questions
How do I know the cable is bad and not the drive?
Swap the cable and the port, then watch the event log for a day. If the errors follow the cable or the bay, the cable or the port was the cause. If they follow the drive into another machine, the drive is the cause.
Can a bad SATA power connector cause the same symptom?
Yes. A marginal contact on the power side drops under the current the drive needs at spin-up, and the drive restarts and renegotiates the link. Connect the drive directly to the power supply to rule the splitter and the adapter out.
Should I run a repair on the disk after a drop?
Copy the data first, then check the file system. A repair writes to a disk that may drop in the middle of the operation, and that is how a recoverable volume becomes a recovery project.
Related Articles
- SMART Attribute 0E Media Data Integrity Errors
- NVMe SSD Disappears From BIOS Intermittently
- M.2 Slot Disabled a SATA Port Through Lane Sharing
- Disk Online With Errors and a Bad Block Warning
- SMART 05 Reallocated Sectors Rising
Products
Articles & Tutorials
- Data Recovery
- Data Backup
- File Recovery
- File Backup
- System Backup and Restore
- Disk and Partition Clone
- Technical articles
- Mobile articles
- Disk Master Help
- Windows Data Recovery Tutorials
- Windows Secure Delete Tutorials
- Windows Partition Management Tutorials
- Windows File Backup and Restore Tutorials
- Windows System Backup and Restore Tutorials
- Windows Disk Backup and Restore Tutorials
- Windows Clone Tutorials