Windows Server 2025 Storage Pool Will Not Extend
Quick Navigation:
- Why the Pool Refuses New Capacity
- Check the Job Queue and Health
- Clear the Pending Job
- Add the Disk Back
- Frequently Asked Questions
A Storage Spaces pool on Windows Server 2025 accepts new capacity only when the pool is healthy and its job queue is empty. If a job stays at Pending, or a member still reports a stale state after a replacement, the extend request returns an error or quietly adds nothing, and the new disk waits in the primordial pool. The order below matters: clear the queue and the health warning first, confirm that every member reports normally, and only then present the disk to the pool.
1 Why the Pool Refuses New Capacity
Every change to pool metadata runs as a single job, and the pool will not start a second change while the first is unfinished. An extend request therefore waits behind the stalled job and then times out. This is a guard rather than a bug: two metadata writes applied at once could describe the same disk twice.
The refusal usually has one of four causes: a member reporting lost communication or an unhealthy operational status, a disk that still carries an old pool signature or partition table, a member whose model or firmware differs from the rest of the pool, or a job waiting on a disk that was physically removed.
Server 2025 also separates pool capacity from virtual disk size. Adding a disk grows the pool, but a thinly or fixed provisioned virtual disk does not grow with it, and a tier without free slabs refuses the allocation even when the pool reports free space. Compare both numbers before you decide that the pool ignored the disk.
2 Check the Job Queue and Health
Open Failover Cluster Manager, select the cluster, and go to Storage, then Pools. The storage jobs view lists each job with a state, a percentage, and any error text. Read the oldest unfinished job first, because every later request is waiting for it.
In the same console, check the health of the pool and of each physical disk. Online is not the same as healthy: a pool in Warning still serves reads, yet it refuses new allocations, which is why the capacity option looks broken while the data remains accessible.
Record the serial number, model, firmware, and site of every unhealthy member, then compare them with the disk you want to add. A disk from another model family, or one installed in a different site, is rejected even when it is empty and healthy.
3 Clear the Pending Job
Resolve the target of the oldest job first. A disk that dropped off the bus should go back to the same port on the same node, and a disk that is failing should be retired through the pool interface rather than pulled from the chassis, since a sudden removal creates the next stalled job.
Do not delete the job and do not restart the cluster to empty the queue. An interrupted metadata write leaves the pool half updated, and the pool may then report reduced resiliency on top of the original fault, which hides the real cause.
When the queue is empty and the pool reports Healthy, check the virtual disks as well. A virtual disk left in a degraded state keeps the pool from accepting capacity changes, and its repair job takes priority over anything queued after it.
4 Add the Disk Back
Before the layout changes, copy the data that lives on the pool to a disk outside it. Qiling Disk Master reads the volume that the pool presents as an ordinary drive letter, so the copy is a plain file copy that stays readable even if the pool later refuses to start.
Step 1. Check the Disk Map First
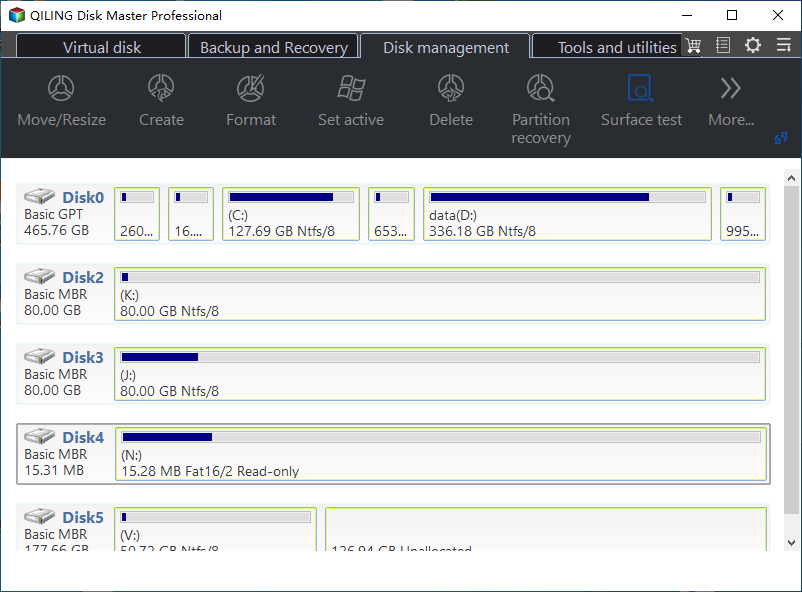
Open the program and switch to Disk management. Each physical disk appears as a card with its number, partition style, capacity, and the volumes it holds; in the sample, Disk 0 is a Basic GPT disk that carries the system and data volumes, while the smaller MBR disks each show one lettered volume and their unallocated space. Compare that list with the pool report and confirm that the disk you plan to add is the empty one.
Step 2. Copy the Pool Volume to a Spare Disk
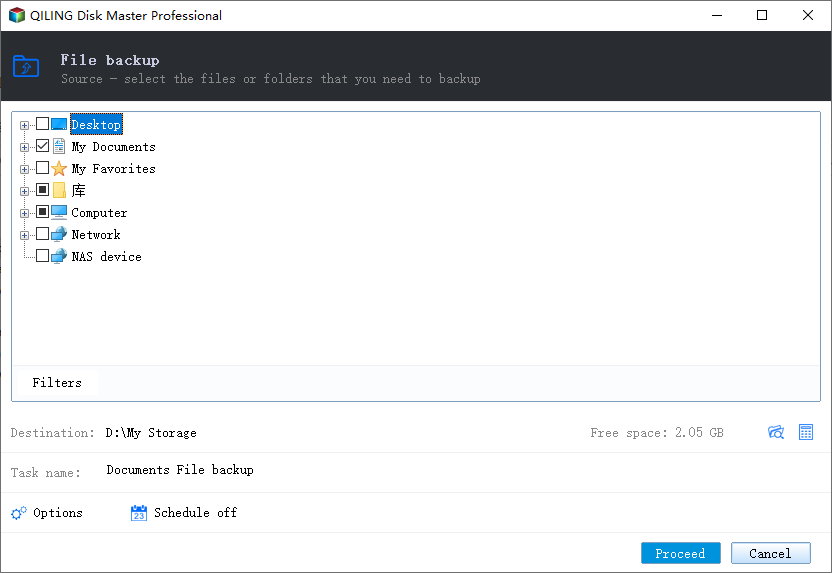
Open Backup and Recovery and choose File backup. In the source tree, expand Computer and tick the drive letter that the pool presents; the same tree offers Desktop, My Documents, My Favorites, Library, Network, and NAS device if the data sits elsewhere. Use Filters to leave out temporary files, and keep the destination line pointed at a disk that is not a pool member.
Step 3. Choose the Destination and Run the Copy
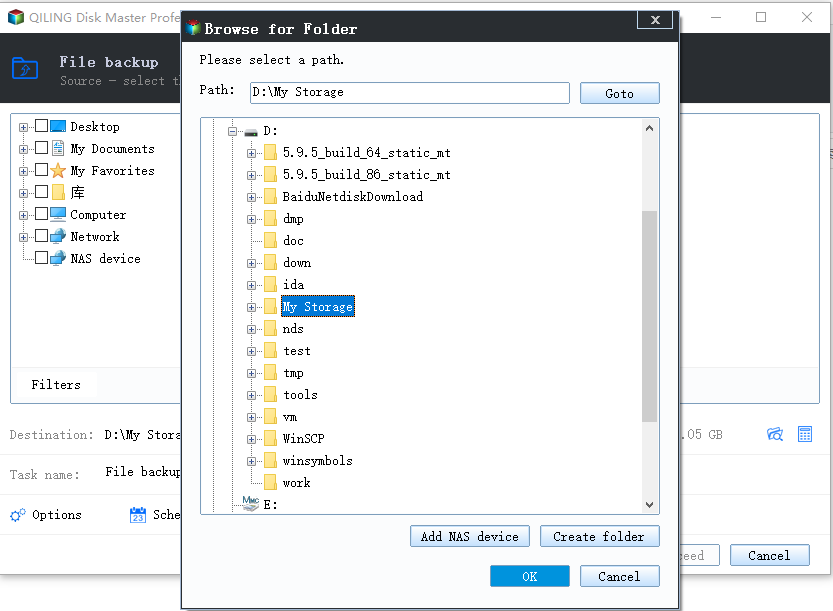
Click the folder icon beside Destination to open Browse for Folder. The dialog shows the current path, the drive tree, and the Add NAS device and Create folder buttons; pick a folder on the spare disk and click OK. Back on the main window, name the task, check the free space figure, and click Proceed.
With the copy verified, add the disk in Windows Storage Spaces, from Settings or from Server Manager, and watch the new job run to completion. A pool that was cleared properly accepts the disk within a few minutes, while a pool that still reports a warning queues the request and fails it again, which is the signal to revisit the member list instead of the disk.
5 Frequently Asked Questions
Can I add the disk while a job is pending?
No. The pool runs one metadata change at a time, so the request queues behind the stalled job and then times out. Clear the queue before you add hardware.
Why is the new disk rejected as already in use?
It still carries an old pool signature or a partition table from its previous host. Wipe it completely and confirm that no other pool claims it before you retry.
Does a pool in Warning still accept a new disk?
It serves reads, but it refuses allocations and capacity changes. Repair or retire the unhealthy member and wait for the state to return to Healthy.
For the warning that often follows an interrupted job, see Storage Spaces reduce resiliency warning.
Related Articles
- Storage Spaces Reduce Resiliency Warning
- Storage Spaces Direct Stuck Storage Job
- Back Up Windows Server 2025 Storage Spaces
- Backup Fails With VSS Error 0x800423F4
- System Restore Fails After Windows 11 26H2
Products
Articles & Tutorials
- Data Recovery
- Data Backup
- File Recovery
- File Backup
- System Backup and Restore
- Disk and Partition Clone
- Technical articles
- Mobile articles
- Disk Master Help
- Windows Data Recovery Tutorials
- Windows Secure Delete Tutorials
- Windows Partition Management Tutorials
- Windows File Backup and Restore Tutorials
- Windows System Backup and Restore Tutorials
- Windows Disk Backup and Restore Tutorials
- Windows Clone Tutorials