Storage Pool Will Not Claim a Replacement Drive
Quick Navigation:
- Why the Pool Rejects the Replacement
- Check the Disk State and Metadata
- Clear the Stale Record
- Add the Drive Back
- Frequently Asked Questions
A member disk fails, you fit a new one, and the Storage Spaces page still refuses to take it. The pool does not look at the bay or the cable; it compares the disk with the record it keeps of its own members. Until the old record, the capacity, and the layout agree, the replacement stays outside the pool even though Windows reports it as healthy.
Why the Pool Rejects the Replacement
Storage Spaces writes the pool configuration to every member. That record holds the pool identifier, the member list, and the role of each disk. When a disk is removed, the pool keeps a placeholder for it so the remaining copies stay consistent.
A replacement is refused for three common reasons. It carries metadata from another pool, it is smaller than the disk it replaces, or it still holds a partition table that the pool will not overwrite. Windows then lists the disk as healthy but unusable, and the add option stays unavailable.
Sector size matters as well. A pool created on 512e disks may reject a 4K native disk, or the reverse, even when the capacity matches. Check that detail before you blame the enclosure or the controller.
Check the Disk State and Metadata
Open Settings > System > Storage > Storage Spaces and select the pool. Note the pool name, the resiliency setting, and every entry in the physical drives list. A failed member usually stays listed with a warning long after it stopped responding.
In Disk Management, confirm that the replacement is initialized, has no volume you still need, and reports the same capacity in bytes as the failed disk. Marketing capacity and real capacity differ, so compare the byte count rather than the label on the box.
If the disk came from another machine, it may still carry the old pool's metadata. That is the usual reason a healthy disk is rejected. Record the disk number before you change anything, because that number is how you identify the disk in every later check.
Clear the Stale Record
Removing the old record is safe only when the pool still holds a healthy copy of the data, or when the volume has already been copied to a disk outside the pool. If the failed disk is physically present but not responding, leave the record alone and fix the connection first.
When the replacement carries foreign metadata, delete its partitions and initialize it again from Disk Management. This erases the disk, so confirm first that it holds nothing you need. A disk with an active volume is never accepted as a pool member.
Do not wipe a disk that may hold the only copy of the volume. If you are unsure which disk is which, disconnect the others and attach one disk at a time; the pool then shows exactly which member is missing.
Add the Drive Back
Disk Master shows every disk with its type, capacity, and partition layout on one screen, so you can confirm that the replacement is empty and copy the pool volume before the record changes. Back up first, then return to the Storage Spaces page to remove the old member and add the new disk.
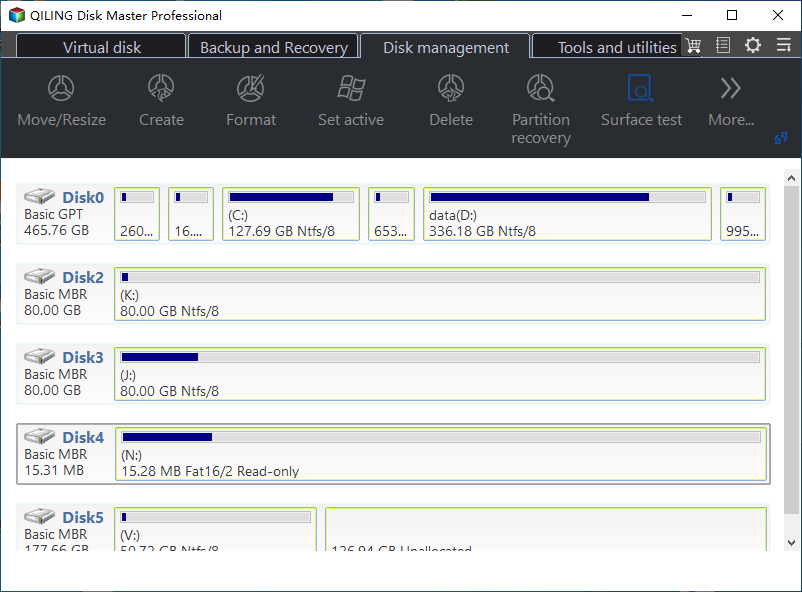
Step 1. Identify the Replacement in the Disk Map
Open Qiling Disk Master and stay on the disk map. Each row shows a disk number, whether the disk is basic GPT or MBR, its total capacity, and every partition with its letter, size, and file system. Match the row against the byte count you recorded, and check that the replacement holds no volume you still need.
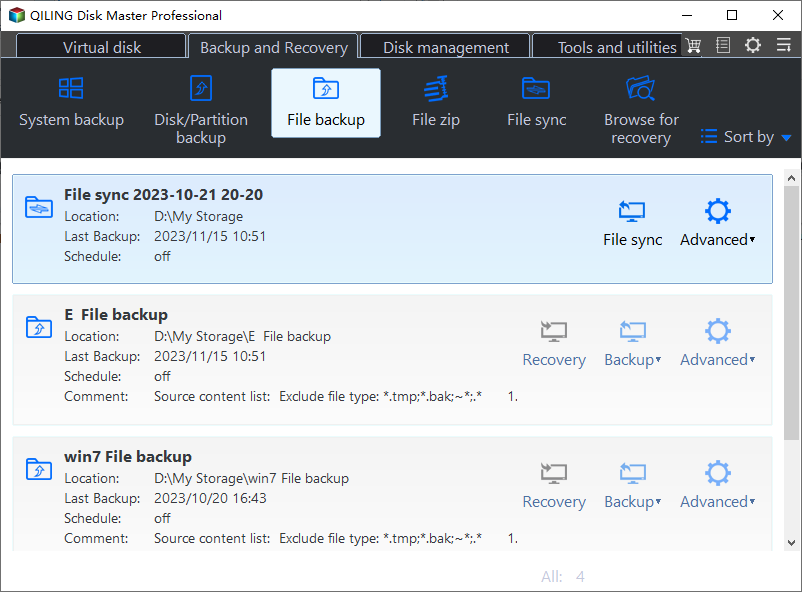
Step 2. Start a File Backup Task
Switch to the Backup and Recovery tab and click File Backup. The list below shows the existing tasks with their location, last backup, and schedule, plus the Recovery, Backup, and Advanced buttons. Use a task that already writes outside the pool, or create a new one for this copy.
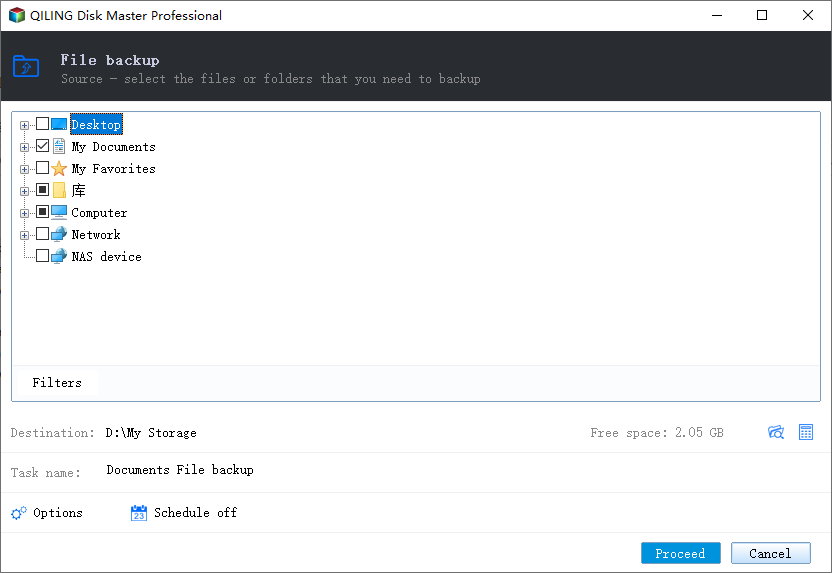
Step 3. Tick the Pool Volume and Run the Copy
In the File backup window, expand Computer in the source tree and tick the drive letter that belongs to the pool volume. Read the Destination line at the bottom, confirm that it points to a disk outside the pool with enough free space, then click Proceed. When the task finishes, restore one file to a temporary folder to prove that the copy is readable.
Frequently Asked Questions
Why is the new disk listed but marked unusable?
It still holds a partition table or metadata from another pool. Clear the disk and initialize it again before you add it.
Can I use a smaller disk as the replacement?
Not for the slot it replaces. The pool must place the same slabs, so a smaller disk cannot hold them. Fit a disk of equal or larger capacity.
Is it safe to remove the old member record?
Only after the data is copied, or while the pool still has a healthy copy. Removing the record of a disk that holds the only data makes recovery harder.
For a member that refuses to leave the pool, see Storage Spaces disk missing and cannot be removed.
Related Articles
- Storage Spaces Disk Missing and Cannot Be Removed
- Storage Spaces Direct Pool Cannot Extend: Stuck Storage Job
- Thin-Provisioned Volume Runs Out of Space
- Recover Deleted Files From a Storage Spaces Volume
- Back Up Windows Server 2025 Storage Spaces
Products
Articles & Tutorials
- Data Recovery
- Data Backup
- File Recovery
- File Backup
- System Backup and Restore
- Disk and Partition Clone
- Technical articles
- Mobile articles
- Disk Master Help
- Windows Data Recovery Tutorials
- Windows Secure Delete Tutorials
- Windows Partition Management Tutorials
- Windows File Backup and Restore Tutorials
- Windows System Backup and Restore Tutorials
- Windows Disk Backup and Restore Tutorials
- Windows Clone Tutorials