Virtual Disk Service Error: Element Not Found (0x80070490)
Quick Navigation:
- What the Code Reports
- Rescan and Restart the Service
- Decide Whether the Object Still Exists
- Refresh, Check, and Back Up
- Frequently Asked Questions
0x80070490 is the Windows code for element not found, and inside Virtual Disk Service it means the disk, volume, or partition the console was working on is no longer in the provider's list. The operation was addressed to an object that has gone, so the request fails before any data is touched. Nothing in the message says the drive is damaged. It says the reference is stale, which happens most often with removable drives, storage that re-enumerates after sleep, and controllers that reset under load.
What the Code Reports
Virtual Disk Service keeps a list of the storage objects it can see, and every operation names one of them by identifier. When a request arrives for an identifier that has been removed, the provider returns element not found rather than guessing which object was meant. The error therefore describes a mismatch between the console's view and the current hardware, not a failed write.
The common triggers are easy to list. A USB or eSATA drive is unplugged, or re-enumerates on its own, in the middle of a format or a resize. A card reader is opened with no card in it. The machine wakes from sleep and the dock has not finished bringing the bridge back. A storage driver resets its port after a timeout, and every handle opened before that reset is stale.
Virtual machines and iSCSI targets produce the same code when a session drops while a disk is attached. In each case the data on the medium is usually intact; the software simply lost the address it was using, and a new enumeration gives it a different one. That is why the first fix is almost always to make the system look again.
Rescan and Restart the Service
Close the console first, then reopen it. A fresh window asks the service for a new list, and a drive that came back after a re-enumeration is picked up without further action. If the list is still short, use the rescan command in the console, which forces a fresh enumeration of every adapter and every port in the whole machine.
Start the service if it has stopped, then reopen the console and rescan. Look at Device Manager for a device with a warning icon or an unknown device, because a bridge or a controller in that state never reaches the service at all. Move a USB drive to a rear port on the board, without a hub, and try another cable before you blame the drive itself.
Virtual Disk Service is a component that ships with Windows and is used by Disk Management and by many third-party tools; it is not part of Qiling Disk Master. The service console, Device Manager, and Disk Management named in this section are Microsoft tools as well, and they are used here only to bring the device list back before any partition work is attempted.
Decide Whether the Object Still Exists
Check the firmware list at boot. A drive that the board cannot see will never appear in Windows, and no amount of rescanning changes that; the fault is the slot, the cable, or the drive's own controller rather than the partition table. Test the same disk in another machine when you can, because that separates a dead drive from a dead port.
If Windows sees the device but the console does not list a usable disk, the driver or the partition table is the problem. An initialize prompt means the partition table could not be read, not that the disk is empty. Do not initialize, and do not create a new partition table, until the data has been copied from another system that can still read it.
Refresh, Check, and Back Up
Qiling Disk Master reads the disk list from the same storage stack, so it shows the disks that Windows can see. The three operations below are separate tools. Refreshing only makes a missing object visible again, checking only reports on the volume, and imaging is the one that protects the data. No repair should be attempted until the image in Operation 3 has been verified.
Operation 1: Refresh the Disk List
This operation only makes the missing object visible again. It writes nothing and protects nothing, so treat a returned disk as a chance to back it up, not as a fix.
Step 1. Reconnect the drive and reopen the disk map. Open the disk map and compare the disks listed there with the drives in the case. If one is missing, reconnect it and reopen the window, because the map is rebuilt each time it opens.
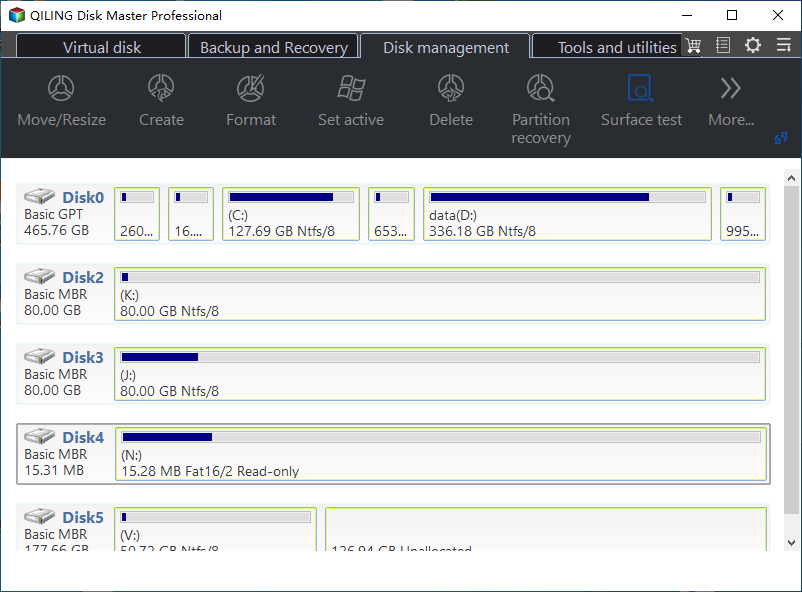
Step 2. Match the disk number and the capacity. Confirm both before you select anything. A re-enumerated removable drive can come back with a different number and letter than before, and a wrong pick turns a refresh into a new problem.
Operation 2: Check the Partition
This is a read-only diagnostic, not a repair. It writes nothing to the volume, and its report decides whether a repair is needed at all.
Step 1. Run the check with the repair option cleared. Right-click the volume, open Advanced, then Check File System, and run the first pass without the repair option. A volume that was interrupted mid-operation often shows index or security descriptor errors, and the log names them before anything is changed.
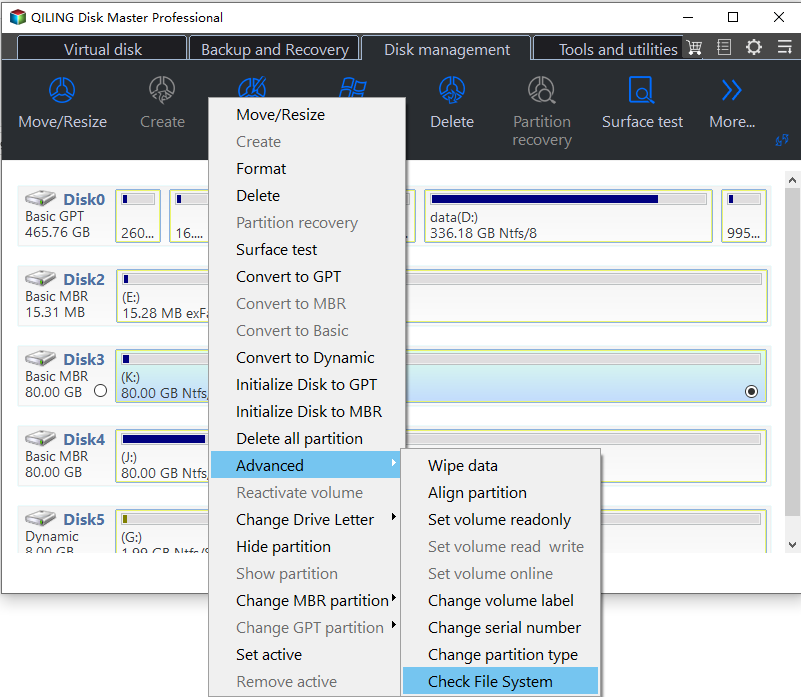
Step 2. Decide from the log. If the report names errors, finish Operation 3 first and repair only afterwards. If it is clean, the volume is readable and can be copied as it is.
Operation 3: Image the Disk
This is the operation that protects the data, and the only one that must be completed before any repair is attempted.
Step 1. Select the whole disk and a destination on another physical disk. Open the Backup and Recovery tab, choose Disk/Partition backup, and tick the whole disk rather than a single folder. A destination on another physical disk keeps one cable or bridge failure from taking out both copies.
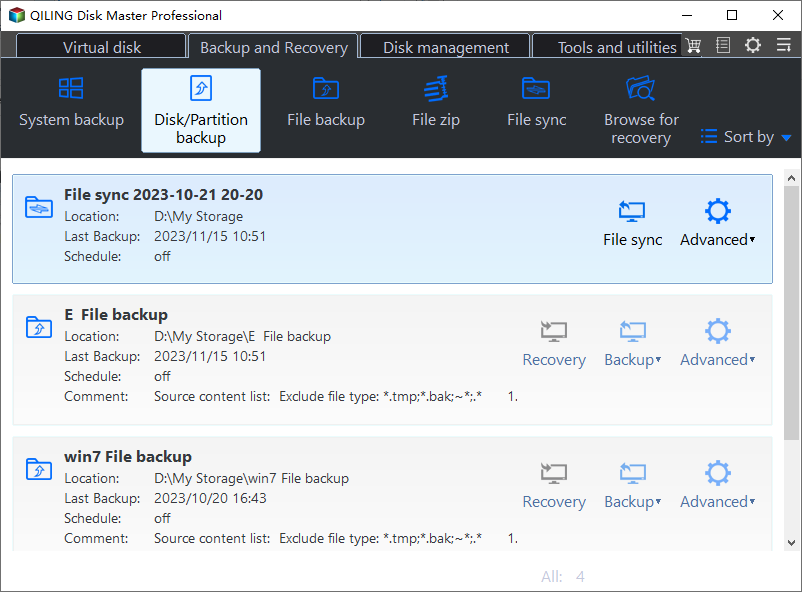
Step 2. Preview the task, click Proceed, and keep the image. Confirm the disk in the preview, run the task to completion, then keep the image until the drive has survived a full read and at least one restart without another disappearance.
Frequently Asked Questions
Is the data lost when the error appears?
Usually not. The message reports a lost object reference, and the volume is still on the medium. Copy the important files as soon as the drive is visible again, because a second dropout during a write is what actually puts the file system at risk, and a backup taken now is worth far more than a repair attempted later on.
Why does the error return after every reboot?
A device that re-enumerates at each start, or a driver that resets its port during boot, produces the same code again. Check for a dock, a hub, or a storage driver update, and test the drive on a port that is not shared with a card reader. If the error survives all three tests, the bridge is the part to replace.
Can I finish a resize after this error?
Not from the old state. Start the operation again once the disk is listed and the data is backed up, and confirm the target disk and partition in the preview before you proceed. A resize that was interrupted has already written part of the new layout, so the second attempt should be based on what the disk map shows you now.
Related Articles
- Virtual Disk Service Error: The Disk Is Not Empty
- Disk Offline After a Windows Update
- Disk Management Keeps Refreshing and Shows No Disks
- USB Drive Not Recognized After a Windows Update
- External Drive Missing After Sleep
Products
Articles & Tutorials
- Data Recovery
- Data Backup
- File Recovery
- File Backup
- System Backup and Restore
- Disk and Partition Clone
- Technical articles
- Mobile articles
- Disk Master Help
- Windows Data Recovery Tutorials
- Windows Secure Delete Tutorials
- Windows Partition Management Tutorials
- Windows File Backup and Restore Tutorials
- Windows System Backup and Restore Tutorials
- Windows Disk Backup and Restore Tutorials
- Windows Clone Tutorials