How to Transfer Music from iPod/iPod touch to iTunes or Vice Versa
Transferring music from iPod/iPod touch to iTunes is a good option to back up your iPod music files. But this only applies to transfer purchased music. As for non-purchased music, you have to use a third-party transfer tool to do it. Whatever music you want to transfer, this guide gets you covered.
In this post, we'll not only explain how to transfer music from iPod to iTunes but also give bonus tips to transfer music from iTunes to iPod and transfer music from iPod to the computer without iTunes.
- Part 1. How to Transfer Purchased Music from iPod to iTunes (Windows & Mac)
- Part 2. How to Transfer Non-Purchased Music from iPod to iTunes
- Part 3. How to Transfer Music from iTunes to iPod/iPod touch
- Part 4. How to Transfer Music from iPod to Computer Without iTunes
Part 1. How to Transfer Purchased Music from iPod to iTunes
Before transferring iPod music to iTunes, it's necessary for you to disable the auto-sync feature in iTunes to make sure that iTunes won't sync your iPod and erase your current data when you connect your iPod to the computer. The next step is to transfer purchased music from iPod to iTunes. Here are the steps.
Disable Automatic Syncing in iTunes
Step 1. Open the latest version of iTunes on your computer.
Step 2. Open the Preference window.
On a Mac computer, select the "iTunes" menu > Preference...
On a Windows computer, select the "Edit" menu > Preference...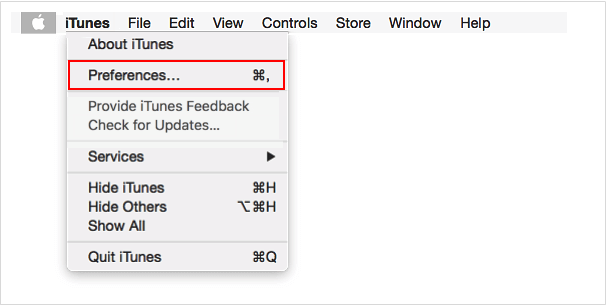
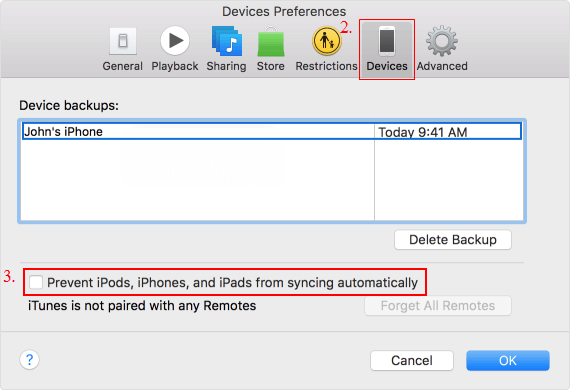
Step 3. Select the "General" tab. ( or "Devices" on an old version of iTunes)
Step 4. Disable the "Sync Library" box if it is not already. (or "Prevent iPods, iPhone, and iPods from syncing automatically" on an old version of iTunes)
Step 5. Select "OK" to save and exit.
Move Songs from iPod to iTunes
Step 1. Launch the latest iTunes version on your computer.
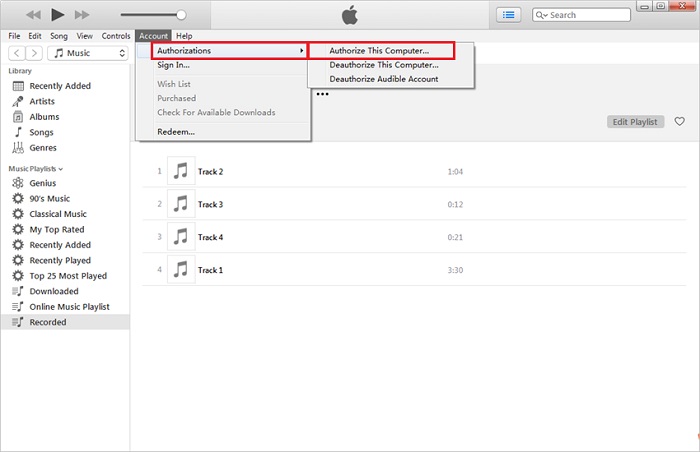
Step 2. Head to the "Account."
Step 3. Choose "Authorizations," then "Authorize This Computer."
Step 4. Log in with your Apple ID and password and click the "Authorize" button.
Step 5. Connect your iPod to your computer via a USB.
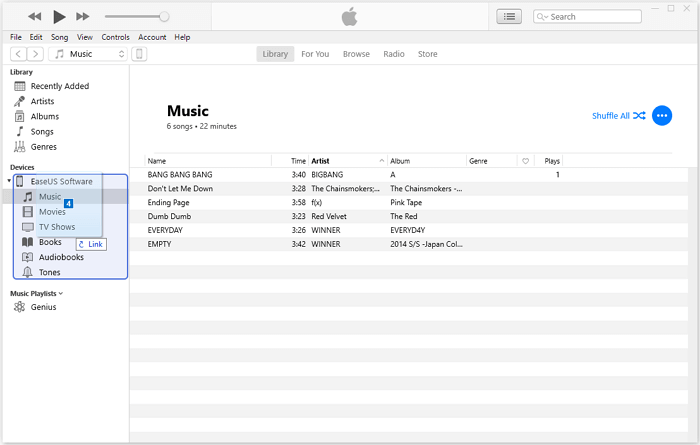
Step 6. Select "File" > "Device" > "Transfer Purchases from [your iPod name]."

Part 2. How to Transfer Non-Purchased Music from iPod to iTunes
It may be easy to get your purchased music to iTunes, but what about non-purchased music? Don't worry. Qiling MobiMover can help you do it without a hassle. Qiling MobiMover is a powerful iOS data transfer tool that owns many outstanding advantages that iTunes and iCloud don't have. Some of which are shown below.
- Storage - As you know, iCloud offers only 5GB storage for free, which is OK for a small data transfer but won't be effective for a larger one like audio and video files.
- Speed - Whether you're planning to use iTunes or iCloud to transfer your iPod music, it seems to take forever to complete the transfer process. But with Qiling MobiMover, you can complete the process within 5 minutes.
- Accessibility - The music you transferred with iTunes is inaccessible on your computer. But with Qiling MobiMover, you can easily access, view, and edit the transferred data at will.
- Tools - Compared with iTunes, Qiling MobiMover provides more practical tools for you. For example, you can use its video downloader to download videos from YouTube.
Now, you can download Qiling MobiMover on your computer (Mac & PC) to start transferring.
Step 1. Connect your iPod to your computer running Windows 10/8/7. Run Qiling MobiMover, and click "Audio" > "Music".
Step 2. Click "Settings" in the upper left corner to customize the path to save exported music on your computer. If you don't make a change, MobiMover will store exported files on your desktop.
Step 3. Choose the music you want to move and click the "Transfer to PC" button to start the transfer process instantly. When the transfer completes, check the files at the destination.
Part 3. How to Transfer Music from iTunes to iPod/iPod touch
You can transfer music from iTunes to iPod/iPod touch automatically or manually. Whichever way you desire to use, here are the detailed steps. Plus, you can also apply similar steps to add music from iTunes to iPhone.
Option 1. Automatically Sync Music to iPod from iTunes
Step 1. Connect your iPod to the computer via a USB cable.
Step 2. Tap "Trust this computer" on your iPod if required.
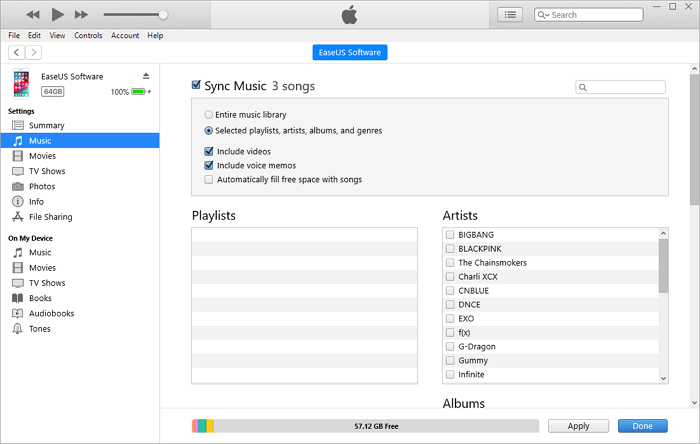
Step 3. Click the device icon, then choose "Music."
Step 4. Tick the box of "Sync Music."
Step 5. Choose "Remove and Sync" from the popup window.
Step 6. Select to sync the "Entire music library" or "Selected playlists, artists, albums, and genres" from iTunes to your iPod.
Step 7. Then, you can choose the desired music you'd like to transfer and then click "Apply" and "Sync" to start transferring.
Option 2. Manually Add Music from iTunes to iPod
Step 1. Launch the latest version of iTunes on your computer.
Step 2. Connect your iPod to the computer via a USB.
Step 3. Tap on "Trust the computer" on your iPod if asked.
Step 4. From the iTunes screen, choose the "Summary" tab.
Step 5. Click on the "Options," then check "Manually manage music and videos."
Step 6. Click "Apply" to save the settings.
Step 7. Go to the "Devices" section.
Step 8. Open the folder that contains the songs you'd like to transfer, then drag and drop them to the left panel or the center of the window. (You can also drag and drop songs from iTunes library to your device.)
Apart from the above mentioned two options, you can also transfer music from computer to iPod without iTunes via Finder or Qiling MobiMover.
Part 4. How to Transfer Music from iPod to Computer Without iTunes
It is easy to transfer music from iPod to the computer without iTunes. Both Qiling MobiMover and File Explore (Finder on Mac) can help you do it. The steps to use Qiling MobiMover have been listed in Part 1. Therefore, in this section, we will mainly show you the steps to use File Explorer to copy music from iPod to the computer.
Step 1. Connect your iPod to the computer.
Step 2. Then your iPod will show up as a drive in File Explorer on Windows and Finder on Mac.
Step 3. Open the drive and head to the iPod_Control > Music folder. Then, you will see many folders labeled with an F and a number.
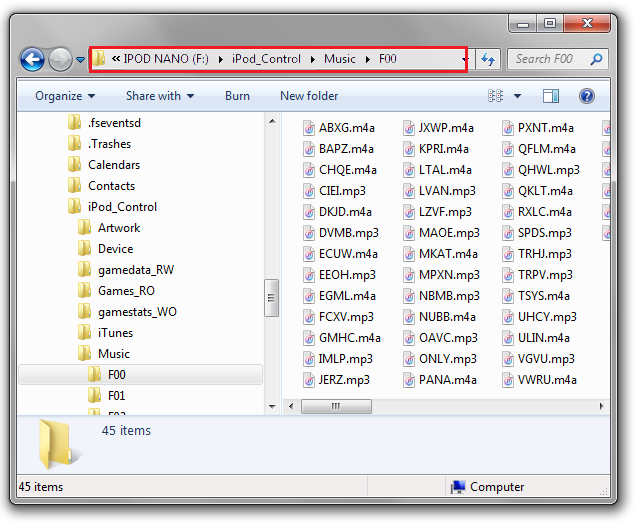
Note: If there is nothing on your iPod, then you'll need to reveal hidden files and folders on your computer. For mac users, they can hold down Cmd+Shift+Period to toggle hidden folders on or off.
Step 4. After seeing your iPod files, you can copy and paste them to your computer.
The Final Words
That's all about how to transfer music from iPod to iTunes. Through reading this guide, we hope you have successfully got all music to iTunes. Apart from moving data between iPod and computer, you may also need to transfer iPod music to iPhone or iPad. Whatever you want, Qiling MobiMover can help you do it with ease. If you have any other questions related to this topic, don't hesitate to contact us to help you out!
Related Articles
- How to Transfer Photos from iPhone to Mac in All Possible Ways
- How to Download Podcasts on iPhone in Every Way
- How to Extract Photos from iPhone to Computer (Mac or PC)
- How to Export iPhone Contacts Without iCloud