How to Transfer Photos from PC to iPad in 5 Ways
Photos are a daily necessity as they effectively carry information, making it almost inevitable to transfer them between devices for file-sharing or data backup. Whether you want to transfer photos from one iPhone to another or copy them from a PC to an iPad, there are easy tips to follow. This guide will provide you with a simple solution to transfer photos from a PC or laptop to an iPad.
How to Transfer Photos from PC to iPad Without iTunes
While iTunes can help transfer photos from a PC to an iPad, it's not the best option as it involves syncing, which can be problematic for transferring PC photos to an iPad.
You can use Qiling MobiMover, a software that transfers files to or from your iPhone, iPad, or iPod touch, instead of iTunes. Unlike iTunes, which syncs data, Qiling MobiMover allows you to transfer files such as photos, videos, music, ringtones, contacts, and more between an iDevice and a computer or between two iDevices.
When transferring photos from a PC to an iPad, you can choose formats such as JPG, BMP, TIFF, PNG, GIF, HEIC, and more. This allows for selective or all-at-once photo transfer between a PC and an iPhone.
To transfer photos from a PC to an iPad:
Step 1. Connect your iPad to your PC, then click "Trust" in the pop-up on your iPhone. Next, launch Qiling MobiMover and select the option "PC to Phone".
Step 2. Click the "Select Files" button, then navigate to your computer to select and open the folders or files from which you want to copy images.
Step 3. MobiMover will display the files you've chosen. You can add more photos by either dragging and dropping or clicking "Add Contents". If other file types are included, they can be transferred along with photos from PC to iPad.
Since Qiling MobiMover is also compatible with macOS, you can also transfer photos from Mac to iPad using this tool. It also serves as an iPhone backup tool, a WhatsApp manager, and a HEIC converter, providing additional functionalities.
- Back up and restore an iPhone, iPad, or iPod touch
- To transfer WhatsApp messages from an iPhone to a PC or another iPhone, you can use the built-in "Backup" feature in WhatsApp, which allows you to export your chat history to a Google Drive account. From there, you can access and transfer the data to your desired device.
- Back up and restore WhatsApp chats
- Convert iPhone photos to JPG
If you're having trouble opening HEIC files on Windows after transferring photos from an iPad to a PC, you can use a HEIC converter to convert them to JPG, making it easier to view them whenever you want.
Qiling MobiMover is a useful tool for managing iPhone, iPad, and iPod content. It's worth trying.
How to Transfer Photos from Computer to iPad with iTunes
When it comes to data transfer, the first option that comes to mind is iTunes. It can be used for various purposes, such as downloading music, making a copy of your iPhone or iPad, or managing iOS files.
To replace your current photos on the iPad with the newly synced photos, you can simply uncheck the "Keep a copy of all photos and videos on my iPad" option when syncing your photos from your computer to your iPad. This will remove the current photos on your iPad and replace them with the newly synced photos.
Step 1. Connect your iPad to the computer with a USB cable, and if iTunes doesn't open automatically, run it manually.
Step 2. Click the "Device" tab and select "Photos."
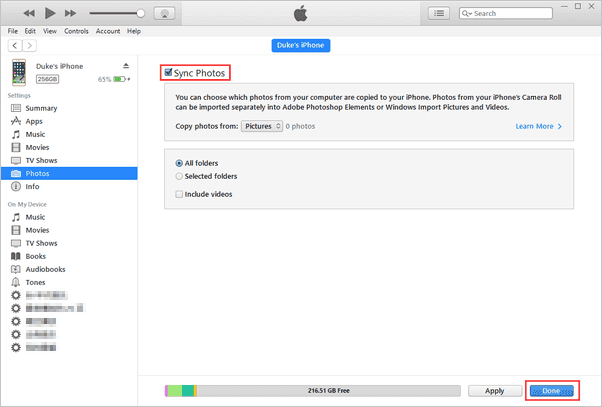
Step 3. To transfer photos, check the "Sync Photos" box and select the photos you want to transfer from the option "Copy photos from."
Step 4. To sync photos from your computer to your iPad, click the "Apply" button.
How to Transfer Photos from PC to iPad with iCloud
iCloud is a convenient way to sync files between Apple and non-Apple devices, but it offers only 5GB of storage space for free, requiring users to make preparations for additional storage needs.
- If you have an Apple ID, you can use the same one on both your PC and iPad. To do this, go to the Apple ID account page on your PC and sign in with your Apple ID and password.
- Buy enough iCloud storage to save the photos
- Connect both devices to stable and fast networks
To transfer photos from PC to iPad using iCloud:
Step 1. To enable iCloud Photos on your iPad, go to "Settings" > [your name] > "iCloud" > "Photos" and toggle the switch to turn on iCloud Photos. This will sync your iPad's photos with your iCloud account, allowing you to access them from any device connected to your iCloud account.
Step 2. Download and install iCloud for Windows on your PC.
Step 3. To set up iCloud for Windows, run the iCloud for Windows application on your computer and sign in with the Apple ID you use on your iPad. This will allow you to access your iCloud data, such as contacts, calendar, and reminders, on your computer.
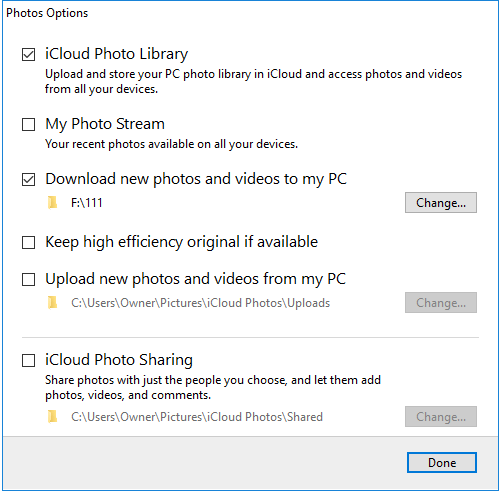
Step 4. Click "Options" next to "Photos" and enable "iCloud Photo Library."
Step 5. To transfer photos from your PC to your iPad, ensure that "Upload new photos and videos from my PC" is enabled. Then, tap on "Change" under this option to select the folder containing the photos you want to transfer. This will allow you to upload the desired photos from your PC to your iPad.
Step 6. After syncing, you can view the photos in the Photos app on your iPad.
You can upload photos to iCloud from iCloud.com without installing the iCloud for Windows app, allowing you to access and manage your iCloud content without needing the Windows app.
Step 1. To visit iCloud.com on your PC, go to the website and sign in with your Apple ID.
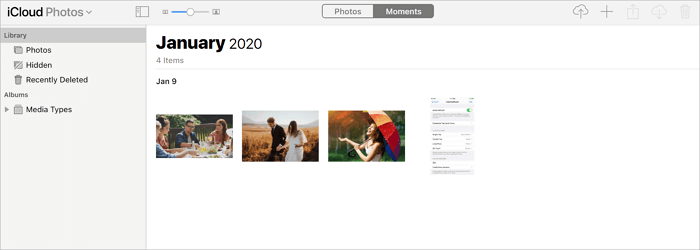
Step 2. Choose "Photos" to access iCloud Photos.
Step 3. To copy photos from your computer to your iPad, click on the "Upload photos" icon on the page and select the photos you want to transfer.
Step 5. Your iPad will automatically sync photos from your device to your iPad over a Wi-Fi connection, making them accessible in the Photos app.
How to Transfer Pictures from PC to iPad with Google Photos
Google Photos offers free online data storage for syncing photos across devices, but only provides 15 GB of free storage, requiring an upgrade for larger photo collections.
To get your PC pictures on your iPad using Google Photos, follow these main procedures: first, download and install the Google Photos app on your PC and iPad; next, upload your PC pictures to Google Photos by clicking on the "Upload" button; then, on your iPad, open the Google Photos app and sign in with the same Google account; finally, you can access and view your PC pictures on your iPad by going to the "Library" tab in the Google Photos app.
- Install Google Photos on your iPad
- Upload photos from PC to Google Photos
- Add photos from Google Photos to your iPad
To copy photos from your PC to your iPad using Google Photos, first, download and install the Google Photos app on your PC and iPad. Next, open the Google Photos app on your PC and sign in with your Google account.
Step 1. Download Google Photos on your iPad from the App Store. If you can't download Apps on your iPad, learn how to fix it first.
Step 2. To visit Google Photos on your PC, go to the Google Photos website and sign in with your Google account.
Step 3. To upload photos from your PC to your iPad, click "UPLOAD" on the app, select the desired photos, choose the upload size in the pop-up window, and then click "CONTINUE".
Step 4. Click "ADD TO ALBUM" and select/create an album to save the pictures.
Step 5. Open Google Photos on your iPad and go to Collections in the menu.
Step 6. To move pictures from an album to your iPad, first find and choose the album that contains the pictures you want to move.
Step 7. Click the ellipsis icon and choose "Select."
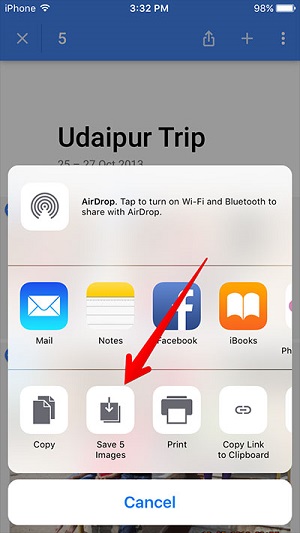
Step 8. To transfer photos from your PC to your iPad, select the photos you want to transfer and tap on the share button. This will initiate the transfer process.
Step 9. To download photos to your iPad, choose the "Save [number] Images" option, which will allow you to access the images in the Photos app.
How to Copy Photos from PC to iPad via Email
If you have a limited number of items to transfer, using email is a viable alternative to transferring photos from your PC to your iPad. You can create an email, attach the photos, send it to your own account, and then download the pictures on your PC. This wireless method allows you to transfer photos without needing a cable.
Step 1. To copy photos from your computer to your iPad, add the photos you want to copy to your iPad as an attachment to an email. Then, open the email on your iPad, select the attachment, and choose to "Save Image" or "Save Photo" to copy the photos to your iPad.
Step 2. Send the email to yourself from your computer.
Step 3. To check the email on your iPad, go to the Mail app, log in with your account credentials, and open the email containing the attachment. Then, tap the "Download" button to save the attachment to your device.
The Bottom Line
You can transfer photos from a PC to an iPad using one of five common methods, each suitable for different situations. For a wired connection, try using Qiling MobiMover and iTunes with a USB cable. Alternatively, you can import photos wirelessly using storage services like Google Photos, iCloud, or email.
We hope you can transfer photos from PC to iPhone successfully, whichever method you choose to use.
Related Articles
- HEIC Files Converters to Convert HEIC Pictures to JPG/PNG
- What Is an HEIC File and How to Convert HEIC to JPG
- How to Convert iPhone Video to MP4 in 2 Simple Ways
- How to Delete Duplicate Contacts on iPhone