Fix Windows PC Won't Boot After Enabling Secure Boot
Secure Boot is a security feature that only allows signed and authenticated operating system bootloaders to run during startup, but it can sometimes prevent a system from booting if the bootloader is not recognized as legitimate.
I am looking for a new laptop and am considering the Surface Laptop 4. I am a student and need a laptop that can handle video editing, photo editing, and general use.
If you're struggling with a Windows PC that won't boot after enabling Secure Boot, this article from Qiling is here to guide you through the process of resolving startup troubles. By the end of this guide, you'll have the knowledge and tools needed to navigate through the Secure Boot conundrum and revive your system.
9 Fixes: PC Won't Boot After Enabling Secure Boot
Here, we listed the 9 solutions that can resolve PC won't boot after enabling Secure Boot. To resolve the issue, you can try disabling Secure Boot, resetting the UEFI settings to their default values, checking the Secure Boot settings, verifying the boot order, checking the boot mode, checking the UEFI firmware version, checking the Secure Boot settings in the UEFI firmware, checking the Secure Boot settings in the operating system, and checking the Secure Boot settings in the motherboard manual.
- Method 1: Disconnect External Drives
- Method 2: Remove CMOS Battery
- Method 3: Convert MBR Disk to GPT
- Method 4. Update BIOS Version
- Method 5. Update SSD Driver
- Method 6. Repair with Third-party Software
- Method 7. Boot from Bootx64.efi or Bootia32.efi Manually
- Method 8. Check for Windows Updates
- Method 9: Perform Clean Install
Method 1: Disconnect External Drives
External drives connected to a Windows PC can sometimes interfere with the system's boot process, causing issues after enabling Secure Boot, which is a security feature that helps protect the system from unauthorized software. This is because Secure Boot checks the integrity of the boot process, and external drives can sometimes be seen as an unauthorized component, causing the system to malfunction.
To resolve the issue, remove all external drives from your computer to prevent any potential interference with the boot process. This will allow the system to boot normally without any external requirements.
If your Windows PC won't boot, try disconnecting the power cord, waiting for 30 seconds, and then plugging it back in. This simple action can often resolve the issue. If this doesn't work, proceed to the next step.
Method 2: Remove CMOS Battery
Enabling Secure Boot on a Windows PC can sometimes cause a boot hiccup, and another potential culprit to investigate is the motherboard's CMOS battery. The battery might be misjudging the state of Secure Boot, leading to startup troubles.
To resolve the boot issue, locate the CMOS battery on your motherboard, which is usually a coin-cell battery. Ensure your PC is powered off and unplugged. Remove the CMOS battery, wait a minute or two, and reinsert it. This brief removal allows the motherboard to reset its settings, and you can then power on your PC to check if the boot issue persists.
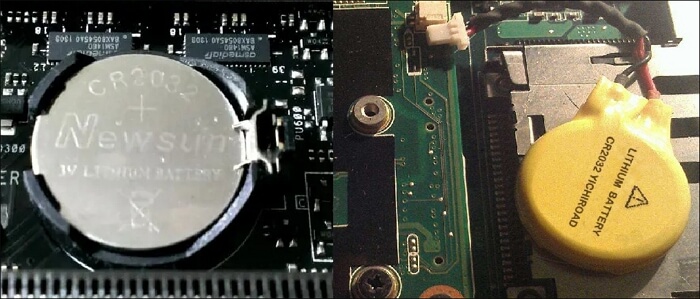
This technique can help ensure a smooth boot process and offers a non-intrusive means of addressing possible misconfigurations, but if the issue persists, further solutions will be explored.
Method 3: Convert MBR Disk to GPT
The partition style of your disk is crucial for system booting, with MBR (Master Boot Record) associated with Legacy BIOS and GPT (GUID Partition Table) linked to UEFI, the modern firmware interface. Secure Boot typically requires a UEFI environment, and compatibility issues may arise if the disk uses the older MBR style.
This technique can help ensure a smooth boot process and offers a non-intrusive means of addressing possible misconfiguration by examining the partition style of your disk, switching to a GPT if it's MBR and you've enabled Secure Boot, and booting from an MBR device can be made easier and more compatible.
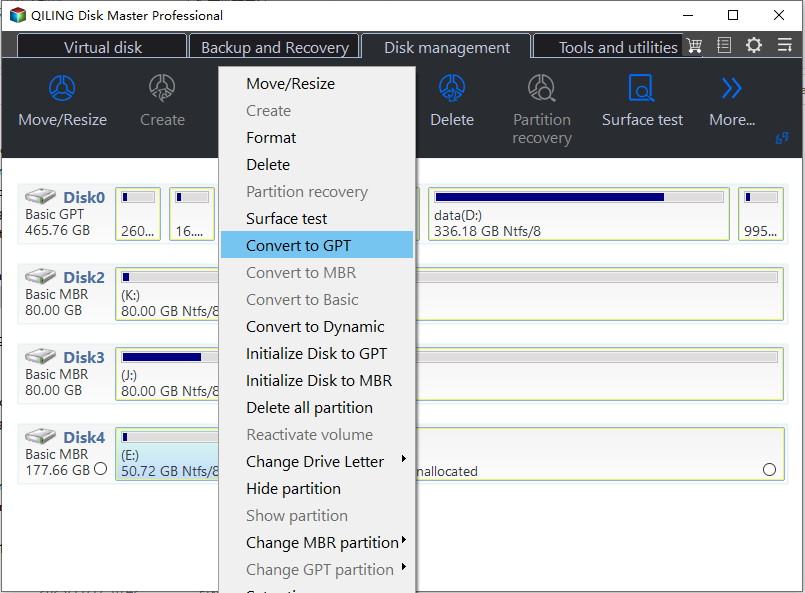
If you don't want to reinstall Windows after converting MBR to GPT, consider using a reliable partition management tool like Qiling Disk Master Professional to simplify the process and save time and effort, avoiding the need for a Windows reinstallation.
Qiling Disk Master Professional is designed to facilitate a seamless transition from MBR to GPT disk management, offering a range of features that cater to the needs of disk management.
Step 1. Download and launch Qiling Disk Master on your computer.
Step 2. Go to Disk Converter, select "Disk management" to continue.
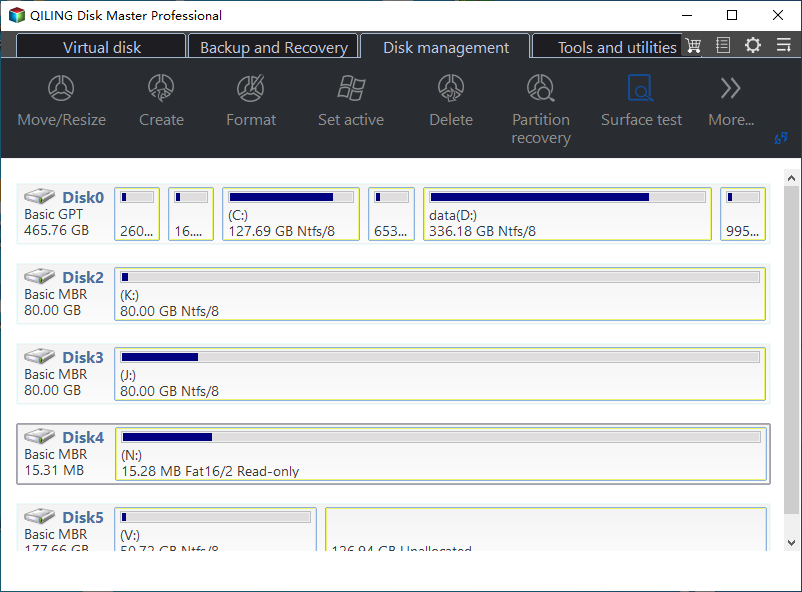
Step 3. Right-click the target MBR disk and select "Convert to GPT" to initiate the conversion process.
You can share this professional software with your friends who need a reliable tool to manage disks and partitions.
Method 4. Update BIOS Version
The BIOS acts as a bridge between hardware and operating system, and an outdated BIOS can cause compatibility issues, particularly with Secure Boot, which is a security feature that ensures the operating system is loaded from a trusted source.
If you're experiencing boot issues, a BIOS update might be the solution. It can help resolve compatibility problems and ensure a smooth boot-up process.
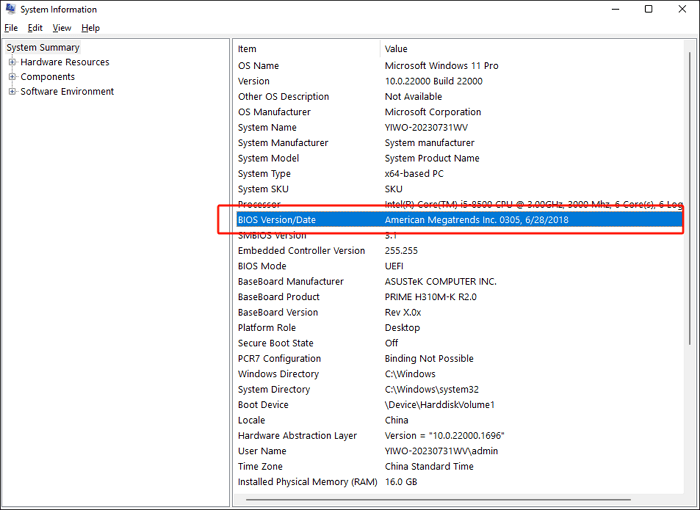
Step 1. To find the BIOS version of your PC, search for and open "System Information" in the search box. Alternatively, you can access this information during the initial boot process or within the BIOS/UEFI settings.
Step 2. To find the latest drivers for your PC, head to the official website of your PC's manufacturer and navigate to the support or downloads section.
Step 3. Find the correct BIOS update for your specific PC model and download it.
Step 4. Ensure a stable power source for your PC.
Step 5. Run the BIOS update utility and follow the on-screen instructions to update your BIOS.
Step 6. Restart your PC, then recheck the BIOS version to confirm the successful update after the update is complete.
To update the BIOS, follow the manufacturer's instructions and guidelines, which typically include creating a bootable media, entering the BIOS settings, saving the changes, and rebooting the system. This process should be done with caution and attention to detail to avoid any potential damage to the system.
Read also:
Method 5. Update SSD Driver
An outdated SSD driver can cause issues with Secure Boot activation on a Windows PC, leading to boot problems if not updated.
To ensure a smooth and secure boot, it's essential for the SSD driver to stay updated.
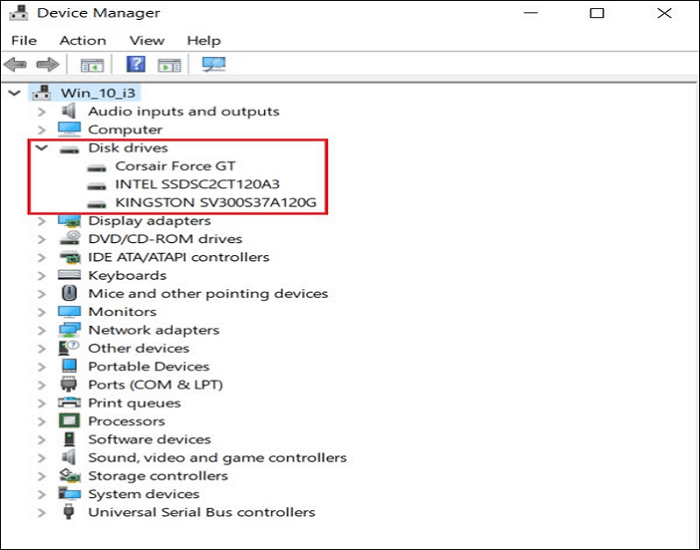
Step 1. To find the model of your SSD, search for and open "Device Manager," locate Disk drivers, and check your PC's specifications.
Step 2. To ensure optimal performance of your Solid-State Drive (SSD), you should update to the latest driver compatible with your model. This can be done by visiting the official website of the SSD's manufacturer and downloading the most recent driver available for your specific SSD model.
Step 3. Before proceeding, back up any crucial data on your SSD.
Step 4. Run the downloaded driver file, follow the on-screen instructions to install the new driver, which may involve extracting files or going through a setup wizard.
Step 5. Restart your PC once the installation is complete.
Updating your SSD driver is a proactive step that can help address immediate boot issues and contribute to your system's overall health and performance.
Method 6. Repair with Third-party Software
Corrupted system files can prevent a system from booting properly, as they are essential to the operating system's functioning.
In times of PC distress, Qiling Disk Master Professional offers a solution. This software provides disk management capabilities and a Boot Repair feature that can fix corrupted system files and get your PC up and running again.
Step 1. To create a bootable USB drive with Qiling Disk Master, start the software after connecting the external drive/USB to your computer, then go to the "Tools" menu and click on "Create bootable media".

Step 2. Select a USB drive or CD/DVD and click "Proceed" to continue the installation process. Alternatively, you can also burn the Windows ISO file to the storage media.

Step 3. Connect a bootable drive to a new computer, reboot by pressing F2/Del to enter the BIOS, set the bootable drive as the boot disk, and exit the BIOS by pressing F10.
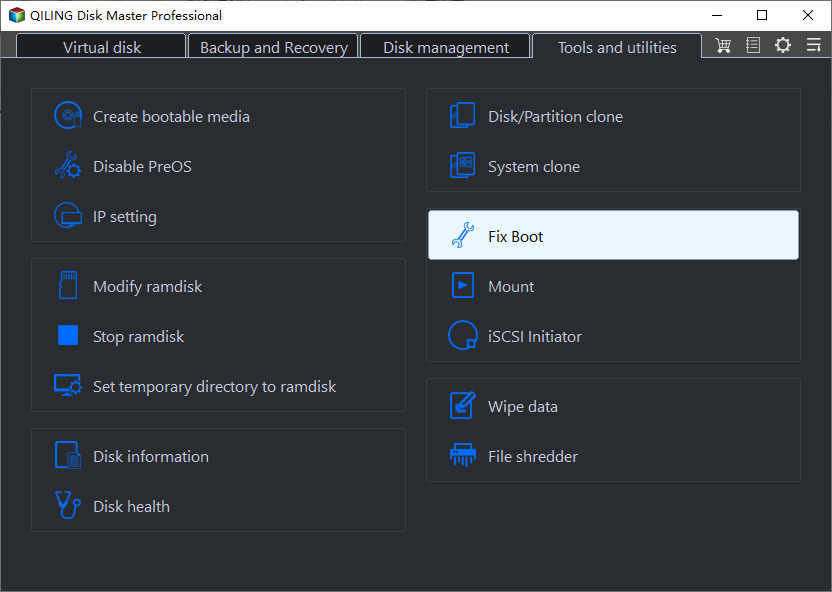
Step 4. Boot the computer again, enter the WinPE interface, and open Qiling Disk Master. Click "Fix Boot" under the "Tools" option.
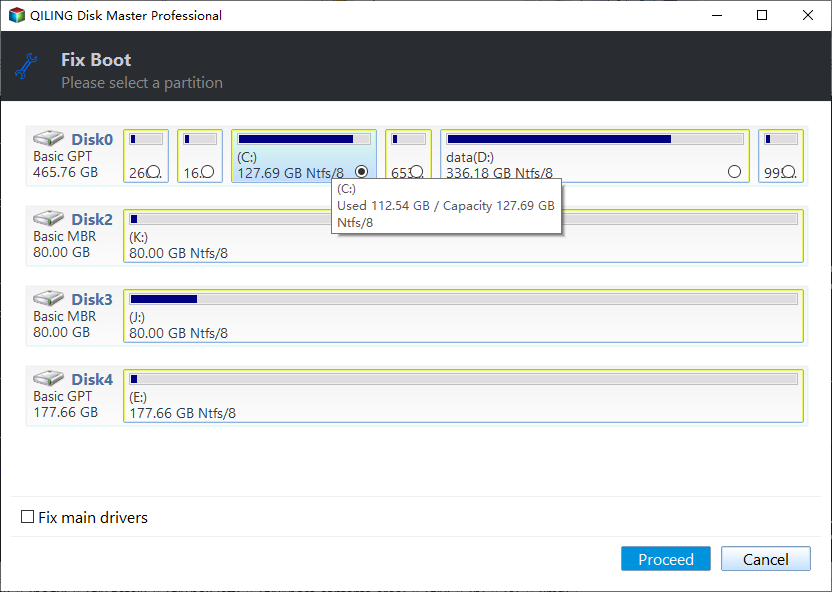
Step 5: Select the system you want to repair and click "Proceed".
Step 6. Wait a moment, and you will receive an alert that the system has been successfully repaired.
⭐Additional Guidance
If you're feeling stuck or need more details, our expert consultants are here to provide tailored guidance to address your specific concerns. They're ready to offer personalized advice and support to help you move forward.
Qiling experts offer 24/7 one-on-one manual services to fix Windows boot errors, BSODs, and computer boot loops. They provide free evaluation services, diagnose and resolve system boot failures, Windows stop codes, and OS lagging issues using their extensive experience.
- 1. Fix BSOD - blue/black screen of death error due to Windows update or other reasons.
- 2. To resolve Windows boot errors like "no bootable device found" or BCD file corruption, start by booting in safe mode. Then, run the System File Checker (SFC) and DISM tools to scan and replace corrupted system files.
- 3. To resolve Windows system or OS boot loop issues with error code 0X000, you can try serving the following fixes: Run the System File Checker (SFC) and DISM tools to scan and replace corrupted system files, Run a System Restore to a previous point when the system was working fine, Check and fix any hardware issues such as loose connections or faulty drivers, and if all else fails, perform a clean installation of Windows.
Read also:
Method 7. Boot from Bootx64.efi or Bootia32.efi Manually
EFI files, with their .efi extension, are crucial for the UEFI boot process, holding executable code for booting the operating system. However, selecting the correct EFI file manually can disrupt the automatic boot process, especially when dealing with Secure Boot-related issues.
Step 1. To access your PC's UEFI or BIOS settings, press the BIOS hotkeys (such as F1, F2, F10, F12, Del, or Esc) while your computer is booting up. This will allow you to enter the settings menu, where you can make changes to your PC's configuration, such as setting the boot order, adjusting the time and date, and more.
Step 2. To manually boot an EFI file, navigate to the boot options section of the UEFI/BIOS settings. From there, select the option to manually pick an EFI file, which can usually be found in the "Boot" or "Advanced" tab. You can then select the desired EFI file to boot from. This process may vary slightly depending on the specific UEFI/BIOS version and manufacturer.
- \EFI\boot\bootx64.efi
- \EFI\boot\bootia32.efi
Step 3. Select either bootx64.efi or bootia32.efi, depending on whether your system is 64-bit or 32-bit. These files are usually located in the EFI sector of your system.
Step 4. Save your changes and exit the UEFI/BIOS settings after selecting the proper EFI file. Your system should then attempt to boot using the manually chosen EFI file.
By manually invoking the bootx64.efi or bootia32.efi files, you're taking control of the boot process and bypassing potential Secure Boot-related issues.
To learn more about the difference between UEFI and BIOS, check out this article.
UEFI vs. BIOS: What's the Difference and How to Choose
UEFI (Unified Extensible Firmware Interface) and BIOS (Basic Input/Output System) are both firmware interfaces used to interact with a computer's hardware, but they differ in their functionality and capabilities. UEFI is a more modern and advanced interface that provides a graphical user interface and supports features like secure boot, faster boot times, and improved hardware support. In contrast, BIOS is an older interface that uses text-based commands and is limited in its capabilities. While both UEFI and BIOS can be used to configure and initialize a computer's hardware, UEFI is generally considered more secure and user-friendly.
Method 8. Check for Windows Updates
Windows updates serve as the first defense against system errors and compatibility issues, enhancing security features and addressing problems that may interfere with your PC's smooth performance. Updating your Windows system, especially in the case of Secure Boot-related boot troubles, can be a solution to resolve these issues.
Step 1. Open Settings and navigate to "Windows Update."
Step 2. Select "Check for updates" from the Windows Update section.
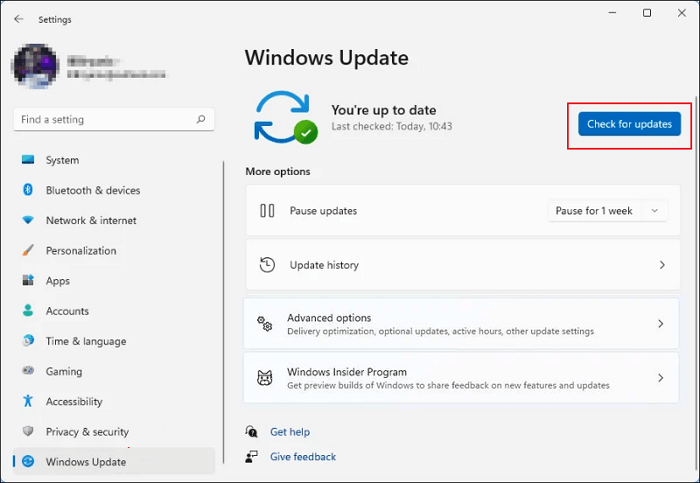
Step 3. If any updates are available, select "Download" and "Install" to initiate the update procedure.
Step 4. After installing the updates, restart your computer to allow the changes to take effect. This is a crucial step to ensure the updates are properly implemented.
Keeping your Windows system up to date helps prevent compatibility issues with Secure Boot and also protects your PC from various security threats.
Method 9: Perform Clean Install
A clean install of your system can be a last resort to resolve persistent boot issues, effectively wiping away accumulated clutter, corrupted files, and misconfigurations, providing a fresh start for a smooth and optimized experience.
Download Windows installation media from the official Microsoft website, then create bootable installation media using a USB drive.
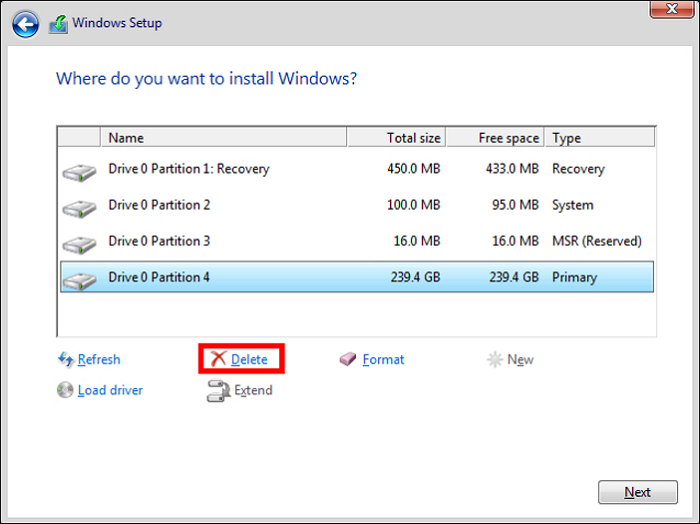
Step 1. Once the USB drive is inserted, boot the computer and restart the system. Then, in the boot device menu, select the USB drive to initiate the installation process.
Step 2. Follow on-screen instructions for a clean install.
Step 3. During the installation process, delete any existing partitions, create a new one, and format the drive.
Step 4. Once you've finished installing the new version of Windows, restart your PC to apply the changes. After the system boots back up, you'll be entering a fresh Windows environment, ready to explore and set up your new installation.
Step 5. Install necessary hardware drivers and check for Windows updates to keep your system current.
Performing a clean install of the operating system can resolve persistent boot issues by completely removing and reinstalling the OS, which can help eliminate any corrupted system files or other issues that may be preventing the system from booting properly. This process can take some time, but it often provides a definitive solution to the problem.
Why Your PC Won't Boot After Enabling Secure Boot
In the Secure Boot era, a PC's inability to boot could be due to a mismatch between the UEFI firmware and the operating system, a corrupted boot configuration, or an issue with the Secure Boot keys. Additionally, the Secure Boot mechanism might be preventing a malicious program from running, but it's not designed to handle legitimate software issues. The Secure Boot process involves verifying the digital signature of the boot loader and kernel, which can sometimes cause problems if the keys are not properly configured or if there's an issue with the firmware.
- Peripherals Failure: Incompatible external storage devices, GPU issues, or a CMOS battery misjudging Secure Boot status can disrupt the boot sequence, causing a PC to stumble in its startup process.
- Incorrect Partition Style: The partition style of your disk, whether Master Boot Record (MBR) or GUID Partition Table (GPT), might conflict with the requirements of Secure Boot, a security feature that helps protect your PC from malicious software. To resolve this issue, you need to ensure that your disk's partition style is compatible with Secure Boot, much like tuning the instruments of a musical performance to achieve harmony.
- Outdated BIOS: The BIOS needs updates to work with Secure Boot, which is like a choreographed dance that requires a specific set of moves to be executed in a specific order. Without the updates, the BIOS can't perform the necessary steps to secure the boot process, making it incompatible with Secure Boot.
- Outdated SSD Drivers: Your SSD driver may not be fluent in Secure Boot's language. Updating SSD drivers is like giving your PC's translator the latest dialect for seamless communication.
- Corrupted System Files: System files are damaged, causing issues with the boot process. This can be resolved by running a system file checker to identify and replace any corrupted files, restoring a stable and harmonious system.
Feel free to share the post on your social media to help more users struggling with the provided information, which offers useful insights and tips.
Conclusion
This guide provides a comprehensive solution to fix Windows PC won't boot problems after Secure Boot activation, covering technical knowledge and hands-on experience. It offers a step-by-step approach to repair, including fixing broken peripherals, updating SSD drivers, and BIOS, and recommends using Qiling Disk Master for its advanced features to streamline the process.
As you navigate the Secure Boot troubleshooting process, remember that you're not alone. Share this post with others who are facing similar issues, and together, you can make this process easier.
FAQs on PC Won't Boot After Enabling Secure Boot
Here are the answers to the common queries that might help mitigate the issue you are having:
1. Why is my PC not compatible with Secure Boot?
Inadequate hardware or lack of support for UEFI firmware, which is a prerequisite for Secure Boot, may render your computer incompatible.
2. What will happen if I enable Secure Boot?
Secure Boot is a security feature that ensures only authorized bootloaders can run during startup, preventing unauthorized code execution and enhancing system security.
3. What to do if Secure Boot says enabled but not active?
If your system indicates that Secure Boot is enabled but not active, troubleshoot by checking the UEFI firmware settings, ensuring the Secure Boot is enabled in the firmware settings, and verifying that the Secure Boot keys are properly configured and updated. Additionally, check for any firmware updates and ensure that the UEFI firmware is set to boot from the correct device. If the issue persists, consider resetting the UEFI firmware to its default settings or seeking professional assistance.
- Ensure the PC supports UEFI firmware.
- Install the latest BIOS/UEFI firmware.
- Confirm signed and unmodified OS bootloader.
- Restart and check the Secure Boot status.
- Reset keys in UEFI/BIOS settings.
Related Articles
- How to Perform Diskpart Quick Format in Windows [Easy & Efficient Ways]
- How Do I Format External Hard Drive for PS5? Follow and Learn How-To
- What Is Format SD Card, Everything You Are Concerned About
- Diskpart Has Encountered an Error: The Media Is Write Protected
When you meet the Diskpart clean error: Diskpart has encountered an error the media is write protected during cleaning your disk using Diskpart, here you can find the reason and the corresponding solution. - How to Delete Large Files Command Line Windows 10?
If you need to delete large files, you can follow the methods outlined in this post, which includes deleting large files command line in Windows 10 and using a professional file delete program. - Fast Duplicate File Finder for All Windows OS Users
If you're looking for a fast duplicate file finder, you've come to the right place. A fast duplicate file finder can help you quickly identify and remove duplicate files from your drive, saving you time and space. This article will guide you through the process of using a fast duplicate file finder to efficiently find and eliminate duplicate files.