How to Replace Hard Drive in Dell Laptop [Step-by-Step]
If your Dell laptop's hard drive is old or running low on space, you can upgrade to a larger hard drive (HDD) or replace it with a solid-state drive (SSD) for improved performance. Qiling offers a detailed guide on how to replace the hard drive in your Dell laptop, and you can find more information and answers to any questions you may have by reading this article carefully.
Here's a summary of Dell laptop hard drive replacement in one paragraph:
| ⏱️Duration | About half an hour |
| ⛏️Tools | Screwdriver (Size PH.1 (required for opening the laptop) |
| 🧑💻Software | Qiling Disk Master (Cloning Software) |
| 👣Steps |
1️⃣Stage 1. Remove the Dell Hard Drive |
| 🧑🤝🧑Suitable Users | Intermediate to advanced users with basic technical knowledge and experience with hardware installations can follow this guide. |
Replacing a hard drive in a Dell laptop is a common task that many people undertake. It's a typical scenario where a user needs to upgrade or replace their existing hard drive with a new one, usually due to storage capacity issues or hardware failure.
Don't worry. Qiling provides detailed information and steps for this task. Keep reading for more.
Preparations to Replace Hard Drive in Dell Laptop
Before replacing the hard drive in your Dell laptop, it's essential to make the necessary preparations to ensure a smooth process. Having all the essential components and tools at hand will make the job easier and less stressful.
1. Find a suitable hard drive:
Here are two options to consider when replacing a hard drive:
- The Samsung 860 EVO SSD offers excellent performance and data transfer speed, making it a popular alternative. It comes in various storage options up to 2TB, and the 250GB 2.5-Inch SATA variant is available for around $50.
- The Western Digital Blue HDD is a budget-friendly option that offers a large storage capacity of up to 4TB for under $74, making it suitable for everyday computing needs.
2. Reliable disk clone software:
Use Qiling Disk Master, a free and efficient cloning tool, to rescue your data from your old Dell hard drive. It allows Windows users to transfer files, apps, games, and operating systems with ease.
3. Get the necessary tools:
To change the drive, a small slotted screwdriver (Size PH.1) is needed to remove the screws.
Replacing the hard drive in your Dell laptop is a straightforward process that requires some preparation. To begin, you'll need to prepare for the replacement process, which we'll discuss in the next section. Once you're ready, you can proceed with the Dell laptop hard drive replacement procedure, which involves several stages.
This guide shows you all the details about replacing a Dell laptop hard drive, and is worth sharing with someone who may benefit from the information.
How to Replace Hard Drive in Dell Laptop without Reinstalling
Replacing the hard drive in a Dell laptop involves three stages. First, you need to prepare the laptop by shutting it down and disconnecting the power cord. Next, you'll need to remove the bottom panel to access the hard drive, which typically requires a screwdriver.
Stage 1. Remove the Dell Hard Drive
To remove the hard drive from your Dell laptop, start by shutting down the computer and unplugging the power cord. Next, locate the hard drive, which is usually found on the bottom or side of the laptop, and gently pry it loose from its mounting bracket using a plastic spudger or similar tool.
Step 1: Turn off your laptop, then detach any external components like the AC adapter, battery, external mouse or keyboard, USB drives, etc.
Step 2: Press the power button for five seconds to discharge any remaining power in the system. This is a safety precaution to prevent any potential electrical shock or damage. It's a standard procedure for shutting down electronic devices.
Step 3: To access the laptop's panel, hold the laptop upside down and carefully remove all the screws. This will allow you to access the internal components and potentially troubleshoot or repair issues.
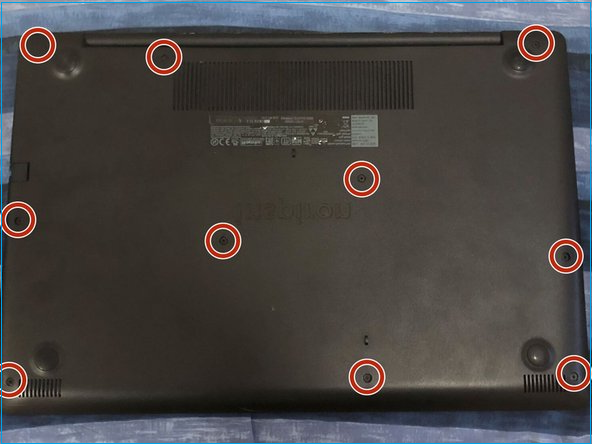
Step 4: Safely keep the access panel and screws aside.
Step 5: Remove the screws that hold the metal bracket to the laptop's casing, taking care not to damage any surrounding components. If the drive is also secured with clips, gently pry them open to release the drive. Be cautious not to touch any electrical components or cables.

Step 6: Double-check if you have unscrewed the hard drive. Do not apply heavy force while unclipping the bracket.
Step 7: To disconnect the hard drive, you would pull out the data cable, which is connected to either a SATA or IDE cable, in addition to the power cable.
Note: You can completely trust this guide, which is derived from Dell Support. If you have any questions, you can also turn to Dell support for assistance.
Stage 2. Clone Dell Hard Drive to the New Drive
Using cloning software like Qiling Disk Master, you can clone your old drive without manually transferring files, software, and the operating system to your new destination. This tool is a reliable and free solution that efficiently manages partitions, cloning, resizing, merging, splitting, and optimizing disk space, making it compatible with all Windows operating systems.
A 100% safe disk cloning program is available for download, featuring a user-friendly interface and robust cloning features. This tool is ideal for replacing an old disk, updating a hard drive, or transferring an operating system to a new computer. The cloning process is streamlined with a simple, step-by-step guide to help users through the process.
Step 1. Select the source disk.
- To clone a disk, click the "Clone" option from the left menu, select the desired cloning option (either "Clone OS Disk" or "Clone Data Disk"), and proceed by clicking "Next".
- Choose the source disk and click "Next".
Step 2. Select the target disk.
- Select the desired hard drive or solid state drive as your destination and click "Next" to proceed.
- Read Warning message and confirm "Yes" button.
Step 3. To view the disk layout and edit the target disk partition size, you can use the `fdisk` command. This command allows you to view the current partition table and make changes as needed. For example, you can use `fdisk /dev/sda` to view the partition table for the disk `/dev/sda`, and then use the `p` command to print the current partition layout.
To reinstall Windows, first back up any valuable data on the target disk, then boot from the installation media. The program will warn that it will wipe out all data on the target disk, so click "Continue" to proceed. If you're unsure, make sure to back up your data before proceeding.
You can customize your disk layout by selecting "Autofit the disk", "Clone as the source", or "Edit disk layout". If you want to leave more space for the C drive, choose the last option.
Step 4. Click "Start" to start the disk cloning process.
Stage 3. Install the New Hard Drive for Dell
To install your new hard drive on your Dell laptop, follow these steps. First, locate the hard drive compartment, usually found at the bottom or side of the laptop. Remove any screws that hold it in place and gently pull out the old hard drive.
Step 1: To install your new hard drive, first locate the empty bay in your computer case. Then, take your new hard drive and insert it into the bay, making sure it is securely fastened with screws.
Step 2: Align it with brackets and connectors.
Step 3: Connect the SATA or IDE cable and power line to the correct ports on the motherboard and the hard drive. This ensures proper data transfer and prevents damage to either the drive or the motherboard.
Step 4: Screw the hard drive gently and ensure a safeguarded connection.
Step 5: Insert the battery and turn on your laptop to test if the hard drive is detected correctly. If the laptop turns on, it means the battery is working properly and the issue might be with the hard drive itself or the connection to the motherboard.
Step 6: Turn off the laptop if it is working and replace the bottom access panel.
Step 7: Insert the screws which you removed in the first stage.
Note* To prevent any hardware damage, ensure all the screws are securely tightened, but avoid overtightening.
Simply turn on your Dell laptop, and you can enjoy its improved performance thanks to the upgraded hard drive.
You may also like the following topics about hard drive replacement:
Conclusion
Changing a hard drive in a Dell laptop involves taking out the old drive, transferring data, and setting up the new one. A reliable cloning tool like Qiling Disk Master can make this process efficient, allowing users to transfer their old hard drive to a new one without reinstalling the operating system. This tool is user-friendly and effective, making it a valuable asset for users who want to upgrade their laptop's storage without the hassle of reinstalling their operating system.
FAQs About How to Replace Hard Drive in Dell Laptop
This FAQ addresses common concerns and provides brief answers about the topic discussed on the page, offering a quick and easy reference for readers.
1. Can I replace HDD with SSD in Dell computers?
Replacing the HDD with an SSD can greatly increase the speed and performance of your computer.
2. Is it worth replacing Dell hard drive?
If your current hard drive is slow, corrupted, or needs more storage space, consider replacing it with a new one to improve your computer's performance and capacity. The decision to replace the Dell hard drive depends on your specific needs and requirements.
3. What to do if Dell hard drive is not installed?
If your Dell hard drive isn't recognized, ensure it's properly connected and visible in the BIOS settings. If it's still undetected, there might be a hardware or connection issue, so contact Dell support or a specialist for assistance.
Related Articles
- SD Card Benchmark 2024 Tutorial with Full Step Guide
- 3 Solutions to File Record Segment is Unreadable
- How to Transfer OS to New SSD? Beginners' Guide 2024
- How to Remove Password in Windows 10 Without Login
- How to Repartition Hard Drive without Losing Data in Windows 10/8/7?
Sometimes. you may need to repartition hard drive to make partition allocation more reasonable. Here we show you how to repartition hard disk without losing data via different methods in Windows 11/10/8/7. - How to Add Unallocated Space into Partition in Windows 10 Safely?
This post explains how to add unallocated space in Windows 10 via Disk Management. Besides, we also share a great tool just in case that you can't add unallocated space as expected.