How to Resize Virtual Hard Disk in 2023 [Efficient & Safe Solutions]
Learn how to resize a virtual hard disk using various tools such as Qiling Disk Master, Hyper-V, VMware, and Gparted on this page.
A virtual hard disk is a virtual storage device that can be used to store data, just like a physical hard disk. It's a virtual container that can be created on a computer or server, and can be used to store files, programs, and other data.
Can I Resize Virtual Hard Disk
A virtual hard disk is a type of disk image file format that stores the entire contents of a computer's hard drive.
A disk image, also known as a virtual machine, is a replica of an existing hard drive, including all data and structural elements. It can be stored anywhere the physical host can access it and is removable, allowing it to be stored and moved using a USB flash device. The user can resize the virtual disk using corresponding tools.
This article will guide you through the process of resizing a virtual disk using common tools, providing a helpful resource for those planning to resize a virtual hard disk.
How to Resize Virtual Hard Disk - 4 Tools
You can resize virtual disks using various tools, ranging from professional third-party software to built-in system tools on Windows. Depending on your needs and computer expertise, you can choose the tool that suits you best, as some may require basic computer knowledge. The process starts with the simplest option, which is discussed next.
Way 1. Resize Virtual Hard Disk via Qiling Disk Master
Qiling Disk Master Professional is a user-friendly tool that can be easily downloaded and installed on a virtual machine, allowing you to resize partitions on a virtual hard disk with just a few clicks. Even novice users can navigate the prompts and perform the task without requiring extensive computer knowledge.
To resize your virtual hard disk, follow the steps below. First, open the Hyper-V Manager and select the virtual machine you want to resize.
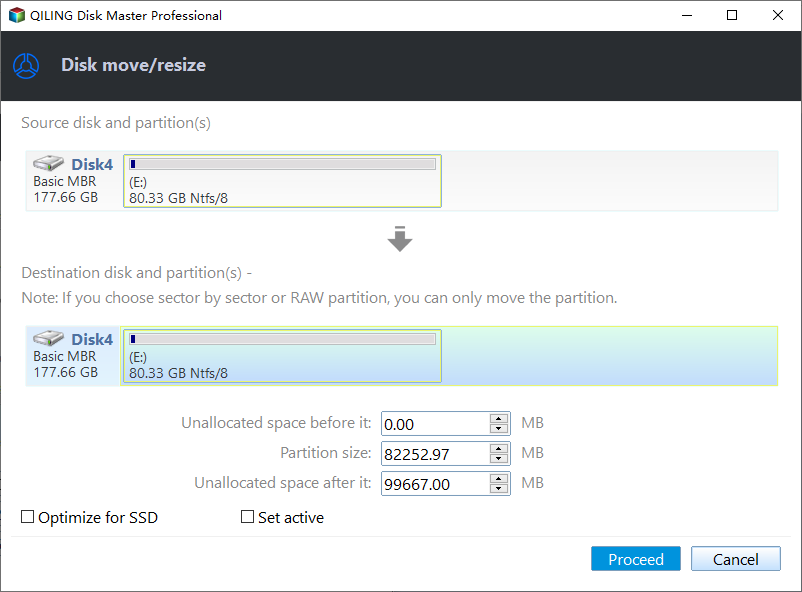
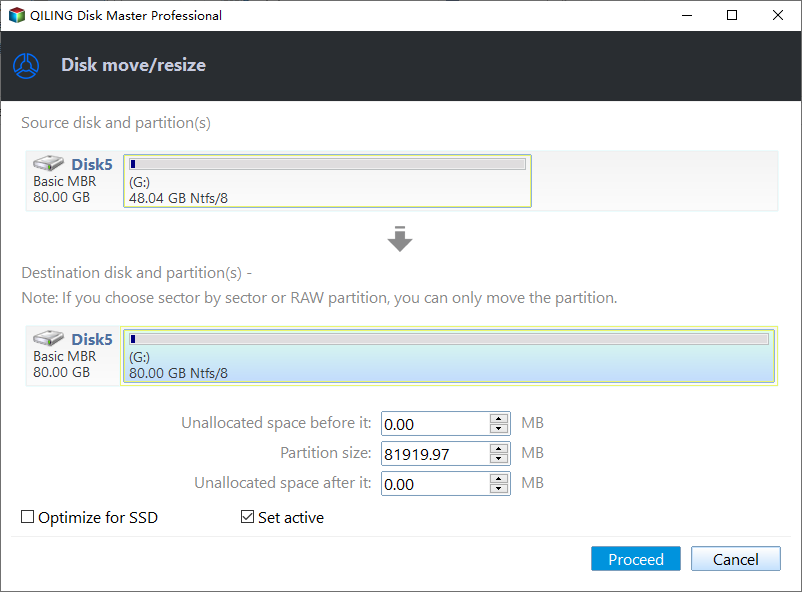
Step 1: Locate and select the target drive/partition
Launch Qiling Disk Master, go to Partition Manager, select the target drive/partition, right-click and choose "Resize/Move" to adjust its size.

Step 2: Resize or move the partition
1.To shrink the partition, simply drag one of its ends to free up unallocated space. Once done.
2. To extend the partition, ensure there is unallocated space available. If not, create some by following previous steps. Then, drag the mouse into the unallocated space and click "OK".
3. To move a partition position, you need to leave unallocated space next to the target partition. If there isn't any, free up some unallocated space first.
Right-To resize and move a partition, click on the target partition, select "Resize/Move" from the options, and then drag the whole partition left or right to adjust its position.
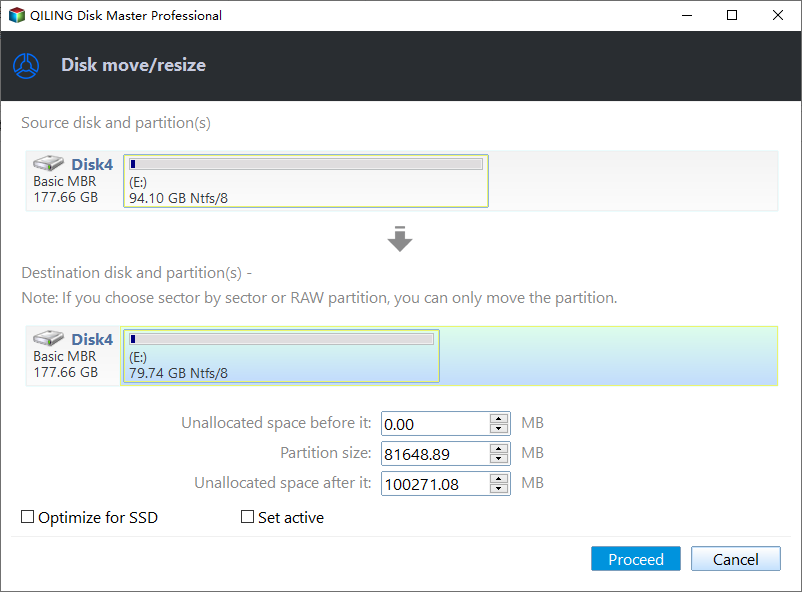
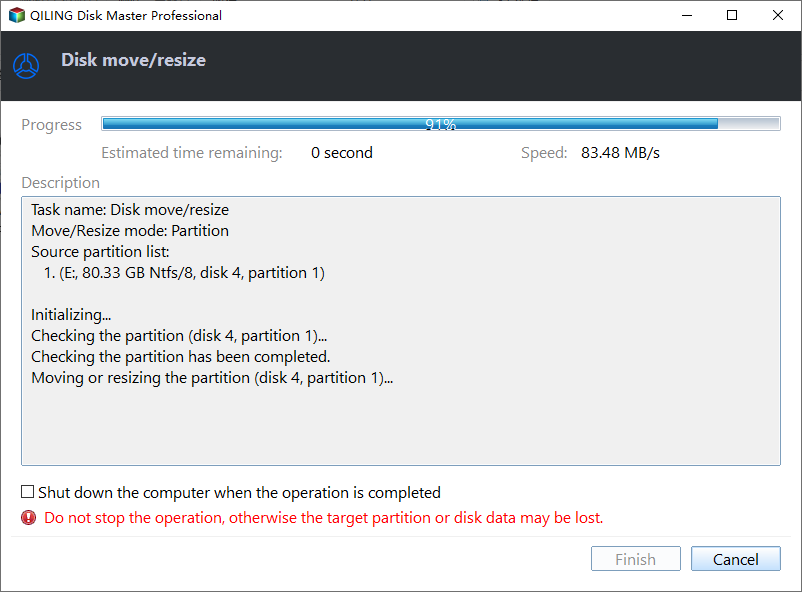
Step 3: Confirm the result and apply changes
At this step, you will see the new disk partition information and diagram, showing the updated configuration of your disk partitions. This is a visual representation of how your disk space is being divided and utilized, with details on the partition size, file system type, and any other relevant information.
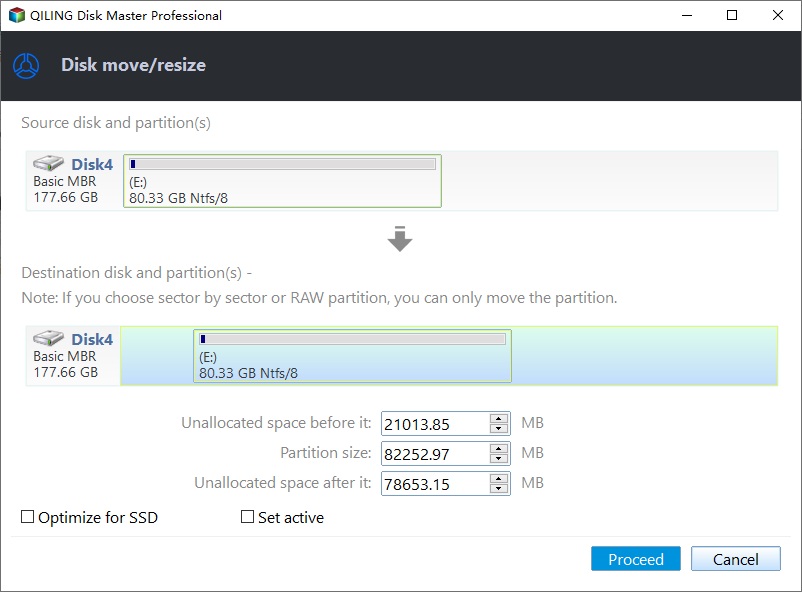
Click the "Proceed" button to save changes.
Other Features of Qiling Disk Master:
- Resize encrypted partition
- Wipe hard drive before selling
- Merge partitions on USB drive or SSD
- Move Unallocated Space to C drive/D drive
- Delete/extend/shrink/create or move partitions
This efficient partition manager can help with a variety of disk issues, making it a useful tool to download and try.
Way 2. Resize Virtual Hard Disk via VMware
Users can add a disk to VMware Workstation and increase the virtual machine disk size without replacing the physical hard disk, which can be done from the GUI of the VMware Workstation.
- Notice:
- To extend a virtual hard disk in VMware Workstation, you first need to shut down the virtual machine.
Here are the detailed steps:
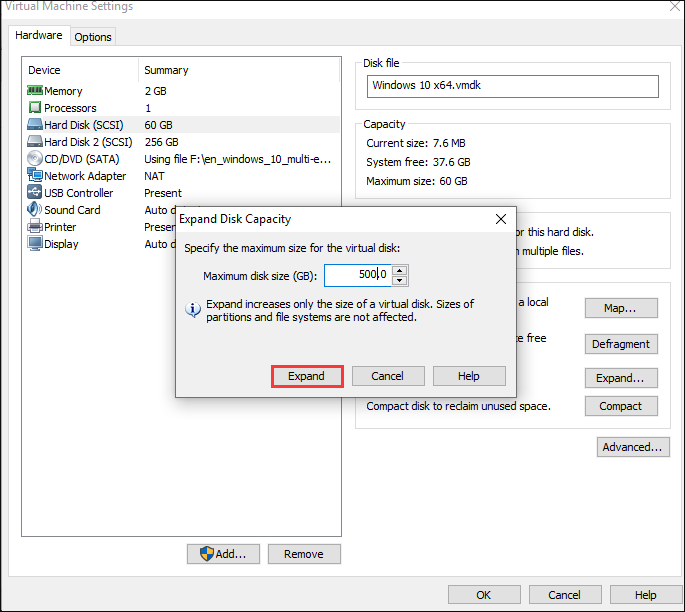
Step 1. To access your virtual machine, open VMware Workstation and select your Hard Disk under Devices.
Step 2. To expand a disk in VMware, click on the Hard Disk icon, then click the "Expand" button on the right side. If the "Expand" button is grayed out due to a snapshot, delete the snapshot to proceed.
Step 3. Specify and type the maximum size for the virtual hard disk and click Expand to confirm your action. Make sure to choose a size that is sufficient for your needs, but not so large that it consumes too much disk space.
Step 4. Click "OK," and you can finish this process.
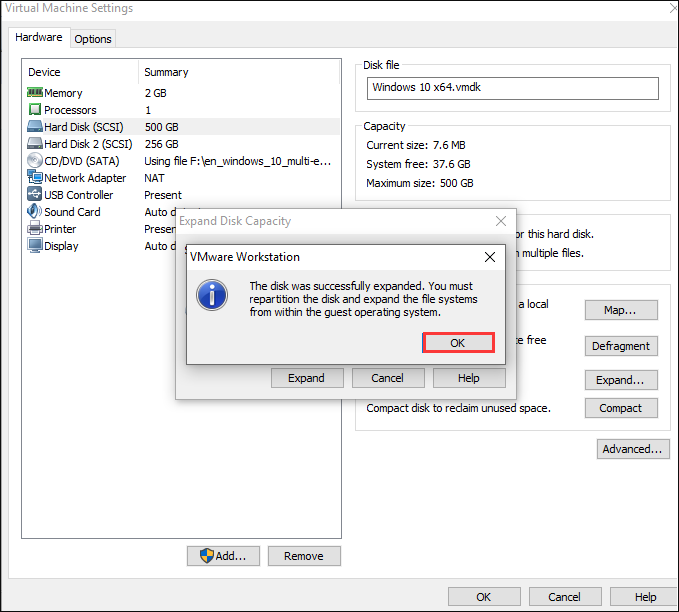
You have finished the process and resized your virtual hard disk. Now, the changes you made will take effect, and your virtual machine will have the new disk size.
Way 3. Resize Virtual Hard Disk via Gparted
GParted is a free, full-This tool is a Linux-based utility for managing disk partitions. It allows users to perform various operations such as deleting, creating, copying, resizing, moving, or marking partitions with different file systems.
You can use the GParted live CD to resize a virtual hard disk by starting the GParted ISO image in the virtual machine, which will lead you to the GParted partition editor in the live Linux environment, allowing you to expand the partitions on the virtual hard disk.
Here are the steps:
Step 1. To load the ISO file into the virtual machine, go to the virtual machine's setup window, select the virtual CD drive, and then browse to the ISO file on your computer.
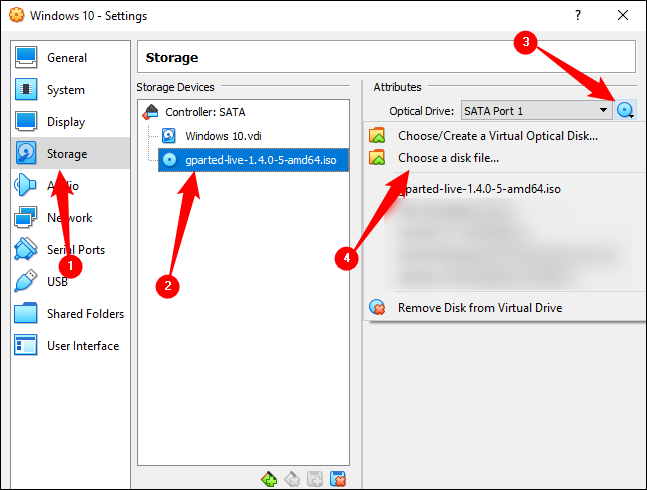
Step 2. After booting Gparted, locate the virtual disk partition and right-click on it.
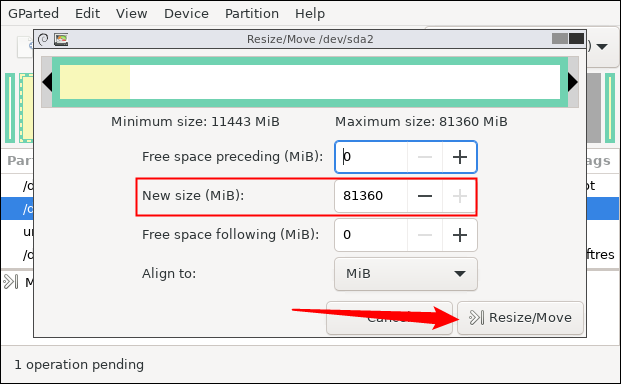
Step 3. To change the size of an object, enter a number in the New Size section, or drag the right side of the slider to the right.
Step 4. To resize a window, first, click on the window title bar to select it. Then, click on the window's sizing handle (the small square in the top-right corner) to bring up the window's resizing handles. Drag one of the handles to the desired size, and click on the "Maximum Size" field to enter a value.
Step 5. Click the top icon to save your changes and wait for the action to be completed.
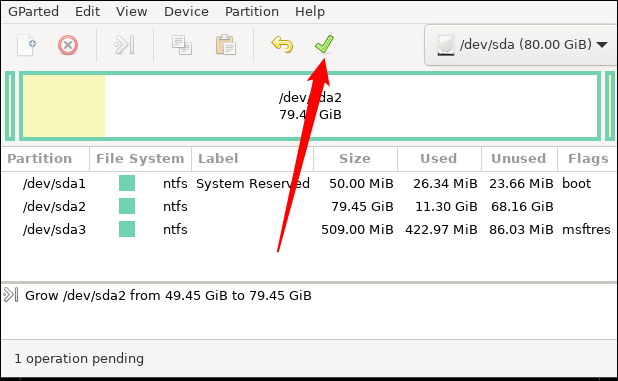
After resizing the virtual machine, restart it and delete the GParted ISO file. Windows will then check the file system types in the virtual machine to ensure everything is working properly, so be patient and let the process complete without interrupting it.
Way 4. Resize Virtual Hard Disk via Hyper-V
Hyper-Shortly, Disk Management in Server Manager allows resizing virtual drives online, but only supports Server 2012 R2 and above.
Prerequisites You Need to Know:
- 1. It must be a SCSI controller.
- 2. The virtual machine's storage must be in VHDX format, which is a Hyper-V virtual hard disk (VHD) format.
- 3. To get a user account and ensure it is a local Hyper-V Administrators group member, you can follow these steps: create a new user account with administrative privileges, add the user to the local Hyper-V Administrators group, and verify the membership. This will grant the user the necessary permissions to manage and interact with Hyper-V virtual machines on the local machine.
- 4. A computer running Windows Server 2012 R2 or later versions with the Hyper-V feature must be installed.
After reading the prerequisites, you can proceed with the guide to resize the virtual hard disk.
Step 1. To access Server Manager on the Windows Start screen, click on the Server Manager option.
Step 2. Click Hyper-V Manager on the Tools menu.
Step 3. To expand a virtual hard drive in Virtual Machines, right-click the virtual machine containing the VHD, click Settings, and select the VHD to extend.
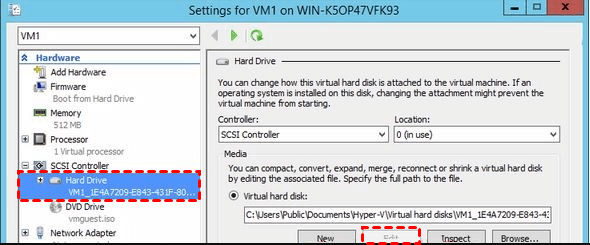
Step 4. Then click "Edit" to launch the Edit Virtual Hard Disk Wizard. Then click on Next.
Step 5. Select the "Expand" option and click Next.
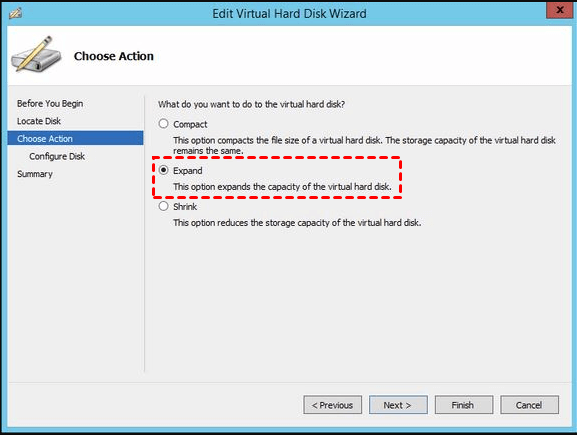
Step 6. Type the new size that you need and click Next.
Step 7. Then, click "Finish."
You may also like the following:
Resizing a virtual hard disk can be done in four ways, but it's essential to exercise caution to avoid data loss when running a virtual machine. These methods allow for adjustments to be made to the virtual hard disk, but it's crucial to take necessary precautions to prevent any potential issues.
Conclusion
Resizing virtual disks can be a challenge, especially when faced with a lack of space. Fortunately, there are various tools available to help with this process, including Qiling Disk Master, VMware Workstation, Hyper-V, and Gparted. For users with limited computer experience, Qiling Disk Master is a recommended option for resizing a disk partition on a virtual disk.
This tool is user-friendly and doesn't require extensive computing knowledge, making it accessible to all users for resolving disk issues with ease.
FAQs About How to Resize Virtual Hard Disk
Here are some other questions when you resize a virtual hard disk. Continue to read to learn more.
1. How do I resize a VHD disk?
Here are the steps to resize a VHD disk via the GUI with Hyper-V manager in one paragraph:
Step 1. Choose the Server Manager option and choose Hyper-V Manager.
Step 2. Locate the target virtual hard disk, click "Settings," and select the VHD you are going to resize.
Step 3. Click "Edit" and follow the wizard to resize the disk.
2. What is the maximum size of a virtual hard disk?
The maximum capacity of a virtual hard drive is 2,040 GB, but it's limited to 127 GB when connected to an IDE controller, and can be increased by connecting it to a SCSI adapter.
3. Does Hyper-V slow down computers?
Any Windows OS running with Hyper-V is technically running in a virtual machine, which can be slower than hardware.
Related Articles
- How to Clone Windows to External Hard Drive [100% Working Solution]
- SSD Slow Boot Windows 11 | Boot Windows 11 from SSD
- How to Fix The Selected Disk is not a Fixed MBR Disk
- How to Format to FAT32 in Windows 11 (4 Useful Methods)
- How to Securely Delete Multiple Recovery Partitions in Windows 10?
This article will introduce you why there are multiple recovery partitions in Windows 10 and how to remove these partitions. - Recovery Partition After Upgrading to Windows 10 from Windows 7/8
After upgrading Windows 7 or 8 to Windows 10, you find an extra recovery partition in Disk Management. What's it for? Can you delete it? This article will tell you all about recovery partition.