Fixed: The Computer Has Rebooted From A BugCheck [2024]
Key Takeaways:
- The "Blue Screen of Death" (BSOD) is a serious computer error caused by hardware issues or outdated drivers, leading to a system reboot.
- The issue may lead to system crashes or more severe damage. It can be resolved by updating drivers, running System File Check, and performing a Memory Check, among other troubleshooting steps.
- The error is typically caused by hardware issues, including RAM problems, memory corruption, or system file damage.
Sudden reboots and the "Computer Has Rebooted From A BugCheck" error, also known as the Blue Screen of Death (BSOD), can be frustrating. This critical system error can be caused by various factors, including hardware failures, outdated drivers, and other issues. This article will explore the meaning, causes, and solutions for this error, covering topics such as hardware problems, driver updates, and other potential causes, to help users resolve the issue.
How to Fix The Computer Has Rebooted From A BugCheck?
To resolve the "Computer Has Rebooted From A BugCheck" error, consider the following eight solutions: Check for driver updates, run a System File Checker (SFC) scan, and perform a DISM scan to ensure the system files and drivers are up-to-date and healthy. Additionally, run a virus scan to detect and remove any malware that might be causing the issue. You can also try running a System Restore to a previous point when the computer was working normally. If the problem persists, try updating Windows to the latest version, running a full disk cleanup, or even performing a clean install of Windows.
| Method | Efficiency | Difficulty |
|---|---|---|
| Uninstall the Device Driver | High A corrupt driver that was recently installed is the most likely cause of this error. | ⭐⭐ |
| Update the Device Driver | High - The program can fix outdated drivers. | ⭐⭐ |
| Run Windows Memory Diagnostic Tool | High The program can resolve system memory or RAM failures. | ⭐⭐⭐ |
| System File Check | Medium - The program checks the system files for errors. | ⭐⭐ |
| Check the Disk | Medium - The program is used to check for disk problems. | ⭐⭐⭐⭐ |
| Perform a System Restore | High - the program can fix problems caused by recent modifications. | ⭐⭐⭐⭐ |
| Use the Boot Repair Tool | High Through extensive research and optimization of the product's algorithms, the tool can effectively address and resolve many startup issues. | ⭐⭐ |
You can jump directly to the program you need or view step-by-step instructions for each program in turn. This allows you to quickly find the information you need and get started with the program without having to read through a long list of options.
Method 1: Uninstall the Device Driver
"Damaged or incompatible device drivers can cause system disruptions and trigger the error 'Computer Has Rebooted From A BugCheck.' To resolve this, try uninstalling any problematic drivers, but first disconnect any recently connected external devices to avoid further complications."
Follow the steps:
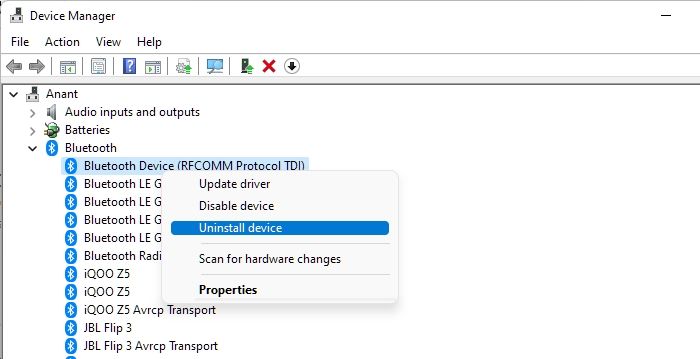
Step 1. To access the Device Manager, go to the Windows search bar and type in "Device Manager" and press Enter. This will open the Device Manager window.
Step 2. Locate the device driver you installed recently.
Step 3. Right-click on the problematic driver and click "Uninstall device."
Step 4. Check the "Delete the driver software for this device" and click on Uninstall.
Step 5. Restart your computer.
Method 2: Update the Device Driver
Updating the device drivers may resolve the issue, as outdated drivers can cause the error "The Computer Has Rebooted From A BugCheck."
Step 1. To update the graphics and audio drivers, open the Device Manager, right-click on the graphics and audio drivers, and select the "Update Driver" option. This will initiate the process of searching for and installing the latest drivers for these components.
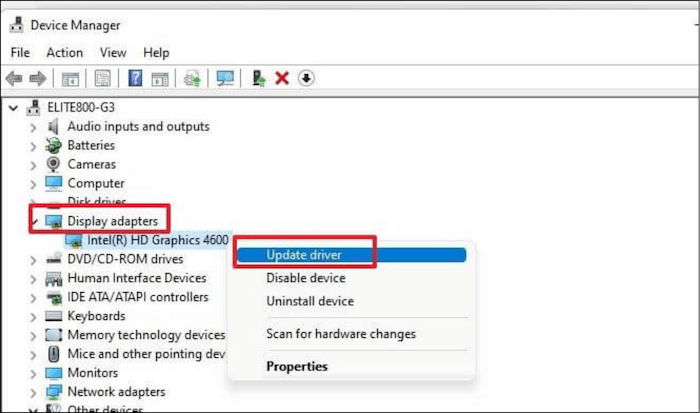
Step 2. Click "Search automatically for the drivers."
Note: To resolve the issue, start by updating your Graphics and Audio drivers, as they are often the culprits. If other drivers are also outdated, update them as well. If automatic updates from Device Manager fail, you can manually update drivers through Windows Update.
Method 3: Run Windows Memory Diagnostic Tool
Here's how to run the Windows Memory Diagnostic tool to assess your system's memory condition and resolve the BSOD problem caused by insufficient system memory or malfunctioning RAM: Run the Windows Memory Diagnostic tool to quickly assess the condition of your system's memory, which can help identify and resolve memory-related problems that may be causing the BSOD error.
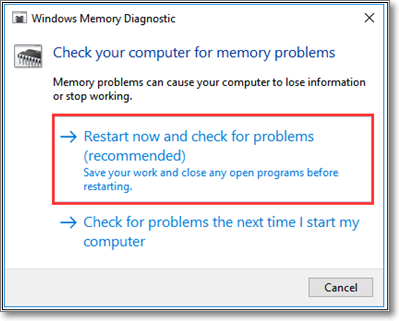
Step 1. To run the Windows Memory Diagnostic app, start by opening the Windows search bar and typing in "Windows Memory Diagnostic". This will initiate the search process, and once the results are displayed, click on the app to open it.
Step 2. Choose the "Restart now and check for problems" option.
Step 3. The test will initiate upon system restart. Allow the test to complete.
Step 4. The system will restart and display the test results after the test is completed.
Step 5. If any instructions appear on the screen, adhere to them accordingly.
Method 4: System File Check
You can check for issues through System File Checker (SFC) functionality in Windows, but for a quick and easy solution, consider using Qiling Disk Master, which can scan and replace damaged and corrupted files.
Step 1. Right-click the target partition that has a problem.
Step 2. Choose "Advanced" > "Check File System".
Step 3. Confirm if you want to hide the partition or not.
Step 4. In the Check File System window, select the "Fix the error on the disk" option.
Step 5. Click "Proceed" to check errors on your partition.
Other Features of Qiling Disk Master:
Method 5: Check the Disk
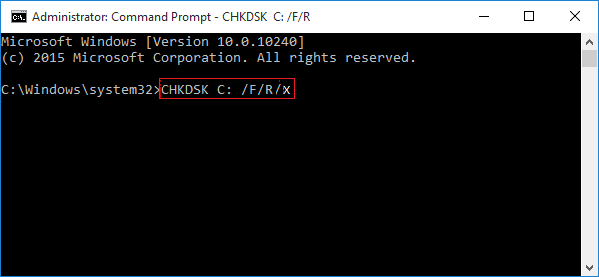
You can also fix a corrupted hard drive using the CMD. Windows provides a feature called Check Disk, also known as "CHKDSK", which identifies issues on your hard drive with a file system check. To check the disk, follow these steps.
Step 1. Run CMD as administrator. Type "chkdsk /f /x /r" to check disk issues and attempt automatic repair.
Step 2. When the volume is actively used, you will receive a notification to schedule a disk check for the upcoming system restart.
Step 3. Confirm by pressing Y and proceeding to reboot the device.
Step 4. Allow the Disk Check to commence without pressing any keys; simply await its initiation.
Method 6: Perform a System Restore
If the error "The Computer Has Rebooted From A BugCheck" persists, you can try a system restore. However, please note that this solution will affect your stored data, programs, and files. We recommend trying the previous solutions first. If those fail, you can proceed with the system restore, but make sure to back up your essential data and programs beforehand.
To perform a system restore using the System Restore Command, follow these steps:
Follow the below steps to perform a system restore:
Step 1. Type "rstrui" in the Windows Run utility and click "OK".
Step 2. Click "Choose a different restore point."
Step 3. Opt for the following option to review the list if a suggested restore point is available.
Step 4. If you're unsure about which restore point to choose, mark the "Show more restore points" checkbox to access additional alternatives.
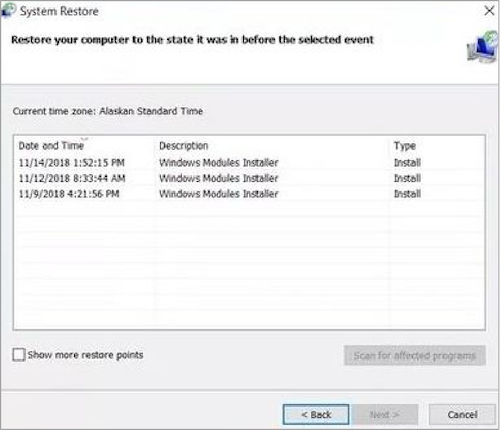
Step 5. Choose the earliest restore point.
Step 6. Proceed by clicking "Next" and confirming your restore point selection.
Step 7. Click "Finish" to start.
Utilizing System Restore allows you to revert your computer's settings to a prior state, addressing issues caused by recent changes.
Method 7: Use the Boot Repair Tool
Qiling Disk Master's "Boot Repair" feature can fix various boot issues through its optimized algorithm, making it a helpful tool for resolving multiple types of boot problems.
Download Qiling Disk Master to access its features, including the ability to download and install the software, and find other useful tools and functions within the program.
Step 1. After connecting the external drive/USB to your computer, start Qiling Disk Master, go to the "Tools and utilities" tab page, and click on "Create bootable media."

Step 2. Insert a USB drive or CD/DVD, and click "Create" to begin the process. Alternatively, you can burn the Windows ISO file to the storage media.

Step 3. Connect a bootable drive to a new computer, reboot it by pressing F2/Del, enter the BIOS, set the bootable drive as the boot disk, and exit the BIOS by pressing F10.
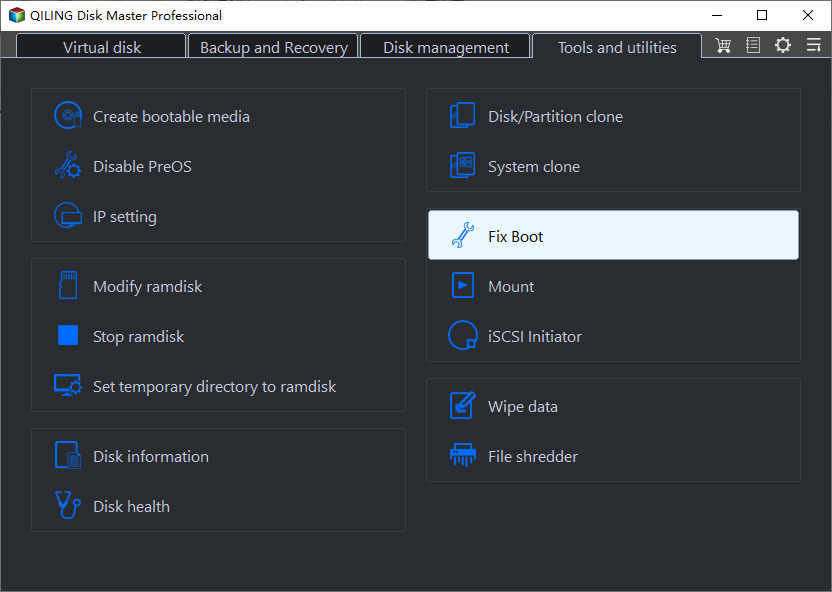
Step 4. After booting the computer again and entering the WinPE interface, open Qiling Disk Master and navigate to the "Tools and utilities" tab page, where you can click on "Fix Boot" to proceed.
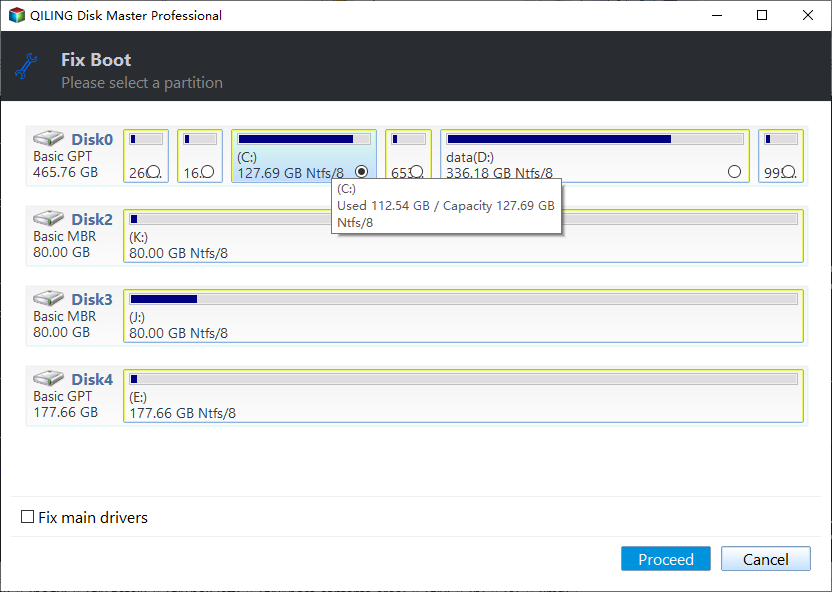
Step 5: Select the system you want to repair and click "Proceed".
Step 6. Wait a moment, and you will receive an alert that the system has been successfully repaired. Click "OK" to complete the boot repair process.
What Caused The Computer Has Rebooted From A BugCheck?
The "The computer has rebooted from a bugcheck" system error can occur due to various reasons, including hardware issues, software conflicts, driver problems, and system file corruption, which can cause the system to crash and restart unexpectedly. This error can also be triggered by overheating, power supply problems, or outdated BIOS. To resolve this issue, users can try troubleshooting steps such as running a virus scan, checking for hardware issues, updating drivers, and running a System File Checker (SFC) scan.
- RAM corruption
- Insufficient RAM
- Outdated device drivers
- Corrupted system files
Any number of reasons can cause the system to crash, go into boot loops, reboot frequently, and so on. However, these issues can be fixed with the solutions and troubleshooting methods provided in this tutorial. If you think this is useful, click the link below to share it with others in need.
Conclusion
To resolve the error "The Computer Has Rebooted From A BugCheck," you can try any of the eight solutions provided, which can be accessed through a tool like Qiling Disk Master's "Boot Repair" feature, offering a convenient and automated solution to this issue.
FAQs About The Computer Has Rebooted From A BugCheck
What is the "The Computer Has Rebooted From A BugCheck" error and how can I fix it? The "The Computer Has Rebooted From A BugCheck" error is a critical system failure that occurs when Windows detects a bug check, also known as a blue screen of death (BSoD).
1. What is the Windows bugcheck?
The Windows bugcheck, also known as the Blue Screen of Death (BSOD), is a critical error that displays on Windows systems, forcing the system to shut down to prevent data loss.
2. What is BugCheck 0x0000001A on Windows?
BugCheck 0x0000001A, also known as MEMORY_MANAGEMENT, occurs when Windows detects memory management issues, potentially caused by faulty RAM, driver conflicts, or software problems.
3. How to fix Bugcheck 0x00000116 on Windows?
BugCheck 0x00000116, also known as VIDEO_TDR_ERROR, occurs when the display driver fails to respond promptly, causing the system to crash. This error is often linked to graphics card or driver issues. To resolve this issue, you can try taking certain initiatives, such as.
- Cross-check and updates the Windows installation
- Update Graphics Drivers
- Check for Overheating
- Adjust Graphics Settings
- Check for Hardware Issues
- Perform System File Check
- Restore system
Related Articles
- Write Protected USB Format Tool / Removal Software Free Download
- How to Format Maxtor External Hard Drive [2023 Guide]
- How to Format USB to NTFS & Convert USB to NTFS in Windows 10/11 (All 4 Ways)
- How to Fix USB Flash Drive Not Showing Up in Windows 11🔥
- 4TB Hard Drive Only Shows 2TB Windows 11/10, Why and How to Restore the Full Capacity
If your 4TB hard drive only shows 2TB or less capacity in Windows 11/10/8/7, don't worry, this guide will help you understand why it's happening and how to fix it. - How to Access Linux EXT4 Partition and Data on Windows 11/10/8/7 in 2022
If you're using dual-booting Windows and Linux, you may need to access files on your Linux EXT4 partition from Windows. However, Windows can't read Linux EXT4/EXT3/EXT2 partitions directly.