How to Fix USB Flash Drive Not Showing Up in Windows 11🔥
Key Takeaways:
- Hardware, software, and file systems issues can cause USB flash drives to not show up in Windows 11.
- If your Flash Drive is not recognized in Windows 11, start by checking the USB port and cable for any issues, and ensure the drive is properly inserted. Next, restart your computer and check if the drive is recognized in Safe Mode.
- Try Qiling Disk Master, a trusted solution for you.
You're experiencing frustration because your USB flash drive is missing from your Windows 11 PC.
Qiling Software offers guidance to resolve the issue of a USB flash drive not showing up in Windows 11.
Quick Fixes to Fix USB Flash Drive Not Showing Up in Windows 11
To fix the issue of a USB flash drive not showing up in Windows 11, first, check if the drive is properly connected and recognized by the operating system. Ensure the drive is not damaged and the USB port is functioning correctly. Next, restart your computer and Windows Explorer to see if the drive appears.
- 1. To check if the USB drive is in Disk Management or File Explorer, follow these steps: Open Disk Management by searching for it in the Start menu, or by right-clicking on the Start button and selecting Disk Management. In Disk Management, look for the USB drive under the "Disk Management" section.
- 2. To resolve the issue, check if the USB device has an external power button and if it's enabled, as some USB drives can't be used in Windows 11 without it.
- 3. Check the USB drive in another computer to see if it's recognized and functioning properly, indicating whether it's damaged or not.
- 4. Reboot the computer: See if a simple reboot can recognize the USB.
If you're experiencing issues with a USB flash drive in Windows 11, the initial checks are essential to resolve the problem. If these checks don't resolve the issue, you can refer to the advanced solutions in the next section. If others encounter the same error, you can share this tutorial with them.
Complete Guide to Fix USB Flash Drive Not Showing Up in Windows 11
To troubleshoot why a USB flash drive is not showing up in Windows 11, let's consider the various scenarios: the drive might be faulty or damaged, the USB port might be malfunctioning, the drive might be formatted with a file system not supported by Windows 11, or there might be a driver issue or conflict with other devices. Additionally, the drive might not be properly inserted or seated in the USB port, or the Windows 11 operating system might not be configured to recognize the drive.
If your USB flash drive is not showing up in File Explorer but is visible in Disk Management, it's likely due to a driver issue or a problem with the drive's file system. In this scenario, the drive is recognized by the operating system, but its contents are not accessible through File Explorer. This can be caused by a corrupted file system, a faulty driver, or a hardware issue.
If your USB flash drive isn't showing up in Windows 11, try updating your drivers, checking the drive for errors, and ensuring it's properly inserted. You can also try using a different USB port or restarting your computer. If none of these solutions work, you might need to format the drive or consult the manufacturer's support for further assistance.
If your USB device is not visible or not working, don't worry! You can try a few solutions to restore its visibility and operation. If the issue is due to a loose connection, simply plug it in again.
Situation 1. USB Flash Drive Not Showing Up in File Explorer But in Disk Management
The USB flash drive disappearing from File Explorer but still appearing in Disk Management on Windows 11 can be very puzzling, making it difficult to determine what's going on with your device.
Check the step-by-step guide given below to fix this issue.
Fix 1. Create a New Partition
If a USB drive has a black bar at the top, it indicates unallocated space, which can prevent Windows 11 from recognizing it. To resolve this, creating a new partition on the USB drive can be a solution. This can be easily achieved using the "Create Partition" feature in Qiling Disk Master, a flexible disk management utility.
To create a new partition, download the software and follow these steps: select the drive you want to partition, choose the size, format the new partition, and assign a drive letter. If you're using a Mac, use Disk Utility; for Windows, use the built-in Disk Management tool or a third-party software like Qiling Disk Master.
Step 1. Launch Qiling Disk Master. On the main window, right-click on the unallocated space on your hard drive or external storage device and select "Create" to initiate the creation process.
Step 2. To create a new partition, you should adjust the partition size, file system, label, and other settings according to your needs. This involves specifying the desired size for the new partition, selecting the appropriate file system, assigning a label to the partition, and configuring any additional settings as required. This process allows you to create a new partition that meets your specific requirements, whether it's for storing data, installing an operating system, or other purposes.
Step 3. Click on the "Proceed" button to create a new partition.
Watch the video tutorial to learn how to create a partition in NTFS, FAT, or EXT file system.
Qiling Disk Master is a software that helps solve hard disk problems and is also a useful tool for Windows boot repair, helping to resolve issues such as a black screen or a stuck computer.
Fix 2. Assign New USB Disk Drive Letter
If your USB drive doesn't have a drive letter, it may go unnoticed in File Explorer. To rectify this, simply follow these easy steps: 1. Connect your USB drive to your computer, 2.
Step 1. Launch the Disk Management tool.
Step 2. To change the drive letter of a USB disk drive, locate the drive, right-click on it, and select "Change Drive Letter and Paths" from the context menu.
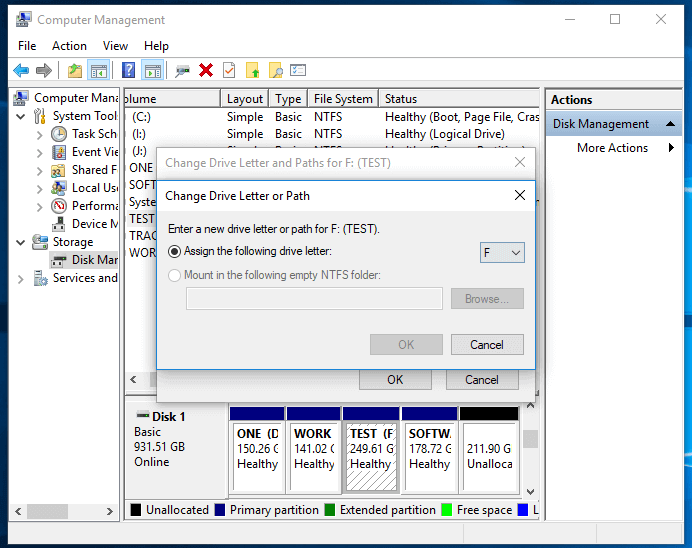
Step 3. After selecting a letter, click "Change" and "OK" to confirm.
Fix 3. Update or Reinstall USB Drivers
If your USB drivers are out of date or corrupted, it may cause connection issues. To resolve this, you can try updating your drivers to the latest version or reinstalling them. This should help resolve any connectivity problems you're experiencing.
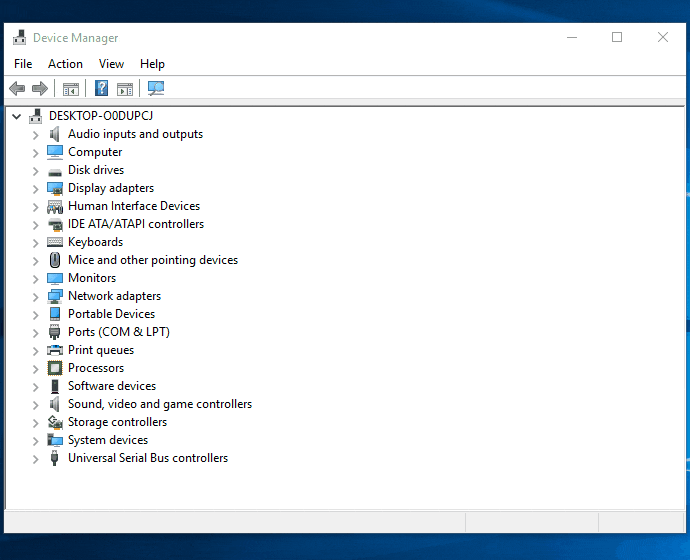
Step 1. Open "Device Manager."
Step 2. Expand the "Universal Serial Bus Controllers" section.
Step 3. For each of the USB drivers, choose the "Update driver" or "Uninstall device" option, keeping in mind that you may need to reinstall the driver later.
Fix 4. Fix File System Errors
Qiling Disk Master is a tool that helps detect and repair file system errors on a USB drive, which can occur due to improper removal, power outages, or other unforeseen events.
To quickly identify and rectify file system errors on a USB drive, use the "Check File System" feature. This feature allows you to scan the drive for errors and fix them, ensuring the drive's optimal working condition and compatibility with Windows 11. To do this, simply follow the steps below: check the file system, identify the errors, and rectify them.
Step 1. Right-click the target partition that has a problem.
Step 2. Choose "Advanced" > "Check File System".
Step 3. Confirm if you want to hide the partition or not.
Step 4. In the Check File System window, select the "Fix the error on the disk" option.
Step 5. Click "Start" to check errors on your partition.
Fix 5. Format USB
If other fixes didn't work, you can try formatting your USB or converting RAW to NTFS/FAT32 to solve the problem, especially if it's due to severe file system errors, corruption, or malware infections. Qiling Disk Master's "Format" feature can simplify this process.
Formatting the drive can resolve issues that prevent it from showing in Windows 11, but be sure to back up important files first. Once formatted, the USB drive should be accessible and ready for use.
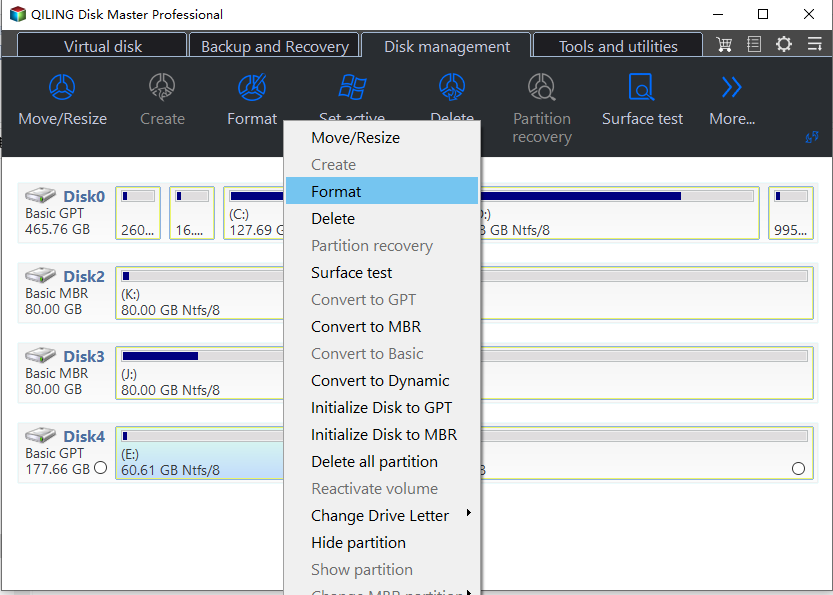
Step 1. Launch Qiling Disk Master, right-click the partition on your external hard drive/USB/SD card which you want to format and choose the "Format" option.
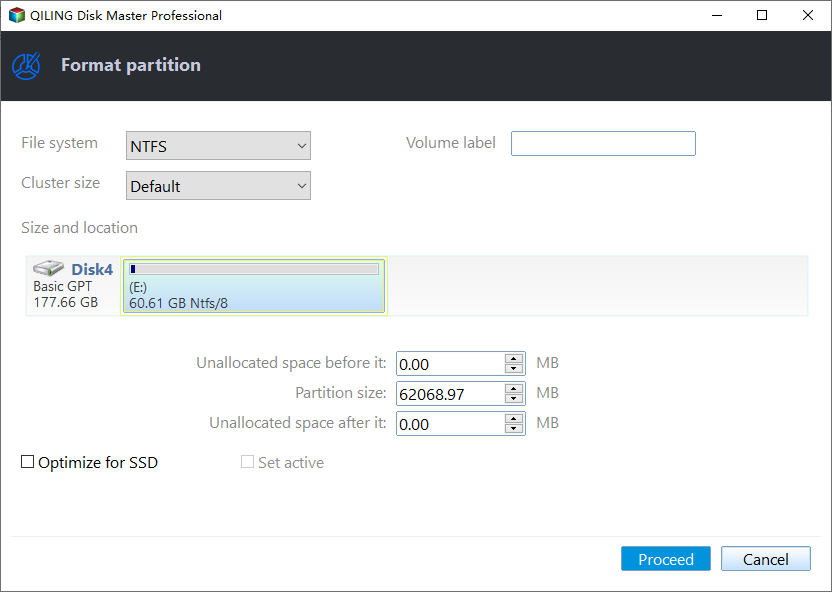
Step 2. Assign a new partition label, file system, and cluster size to the selected partition.
Step 3. To format your external hard drive, USB, or SD card, click the "Proceed" button. This will initiate the formatting process, which will erase all data on the device.
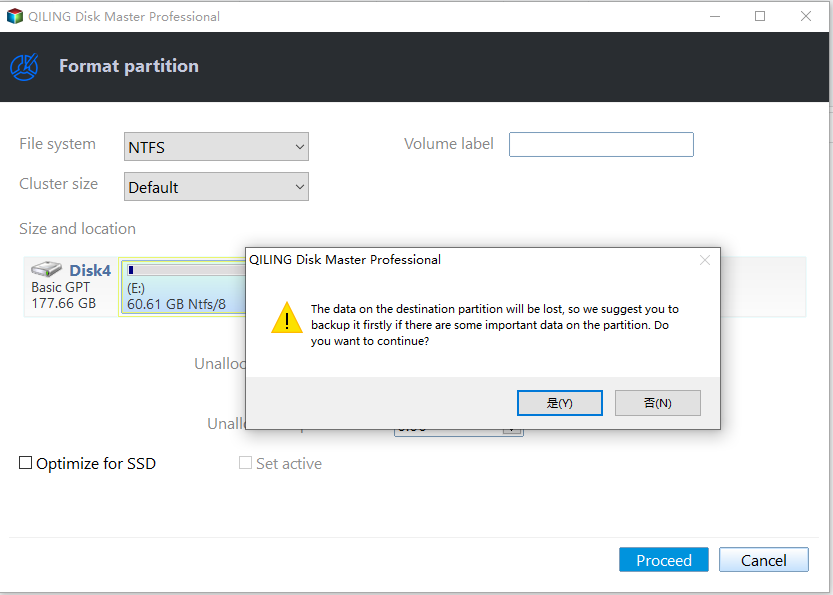
Step 4. In the Warning window, click "Yes" to continue.
You May Also Like:
Situation 2. USB Flash Drive Not Showing Up in Windows 11
If your USB flash drive isn't showing up in Windows 11 or isn't visible in Disk Management, there are several troubleshooting methods you can try to resolve the issue.
Fix 1. Check Connections
To troubleshoot issues with a USB drive not being recognized by your computer, start by ensuring the drive is securely attached to your computer. Then, try using a different USB port on your computer to rule out any port-specific problems.
Fix 2. Enable Flash Drive in BIOS Setup
To activate your USB drive in your computer's BIOS or UEFI settings, you'll need to enter the settings and select the USB drive as a boot option. The steps may vary depending on your computer's make and model, but generally, you'll need to press a key like F2, F12, or Del while your computer is booting up to enter the BIOS or UEFI settings. From there, you can navigate to the boot options and select the USB drive as a boot device.
Step 1. To access the BIOS or UEFI setup, restart your computer and, during the boot process, press the specified key (usually F2, Del, or Esc) to enter the settings menu.
Step 2. Select the "Advanced" or "Boot" section.
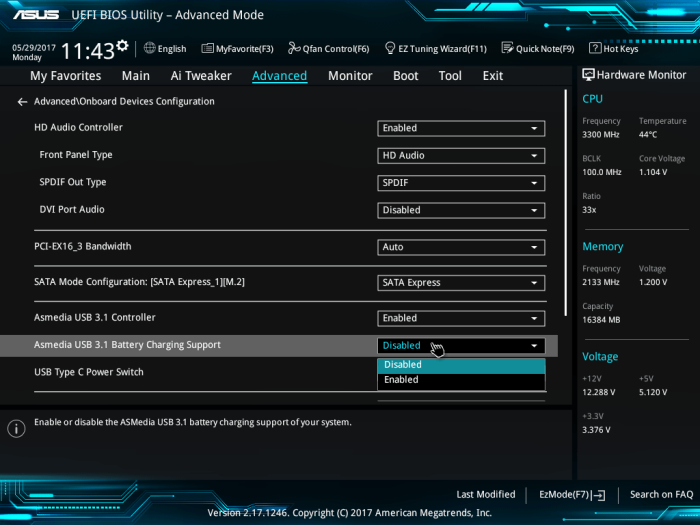
Step 3. Look for a USB or external device choice.
Step 4. Enable the "External USB Port" option and check if the issue persists.
Further Reading: Boot Drive Not Showing Up in BIOS
Fix 3. Reinstall the USB Controller
To resolve issues with USB controllers not being recognized, try reinstalling the drivers for the affected controllers. This can often resolve problems caused by corrupted or outdated drivers. Simply go to the device manager, find the USB controller device, right-click it, and select 'Uninstall device'.
Step 1. Open "Device Manager."
Step 2. Expand "Universal Serial Bus controllers."
Step 3. Right-click your USB controller to select "Uninstall device."

Step 4. Restart your computer and reinstall the USB controllers.
Fix 4. Disable USB Selective Pause Setting
Disabling selective suspend can help resolve issues caused by USB power management settings.
Step 1. Got to the "Power & sleep settings."
Step 2. Select "Additional power settings" and click "Change plan settings."
Step 3. Choose "Change advanced power settings."

Step 4. Go to USB settings, then select USB selective suspend setting and change it to Disabled.
Fix 5. Modify USBSTOR
To modify the system files, you can use the `sudo` command followed by the `nano` editor to edit the file. This approach should be done with caution as it involves modifying system files.
Step 1. Open the Run dialog.
Step 2. Once you type "regedit" and hit Enter, the Registry Editor will launch.
Step 3. Go to "HKEY_LOCAL_MACHINE\SYSTEM\CurrentControlSet\Services\USBSTOR."
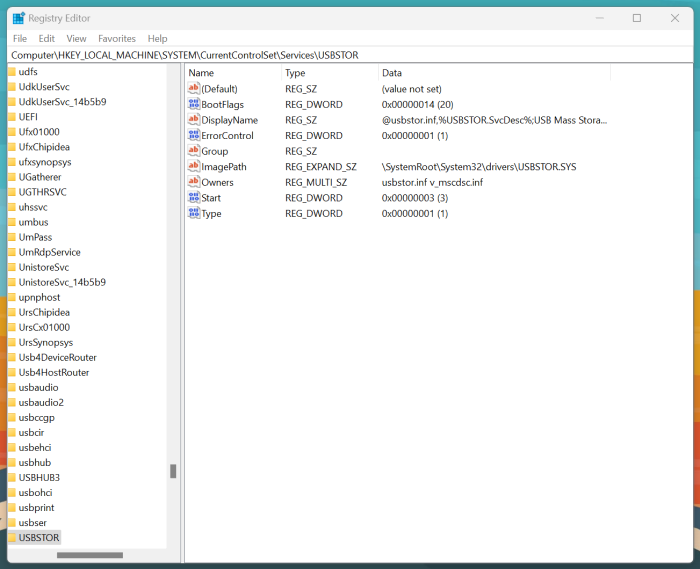
Step 4. Find the DWORD value "Start."
Step 5. Double-click on the "Start" key and set its value to "3" if it's not already set that way.
Step 6. Restart your computer after quitting the Registry Editor.
If you found this tutorial helpful, you might want to forward it to others who have the same issue.
Why USB Flash Drive Not Showing Up in Windows 11
Identifying the underlying variables contributing to a problem is crucial to finding a solution. Several factors could be at play, including various underlying variables, which need to be pinpointed to address the issue effectively.
- USB connection failure: Faulty or incompatible USB ports can cause USB connection failures that go unreported by the system due to physical connection difficulties.
- USB corruption: USB corruption can manifest as file system errors, faulty sectors, or physical damage to the device, potentially causing the USB device to disappear from view and disrupting regular connection with Windows 11.
- USB Incompatibility: If your USB drive isn't compatible with your Windows PC, it's likely due to an incompatible file system. To resolve this, simply format the USB drive with a file system that's compatible with Windows, which should resolve the issue.
- USB drive letter conflict: A USB drive letter challenge occurs when Windows doesn't recognize a USB drive due to a lack of assigned partition or drive letter, causing it to be invisible in File Explorer.
- Corrupt or outdated driver for USB storage device: Corrupt USB storage device drivers or outdated USB controller drivers may also cause a USB drive to not appear in Windows 11.
To resolve the issue of a USB flash drive not displaying in Windows 11, you can try restarting your computer, checking the drive's file system, and updating your operating system and USB drivers. If the problem persists, you may need to format the drive or use the built-in Windows tool to assign a drive letter to the device.
Conclusion
If your USB flash drive is not showing up on your Windows PC, try restarting your computer, checking the drive's file system, and ensuring it's properly connected. You can also check the drive's properties, run a disk check, and update your USB drivers. If the issue persists, try using the built-in Device Manager to troubleshoot the problem. If none of these solutions work, consider formatting the drive to start fresh.
Share valuable resources with others, and utilize Qiling Disk Master for efficient solutions.
USB Flash Drive Not Showing Up in Windows 11 FAQs
If your USB flash drive isn't showing up in Windows 11, you're not alone. Many users have encountered this issue, and it can be difficult.
1. Why is my USB not showing up but making a sound?
A USB drive that makes a connection sound but isn't visible to your computer suggests that the hardware is detected, but the drive may not have been assigned a drive letter, making it inaccessible.
2. How to fix my USB drive not showing up in Disk Management?
Connect the USB drive and ensure it's powered on and visible in Disk Management. If needed, assign a drive letter to it.
3. How to get Windows 11 to recognize my USB drive?
Connect the USB drive and check if it appears in File Explorer. If not, open Disk Management to assign a drive letter.
Related Articles
- How to Enable/Disable UEFI Mode? Your Complete Guide
- How to Align Partition | Easy and Detailed Tutoial
- CHKDSK Cannot Continue in Read-only Mode: Get 5 Fixes for CHKDSK Read Only Mode
- Clean VS Formatting a Hard Drive, Can You Tell Me Their Difference
Is cleaning a hard drive the same as formatting a hard drive? Of course not. This article focuses on this question and tells you how to format a hard drive instead of cleaning a hard drive. - Download Corrupted Memory Card Formatting Software for Free
If you're looking for a solution to format and repair a corrupted or damaged SD memory card, this page can guide you through the process using a corrupt memory card formatting tool and command prompt to fix issues with your SD card, USB flash drive, pen drive, or other storage media. - What to Do with Corrupted Operating System
Corrupted operating system files can cause a range of problems, from halting a computer's functionality to causing significant user frustration. Fortunately, there are several options available to fix these issues.