Fix 0x8004242D: Cannot Create a Partition on the Disk
Quick Navigation:
- What 0x8004242D Reports
- Four Disk States That Cause It
- Read the Layout Before You Write
- Create the Partition with Qiling
- Frequently Asked Questions
You open Disk Management, right-click a block of free space, choose New Simple Volume, and the wizard ends with 0x8004242D and a message that the partition could not be created. The disk is still there, the space is still empty, and the same wizard fails again on the next attempt. The code is a refusal from the Virtual Disk Service rather than a hardware error: the layout you asked for cannot be applied to the disk in its current state. Four states account for almost every case, and each one is visible before you touch anything.
What 0x8004242D Reports
Disk Management and the DiskPart command do not write to a disk by themselves. They pass the request to the Virtual Disk Service, or VDS, which checks it against the current layout and either applies it or returns a status code. 0x8004242D is one of those refusals, and it carries no information about which check failed. A healthy disk with a full partition table returns it just as readily as a disk that is flagged read-only.
That limitation is also the key to the repair. Because the code does not name the condition, retrying the same wizard only repeats the same request and produces the same answer. Read the disk first, match what you see to one of the four states below, change that state, and the request will be accepted the next time it is made.
Two shortcuts make the situation worse and should be avoided while you diagnose. Deleting an existing partition to free a table entry destroys the volume that uses it, and converting a basic disk to dynamic to unlock free space makes the volumes harder to read on another machine and is not reversible from Disk Management. Neither step is needed to find out why the request was refused.
Four Disk States That Cause It
The first state is a full MBR partition table. An MBR disk holds four primary entries, and once all four are used no fifth partition can be created no matter how much unallocated space remains. A fifth volume on such a disk has to be a logical drive inside an extended partition, or the disk has to be converted to GPT, which removes the entry limit and is the cleaner answer on a modern machine.
The second state is the absence of usable unallocated space. Free space must exist as an unallocated block, not as unused room inside an existing volume, and a new volume can only be carved from a block that is at least large enough for the file system overhead. A disk whose only free space sits behind a partition you cannot move will refuse the request even though the total free capacity looks generous.
The third state is a disk that refuses every write. A disk marked read-only, a disk left offline after an enclosure was reconnected, or a removable card with its write-protect switch engaged returns the same code. The flag may be set on the disk, by a policy in Windows, or by a switch on the hardware, and clearing it is a separate job from creating the partition.
The fourth state is leftover metadata. A disk that was once part of a storage pool, or one that was converted between MBR and GPT by a tool that did not finish, can carry a backup header or a protective entry that no longer matches the primary table. Windows sees a disk that is neither clean nor consistent and refuses to add an entry to it. The usual sign is a disk that shows the right capacity but offers no usable free space, or one that reports a partition style you did not expect.
Read the Layout Before You Write
Disk Management, DiskPart, and chkdsk are Microsoft tools that ship with Windows. They are not part of Qiling Disk Master, and this section uses them only to read the state of the disk before anything is changed. Disk Management shows the partition style next to the disk number, the number of volumes, and the exact position of the unallocated block. That single view is enough to tell the four states apart in most cases.
DiskPart reports the same facts as text and is easier to compare when several disks are attached. Open a command prompt as administrator, run diskpart, then list disk and select disk followed by the number of the disk you are working on. The detail command prints the partition style and the offsets, and list partition shows how many entries are already in use. Read the output, note the disk number, and close the window; nothing has to be written at this stage.
Confirm that you are working on the right disk before you continue. Two drives of the same capacity are separated only by their disk number and their position in the list, and every operation later in this guide applies to the disk you select. A photo of the window, with the disk numbers and the volume letters visible, settles the question later if the layout changes.
If an existing volume holds the only copy of your data, copy it to another disk before you convert or shrink anything. Creating a partition in free space is harmless, but the fixes for the other three states change structures that existing volumes depend on.
Create the Partition with Qiling
Qiling Disk Master makes the same request to Windows but shows the pending result before it runs, so a refusal caused by the layout is visible before anything is written. The operations below cover the two common paths: creating a volume on a disk that already has free space, and converting an MBR disk whose table is full before creating the volume.
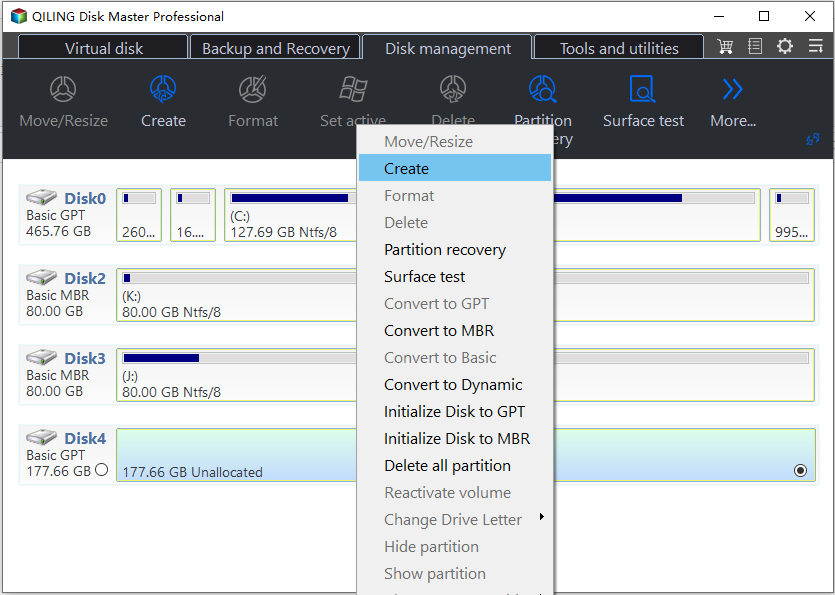
Step 1. Right-click the unallocated block and choose Create. Open the Disk management tab and read the disk map, which is drawn to scale. The unallocated block sits to the right of the last partition and is labelled as unallocated; right-click the block itself rather than a volume, because the Create command is greyed out on a partition that already has a file system.
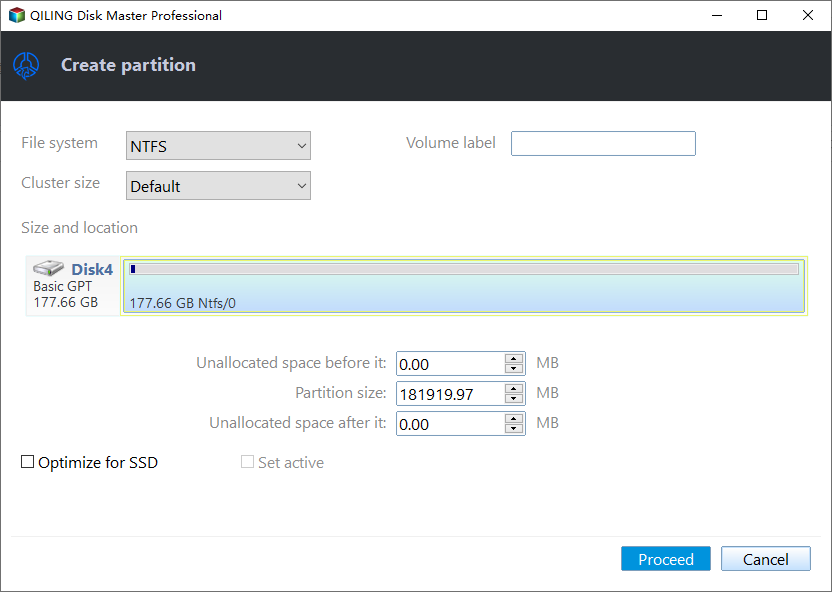
Step 2. Set the file system, the label, and the size. Keep the cluster size on Default unless a specific workload needs another value. Leave a little unallocated space behind the new volume if you may want to extend it later, because extending requires free space directly adjacent to the partition.
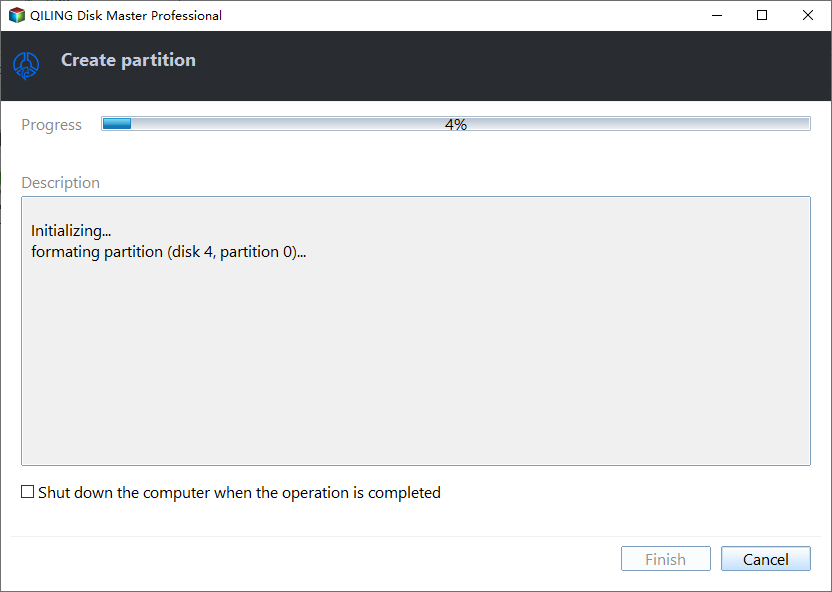
Step 3. Preview the task and click Proceed. The preview lists the disk number, the size, and the file system, and the task has not started yet. Confirm those three values, then start the job and wait for the window that reports completion; the volume is formatted as part of the same task, so a letter appears in File Explorer as soon as it finishes.
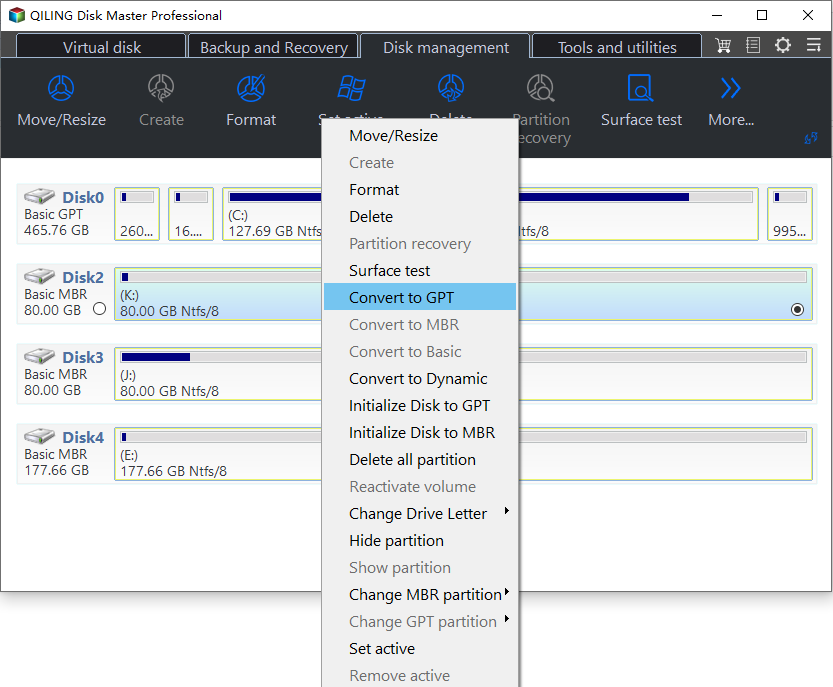
Step 4. When the table is full, convert the disk to GPT first. If Step 1 is refused on an MBR disk that already holds four primary partitions, right-click the disk, choose Convert to GPT, and confirm the disk number. The conversion begins as soon as the command is chosen: there is no preview page and no Proceed button, so do not interrupt the machine or cut the power while the disk is being rewritten. Wait for the task to report that it has finished, then repeat Steps 1 to 3 on the new unallocated space. The existing volumes keep their data, but check that the firmware still starts the system before you rely on the change.
After the task completes, reopen Disk Management and confirm that the new volume carries a letter and the file system you selected. If the disk was read-only or offline, clear that condition first, because no tool can create a partition on a disk that rejects every write.
Frequently Asked Questions
Does 0x8004242D mean the disk is damaged?
No. The code reports that the requested layout cannot be applied, not that the hardware failed. A full MBR table, a read-only flag, or a block of free space in the wrong position all produce it on a disk that works perfectly.
Can I create a fifth partition on an MBR disk?
Not as a primary partition, because MBR allows four entries. The fifth volume has to live inside an extended partition as a logical drive, or the disk has to be converted to GPT, which the machine must be able to boot in UEFI mode.
Will converting to GPT remove my files?
The conversion rewrites the partition style and keeps the existing volumes, but it can affect how the firmware finds the boot files. Back up the disk first, and confirm that the system boots in UEFI mode rather than Legacy before you convert a disk that holds Windows.
Related Articles
- Fix 0x8004240F: Cannot Create Partition or New Simple Volume
- MBR Four Primary Partition Limit: Cannot Create More
- No Drive Letter After Resizing or Cloning a Partition
- Windows Setup Error 0x80300024: Target Disk Not Supported
- Partition Table Damaged: Repair MBR and GPT
Products
Articles & Tutorials
- Data Recovery
- Data Backup
- File Recovery
- File Backup
- System Backup and Restore
- Disk and Partition Clone
- Technical articles
- Mobile articles
- Disk Master Help
- Windows Data Recovery Tutorials
- Windows Secure Delete Tutorials
- Windows Partition Management Tutorials
- Windows File Backup and Restore Tutorials
- Windows System Backup and Restore Tutorials
- Windows Disk Backup and Restore Tutorials
- Windows Clone Tutorials