2022 Tips to Fix 100 Disk Usage in Windows 7/8/8.1/10/11
Your hard drive is likely being overworked, causing the lag. It's possible that the disk activity is due to a resource-intensive program or process running in the background, or it could be a sign of a more serious issue like a failing hard drive. I recommend running a disk check (chkdsk) and a virus scan to rule out any potential issues.
Top 5 Ways to Fix 100 Disk Usage in Windows 7/8/8.1/10/11
Computers or laptops are becoming slower with frequent pop-ups warning you that the disk is 100% used. To fix the disk 100% usage issue and optimize computer performance, follow these effective solutions. Don't let these problems bother you anymore, as the steps below will help you resolve the Windows 7 100 disk usage issue with ease.
| Workable Solutions | Step-by-step Troubleshooting |
|---|---|
| Fix 1. Check and Fix System Error | Open Qiling Partition Master on your computer. Then locate the disk...Full steps |
| Fix 2. Reset the Virtual Memory | Press Windows key + Pause/ Break key at the same time. Then choose...Full steps |
| Fix 3. Stop Windows Service | To open the Run dialog box in Windows 7, you can press the Windows key + R on your keyboard or type "Run" in the search box. Then, type in the command you want to execute, such as a program name or a file path, and press Enter to run it.services.msc...Full steps |
| Fix 4. Clean Up System Files | Download and install Qiling CleanGenius. Select "Cleanup"...Full steps |
| Fix 5. Upgrade Your HDD/SSD | Open Qiling Partition Master. Right-click the disk that you want to copy or clone...Full steps |
How to Tell Windows 7 Disk Usage Situation
To check the disk usage situation, simply open the Disk Utility app on your computer, which is usually located in the Applications/Utilities folder. Alternatively, you can also use the built-in "About This Mac" feature to view the disk usage. Once you're in the Disk Utility app, click on the "Storage" tab and look for the "Used" column, which displays the percentage of disk space being used.
Press CTRL+ALT+DEL > Right-click Taskbar > Select Task Manager > Tap Processes
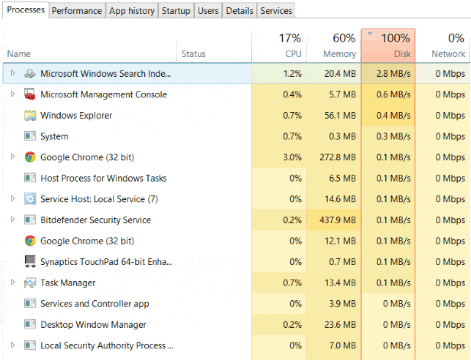
To solve the "disk 100% used" issue in Windows 10/8/7, select the unnecessary programs taking up space and click "End Task" to stop them from running. Then, you can proceed with troubleshooting to resolve the issue. Recommended methods include identifying and removing unused programs, running disk cleanup, and checking for malware and viruses. Additionally, you can try checking for disk errors, defragmenting the disk, and reinstalling Windows if necessary.
Fix 1. Check and Fix System Error to Fix 100 Disk Usage
Check disk errors using CHKDSK or third-party software like Qiling Partition Master to resolve 100% disk usage caused by unknown system errors.
- Increase C drive space.
- Resize/move, merge, clone partition, and check file system error.
- The tool can clone a disk, convert it between MBR and GPT partition schemes, switch between dynamic and basic disk configurations, and even completely wipe data from the disk.
- Migrate OS, increase partition space, and more
Step 1. Right-click the target partition that has a problem.
Step 2. Choose "Advanced" > "Check File System".
Step 3. In the Check File System window, select the "Fix the error on the disk" option to resolve the issue.
Step 4. Click "Proceed" to check errors on your partition.
Fix 2. Reset the Virtual Memory If Windows 100% Used
Virtual memory is a combination of RAM and hard disk space, and it can be a cause of the 100% disk usage issue. If your computer still has this problem, resetting virtual memory may be a solution to fix it.
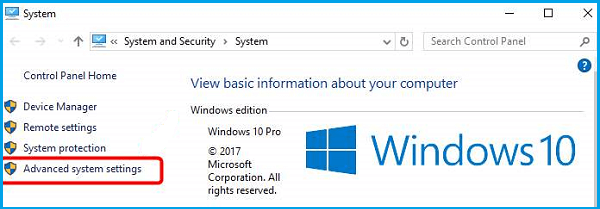
Step 1. To access the Advanced System Settings, press the Windows key + Pause/Break key at the same time, and then select Advanced System Settings from the left panel.
Step 2. Go to the "Advanced" tab, then click "Settings".
Step 3. Go to the "Advanced" tab, then choose "Change" in the Virtual memory section.

Step 4. To ensure the Automatically manage paging file size for all drives checkbox is NOT ticked, you should navigate to the Performance Options window, click on the Advanced tab, click on the Change button under the Virtual memory section, and then uncheck the Automatically manage paging file size for all drives checkbox. This will allow you to manually set the minimum and maximum size of the paging file for each drive.
Step 5. In the Performance Options window, select the disk you want to use for virtual memory (usually the C: drive) and enter an Initial size and Maximum size for your virtual memory.
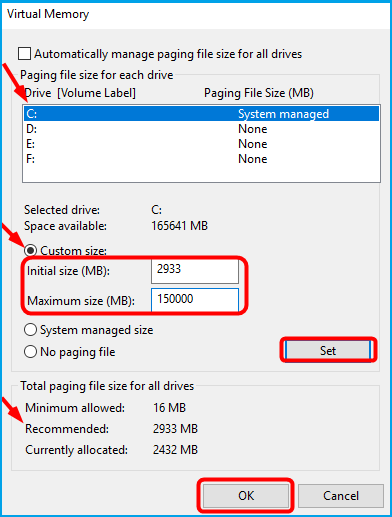
Once you've entered your virtual memory values, click Set, then click "OK" to proceed.
Fix 3. Stop Some Windows Service to Fix Windows 7 100% Disk Usage
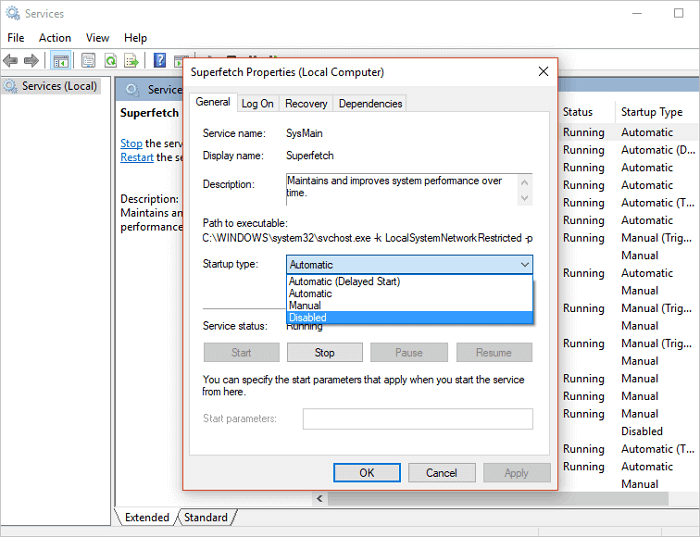
If Fix 2 doesn't work, you may need to disable some of the mysterious, cumbersome background services in Windows like Superfetch.
Step 1. To open the Services window, press the Windows key + R on your keyboard or type "Run" in the Windows 7 search box, then type "services.msc" into the "Open" box and click the "OK" button.
Step 2. To disable Superfetch, right-click on the "Superfetch" service, select "Properties", click on the pop-up window to stop it, and then choose "Disabled" from the startup type dropdown menu.
Fix 4. Clean Up System Files to Speed Up Windows 7
If Windows is running slow, you can clean up system files to speed it up. You can either manually clean up system files or use a light-weight cleanup software to do the job for you. To manually clean up system files, you can use the built-in Disk Cleanup tool or manually delete unnecessary system files. Alternatively, you can use a third-party cleanup software like CCleaner to scan and clean up system files.
Step 1. Download and install Qiling Partition Master Suite.
Step 2. Click PC Cleaner and install Qiling CleanGinus. Then, click "Cleanup" and click "Scan" to start cleaning up the system and make your PC as good as new.
Step 3. The software scans your computer to find large, unnecessary files and system junk, allowing you to select and delete them with a "Clean" button.
Step 4. When the scan is complete, click "Done" to finish cleaning system junk files.
Fix 5. Upgrade Your HDD/SSD to A Bigger One
If none of the solutions work, you can upgrade your SSD or HDD to a bigger one, and Qiling Partition Master can help you replace the hard drive or SSD with a new one without reinstalling Windows.
- Tip
- To clone a hard drive, ensure the destination SSD or HDD has enough unallocated space to hold all the contents from the source disk. Also, back up any necessary data on the destination disk, as everything will be deleted during the process.
- If the partition tables of the source and destination disks are different, you need to ensure your PC's motherboard can support the boot mode required by the destination disk. If not, you should convert the partition table from MBR to GPT or GPT to MBR beforehand.
Step 1. Select the source disk.
Right-To clone a disk, click on the disk you want to copy and then select the "Clone" option.
Step 2. Select the target disk.
Select the desired hard drive or solid-state drive as the destination and click "Next" to proceed.
Step 3. To view the disk layout and edit the target disk partition size, you can use the built-in disk management tools in your operating system. For example, in Windows, you can use the Disk Management console to view the disk layout and resize partitions. In Linux, you can use the `fdisk` or `cfdisk` command to view and edit disk partitions.
To repartition the target disk, first, open the Disk Management console by typing "diskmgmt.msc" in the Run dialog box or searching for it in the Start menu. Then, right-click the target disk and select "Delete Volume" or "Delete Partition" to remove any existing partitions. Next, click "Continue" when the program warns it will wipe out all data on the target disk.
To customize your disk layout, you can select one of three options: "Autofit the disk", "Clone as the source", or "Edit disk layout". If you want to leave more space for the C drive, choose the third option.
Step 4. Click "Proceed" to start the disk cloning process.
Conclusion
After following these steps, your computer should be free from the 100% disk usage problem. This means you'll have a fully optimized computer with a significant amount of available space to store more useful data. If you're still experiencing issues like Windows 10 Microsoft Compatibility Telemetry high disk usage or Antimalware Service Executable high CPU usage, you can seek further assistance from Qiling.
100% Disk Usage in Windows 7/8/8.1/10/11 FAQs
You can get additional help here if you read on.
How do I reduce disk usage in Windows 7?
To reduce Windows 7 disk usage:
- Move the temp files
- Disable the paging file
- Symlink the Windows update download folder
Why my disk usage is high?
If you consistently see a very high disk usage, it means there is something else going on that isn't quite right. You can right-click the Start button, and select Task Manager, or you can press CTRL + SHIFT + ESC to see what's going on.
What is taking up space on my hard drive Windows 7?
To see what is taking up space
Step 1. Show hidden files on the hard drive
Step 2. To identify what's consuming your hard drive space, you can use built-in tools on your computer or third-party software. On Windows, you can use the "Storage" section in the Settings app to see a breakdown of disk usage by file type, app, and location.
How many GB should windows 7 take up?
1 gigabyte (GB) RAM (32-32-bit: 16 GB available hard disk space, 2 GB RAM. 64-bit: 20 GB available hard disk space, 4 GB RAM.
Related Articles
- SD Card Not Detected Windows 11/10 | How to Fix SD Card Not Showing Up on Windows 11/10
- How to Convert Basic Disk to Dynamic Disk in Windows Server 2012/2016/2008
- How to Fix Can't Shrink Volume in Windows 11/10/8/7
- How to Wipe a Hard Drive in Windows XP Without CD
- Download Partition Magic Freeware for Windows 10/11 Disk Partitioning [Don't Miss It]
Symantec no longer supports PartitionMagic, but reliable partition magic freeware is still available to help Windows users manage disk partitions on their computers. For Windows 10 and Windows 11 users, there are options available to apply and manage disk drives in simple steps. - [Fixed] EmuDeck Not Recognizing SD Card on Steam Deck
Encountering issues with EmuDeck not recognizing your SD card on your Steam Deck can be frustrating, especially when trying to enjoy more games on your device. To resolve this problem, continue reading to find solutions that can help you fix the issue and get back to gaming.