FIX Error: Rufus Can't Create Bootable USB
Problem: Unable to create bootable USB with Rufus
"Recently I bought a second-You had a PC without an optical drive and initially didn't mind, but later needed to use a bootable USB stick. You tried to install Free DOS using Rufus, but kept running into issues because the PC was trying to write the NTFS structure while you had chosen the MBR structure, and the boot-up process would hang with an error message.
Warning: Could not obtain exclusive rights. Retrying with write sharing enabled..."
Rufus is a device that allows users to create bootable flash USB drives, although other system techniques using the NTFS structure are now more commonly used in Windows 10. Despite this, Rufus remains a necessity for many computers, and its availability is often compulsory for the Windows system. However, Rufus has limitations, as it cannot create bootable USB drives using the MBR technique, and is instead an open-source utility that is free.
As a result, it is pretty hard to avail of customer service for issues caused by Rufus.
How to Make a Bootable USB for Windows Without Rufus
Rufus is a simple technique used for creating bootable USB, but due to its complexity, people often opt for other methods. One such method is downloading ISO files and using the Windows Media Creation Tool to install Windows, including Windows 10. This process involves a step-by-step solution to create a bootable USB for Windows. However, if the personal computer already has an advanced Windows 10 operating system, this method may not be necessary.
Before installing, ensure your PC has a Windows utility program disk, an 8GB USB drive, and an ISO file compatible with your operating system.
Step 1. To download and create a Windows installation media, run the Microsoft media creation tool, and once the installation is complete, choose the option to create installation media for another PC.
Step 2. To create a bootable USB, you'll need to select the suitable ISO file that the media will implement on how to create a bootable USB. This ISO file can usually be found on the official website of the operating system or software you want to install.
Step 3. If you have Windows 10, select an ISO file suitable for Windows 10 and download it automatically.
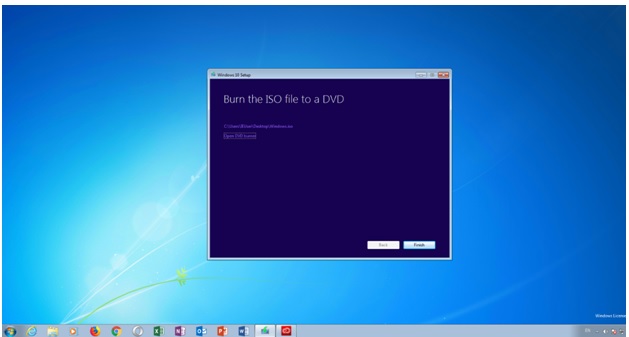
Step 4. Once completed, you can store the backup file in a hard disk or CD drive for future usage.
Step 5. Click the Finish button to close the files.
This technology has been widely used, but other techniques like Rufus and Command prompt utility are also available and have been successful in some computers.
Do You Need a Portable USB Drive for Windows?
Rufus is a software used to create a bootable USB drive from a downloaded Windows iso file, allowing users to clean install Windows on a computer.
However, some people aren't looking for the same thing. They just want to put their Windows operating system on a USB drive and make it bootable, which is not what Rufus does, but Qiling Disk Master can accomplish this.
Qiling OS2Go allows you to create a portable Windows system on a USB drive, making it easy to carry and use Windows 7, 8, 10, and 11 without needing a laptop, and also provides a recovery option.
To create a Windows portable USB drive with Qiling OS2Go, you can follow these steps: First, download and install the Qiling OS2Go software from the official website. Next, plug in a USB drive with a minimum capacity of 8GB, as recommended by Qiling OS2Go.
Step 1. To use Qiling OS2Go, first install it on your Windows computer, which will display the used space on your system drive. Next, plug in a USB drive that is larger than the used space on your system drive. Then, choose the target USB drive and click Next to continue.
Step 2. Qiling OS2Go will notify you that the operation would delete all data on your drive, so make sure to back up important data before proceeding. Click Continue to proceed.
Step 3.Adjust the disk layout by selecting the default layout that matches the resource drive or editing it to suit your needs. If using a Solid State Drive as the Windows bootable drive, tick the corresponding option. Then, click Proceed.
Step 4.Qiling OS2Go will start to create the portable USB drive. This process may take a while, depending on your operating system and network conditions. Once the progress reaches 100%, the USB drive should be bootable.
Step 5. To access the BIOS and boot from a USB, insert the portable Windows USB into your computer, start your computer, and press the required key (usually F2, DEL, or F10) to enter the BIOS settings. From there, select the option to boot from the USB disk.
Note: To ensure a successful boot, verify that the boot mode of your portable USB and target computer are identical, either both in UEFI or Legacy mode, to avoid booting issues.
Conclusion
Having a bootable USB drive is a game-changer for maintaining a seamless system flow, especially when you're on-the-go. Instead of lugging your computer to every location, this portable drive provides a convenient solution. With technology constantly evolving, it's essential to reduce the stress of weight and potential threats. To ensure the safety of your content and enhance your computer-based experience, having a bootable USB drive at hand is a must, especially since Rufus may not be compatible with all computers.
Related Articles
- 3 Steps Done All: How to Install Windows 11 on Any PC
- Windows 10 Boot Drive Size & How to Create a Windows 10/11 Bootable Drive
- Rufus vs. Qiling OS2Go: Should I Create a Bootable or Portable USB?
- Windows To Go for Mac: How to Install and Use
- Top 5 Best Partition Magic Server Software Recommend in 2024
Looking for reliable partition magic server software to manage and partition disk drives on Windows Servers? This page lists five practical tools for partitioning Windows Server disks and managing internal or external hard drive space. - Partition SSD for Windows 10 Installation, Full Guide with Pictures
Need to install partition SSD for Windows 10? Follow this comprehensive guide to access the simplified solutions for this process.