How to Solve Windows 11 Update Not Enough Space (5 Ways)
| Workable Solutions | Step-by-step Troubleshooting |
|---|---|
| Fix 1. Delete the Windows.old folder | To clean up your computer, go to the Startup menu, search for "Cleanup" in the search box, and click on Disk Cleanup.Full steps |
| Fix 2. Remove junk and useless large files | Install Qiling CleanGenius on your PC, then navigate to the "Cleanup" section and click on "Scan" to initiate the cleaning process.Full steps |
| Fix 3. Transfer Free Space to C Drive | Right-Click on the D: partition with enough free space and select "Allocate Space" to allocate the entire disk to the virtual machine.Full steps |
| Fix 4. Resize C Drive Space | Right-click on the System C: drive and select "Resize/Move"...Full steps |
You're excited about the Windows 11 free upgrade from Windows 10, but keep getting error messages saying you don't have enough disk space to update your device on Windows 11.
- "Windows needs more space."
- "Can't install due to low disk space."
- "Get more space with external storage."
- "You're running low on disk space on drive C:. Please free up some space or consider expanding the partition.
The error messages are occurring because Windows 11 requires at least 64 GB of free space on the device for the update installation, as specified in the Windows 11 hardware and system requirements.
Windows 10 and Windows 11 can coexist on a device, but it requires sufficient free space to support both operating systems' tools and processes.
If you're running out of space on your device, you don't necessarily need to buy a new computer to experience Windows 11. Instead, you can either free up space on your current device or move some of the data from the C drive to other drives to create more space.
Here are five ways to free up enough space for the Windows 11 update:
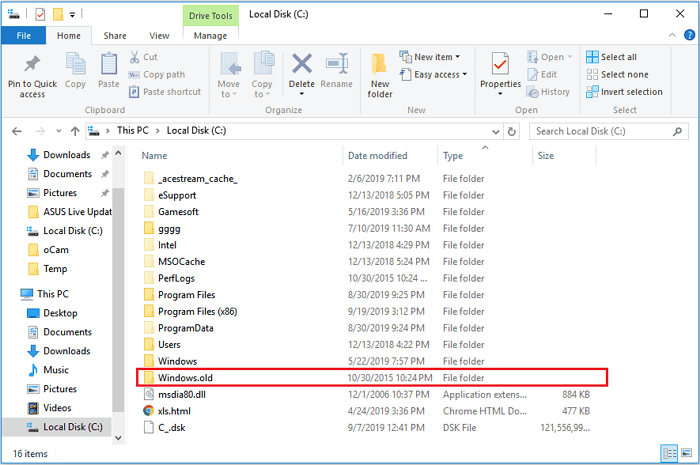
Solution 1. Delete the Windows.old folder
To free up space on your device for the Windows 11 update, you can delete the Windows.old folder, which is automatically created when you upgrade from one Microsoft OS version to another, starting with Windows Vista. This folder takes up a significant amount of space and can be safely deleted without affecting your system's functionality.
The Windows.old folder stores data from your previous Windows version, allowing you to restore old versions or files. It's located in the C: drive and can take up to 20 GB or more of storage space, depending on the size of your previous Windows installation.
If your Windows.old folder contains data from older Windows versions or files you no longer need, it's recommended to delete the folder to free up space for the Windows 11 update.
To delete the Windows.old folder, follow the below steps:
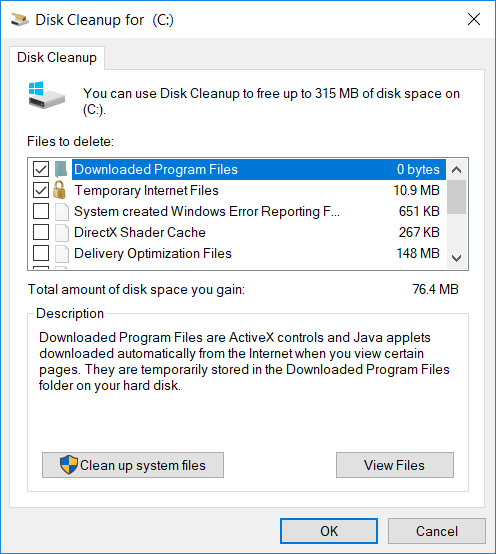
Step 1. To run the Disk Cleanup tool, go to the Start menu, search for "Disk Cleanup" in the search box, and click on the result.
Step 2. To proceed, select drive C: and click "OK." This will initiate a scan of your drive, which may take a few moments. Once complete, click "Clean up system files" to continue with the cleanup process.
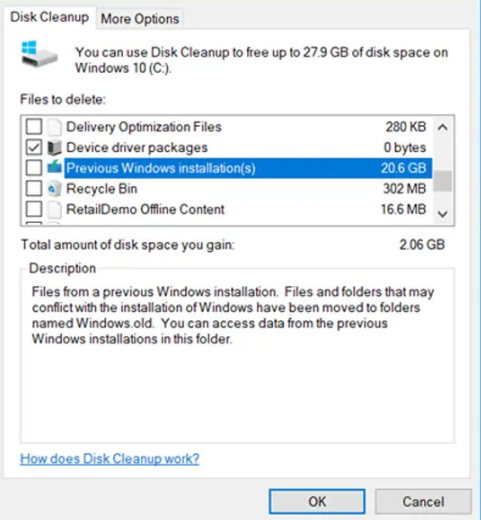
Step 3. Select C: drive again when prompted and press OK.
Step 4. Now, just select the "Previous Windows installation" checkbox from the files to delete the list and click "OK".
If you delete the Windows.old folder from File Explorer, it can produce an error message. This error can be avoided by using the PC cleanup tool to scan and remove the Windows.old folder.
Solution 2. Remove junk and useless large files
Your computer generates numerous junk files daily, which are created when performing tasks like opening documents or images. Once the task is complete, these files become useless but remain on your device, consuming space and clogging it up.
Deleting junk files is generally safe and can help free up disk space. However, manually searching for and removing these files can be a tedious task, making it more efficient to use a PC clean tool to streamline the process.
Using a PC cleaner tool like Qiling CleanGenius, you can easily detect and delete junk files, useless files, and rarely used files, freeing up space and improving your computer's performance. The tool can also remove browser plugins, optimize startup, and free up RAM, among other features.
Step 1. Download and install Qiling Partition Master Suite on your PC, then click to download PC Cleaner on the panel.
Step 2. Install Qiling CleanGenius on your PC and navigate to "Cleanup" to click "Scan."
Step 3. Qiling CleanGenius will start scanning your PC immediately, selecting and removing all useless files, system junk files, and invalid entries with just one click on the "Clean" button.
Step 4. Once completed, you can see clearly how many MBs or GBs of data are cleaned. Click "Done" to finish the process.
The next three solutions focus on managing the disk and partition space. To do this, you'll need a tool to manage your drivers' space, and Qiling Partition Master is another useful member of the Qiling family that can help with this.
Qiling Partition Master is a popular disk partitioning software used by millions, allowing users to increase C drive space, resize, format, and manage disks, and even migrate the OS without reinstalling it.
So, let's manage your disk space better as the coming three solutions!
Solution 3. Transfer Free Space to C Drive
In order to reallocate free space on your D, E, F, or G drivers to your C: drive, you can utilize the "Allocate Space" feature on Qiling Partition Master, which allows you to redistribute unused space from other partitions to your C: drive. This process can be completed in a few simple steps, making it a convenient solution for maximizing your C: drive's capacity.
You can use this feature to free up unallocated and allocated space on your C drive, making it possible to install Windows 11 setup.
Step 1. To free up space on your computer, click on the D: partition that has enough available space and choose the "Resize/Move" option.

Step 2. To move free space from the D: drive to the C: drive, drag the partition panel leftward to shrink it, and then click "Proceed" to confirm.

Step 3. Select the target partition - C: drive and select "Resize/Move".
Step 4. To add free space from the D: drive to the C: drive, drag the partition panel to the right, and then click "Proceed" to initiate the process of moving free space from D: drive to C: drive.
Solution 4. Resize C Drive Space
If your system disk has no unallocated space, you can use the Qiling Partition Master "Resize/move" feature to expand your C drive space. This allows you to utilize the available space on the disk to increase the size of your C drive.
To free up space for the C: drive, click a partition other than C: and select the "Resize/move" feature. Then, drag the left edge of the partition to the right to shrink it, leaving unallocated space for the C: drive. This provides enough space to install Windows 11.
Option 1. Extend System C drive with unallocated space
- 1. Click on the System C: drive and select "Resize/Move".
- 2. Drag the system partition end into the unallocated space so to add it to the C: drive.
- 3. Click "Proceed" to execute the operations and extend the C drive.
Option 2. Extend System C drive without unallocated space
- To resize a partition, click on a large partition with sufficient free space on the system disk and select the "Resize/Move" option.
- 2. To free up space, drag the partition end to shrink it, making room for the unallocated space. Confirm the change by clicking "Proceed".
- 3. Select the system drive at the "Disk Management" page, and select "Resize/Move".
- 4. To extend the C drive, drag the end of System C drive into the unallocated space, then click "Proceed" to save the changes and extend the C drive.
Solution 5. Merge C Drive with Any Other Drive
If you have multiple partitions on your hard drive with some having ample free space while the C: drive is almost full, you can merge the drives with sufficient free space to the C drive. This will create a larger C drive that can accommodate all Windows 11 updates, ensuring a smoother experience.
The drive merger process may seem daunting at first, but using Qiling Partition Manager can simplify it.
Step 1: Select the target partition
To add space to a partition and keep it, click on the partition you want to modify and select "Merge".
Step 2: Select a neighbor partition to merge
Select a partition adjacent to the previously selected partition and click "Proceed" to combine the space and add files from the second partition to the first partition.
Parting Thoughts
If the C: drive still does not have enough space after cleanup, move large personal files, apps, or backups to another drive before running the Windows 11 update again.
- Deleting the Windows.old folder
- Removing junk files
- Transferring free space to C drive
- Resizing C drive
- Merging C drive with other drivers
Use Qiling Partition Master to resize, shrink, merge, or move partitions when you need more space for the Windows 11 update. After completing the update, you can keep the new layout or adjust partitions again based on your storage needs.
Related Articles
- 7 Ways on How to Expand or Extend Partition in Windows 7/8/10 without Data Loss
- How to Format a Bootable USB Drive in Windows 10
- 2022 Sony USB/Pen Drive Format Tool Is Online | Free Download
- Easy Way to Install Windows 11/10 on SSD
- Can't Shrink the 3 TB USB Drive, How to Fix?
If you have encountered the 'Can't shrink the 3 TB USB drive' problem, this post may be able to help as it contains an effective method of shrinking a 3 TB USB drive. - Can't Delete Files or Format My SD Card, What Should I Do?
Why can't delete files or format my SD card? This article provides a detailed guide on this issue and introduces an efficient way to help format a write-protected SD card.