How to Recover Data Files Deleted by Antivirus
You scanned your USB drive with Avast and found a virus, but the "Move to Chest" action failed, so you chose to delete the infected files instead. Unfortunately, this resulted in the accidental deletion of many files. Don't worry, it's possible to recover some or all of the deleted files, but you'll need to act quickly and use a suitable data recovery tool.
Losing data after an antivirus scan is a frustrating experience, but don't worry, data recovery is possible. If your files were deleted while trying to remove a virus, there are two ways to recover them.
Method 1. Recover Files Deleted by Antivirus from Quarantine
Quarantine is a feature of antivirus software that isolates infected files on a computer's hard disk, preventing them from causing further harm. If a file is moved to quarantine, it can be easily restored from there, providing a safe way to retrieve deleted files.
- Step 1: Open your Antivirus program
- Step 2: Click on "Menu"
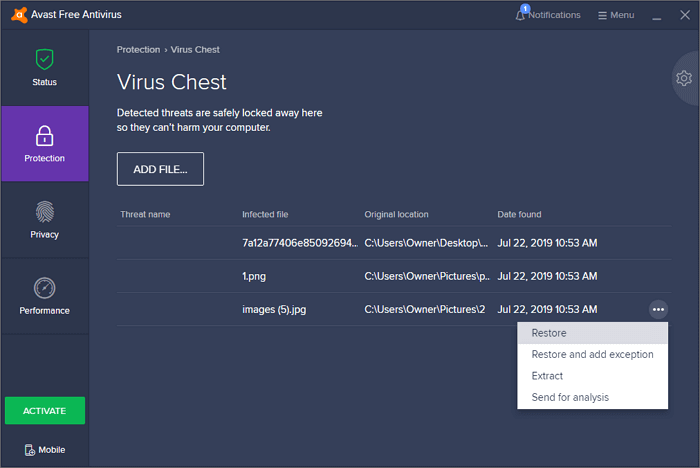
- Step 3: To access a quarantined file, click on the "Quarantine" or "Virus Chest" tab. From there, search for the file you're looking for and select it.
If you've accidentally deleted a file using Avast Antivirus, you can restore it by clicking the "Restore" button at the bottom of the antivirus software or by right-clicking the file and selecting "Restore" from the context menu. This will retrieve the file from Avast's backup.
Method 2. Retrieve Data Using Qiling Data Recovery Software
If method 1 fails to perform Antivirus deleted files recovery, try the second way - recover files deleted by antivirus using Qiling file recovery software. It can help you recover deleted files from virus infected hard drive, memory card, USB flash drive, SD card, and pen drive, etc. What's more, it can do the following things for you:
- Data recovery software can help recover deleted, formatted, and inaccessible data in various data loss situations, including accidental deletion, hardware failure, and file system corruption. These tools can scan storage devices, identify recoverable data, and restore it to its original location or a new location, helping users retrieve valuable information and avoid data loss.
- Recover lost data with ease and confidence, including photos, audio, music, and emails, from any storage device with our effective, safe, and complete recovery solutions.
- You can recover data from various devices and storage media, including the recycle bin, hard drive, memory card, flash drive, digital camera, and camcorder.
Download this data recovery software to recover lost files quickly.
Step 1. Run Deep Data Recovery. Select file types and click "Next" to start the recovery process.

Step 2. After using an antivirus program, select the disk drive where the lost files were located and click "Scan" to initiate the scanning process.

Step 3. When the scan process is complete, all lost and deleted files on the selected drive should be visible. You can either search for antivirus deleted items in the tree-view panel on the left or use the "Filter" function to narrow down the search by specific file formats, such as pictures, videos, emails, documents, etc.

Step 4. Double-click a file to preview it, then select the file(s) at once and click "Recover" to initiate the recovery process.
Related Articles
- [Real Fix] There Is No Option to Empty Recycle Bin on Windows 10
- Cloud Drive Data Recovery: Recover Data from WD, Dropbox, Google
- Top 5 Free Folder Recovery Software in Windows 10/8/7
- Netgear NAS Recovery: Safe Software to Restore NAS Data
- How to Recover Photos from Corrupted SD Card in 2022 (5+ Fixes)
If your SD card becomes corrupted, you can still recover your pictures with Deep Data Recovery and other 5+ corrupted SD card recovery fixes. Follow the steps to learn how to recover photos from a corrupted SD card and effectively fix the corrupted SD card with ease. - How to Retrieve Deleted Skype Messages and Chat History
Skype conversations are stored in various places depending on the device, and deleted messages and chat history can be recovered on both Android and iPhone devices, as well as on computers, by following a step-by-step guide outlined in this article.