Unhide USB Files Using Windows, CMD, or Software
Many people store personal data on USB drives, but sometimes files go missing after a system update, program installation, or virus attack, leaving them invisible. You didn't intentionally delete them, but they're nowhere to be found. To unhide these files, you can use one of three methods: show hidden files in USB using Windows, CMD, or third-party USB drive recovery software.
| Effective Solutions | Step-by-step Troubleshooting |
|---|---|
| Solution 1. Use Recovery Software | Connect USB/SD to PC > Run Deep Data Recovery > Scan and restore hidden files...Full steps |
| Solution 2. Use Control Panel | Connect device to PC > Open Control Panel > "Appearance and personalization" > "Show hidden..."...Full steps |
| Solution 3. Use Command Prompt | Open Command Prompt as Administrator > Enter attrib -h -r -s /s /d G:\*-* (G for device drive letter)...Full steps |
How to Show Hidden Files and Folders on a USB Pen Drive
Files and folders on a USB drive that are not visible by default are considered hidden, taking up disk space but not normally showing up. These may be set as hidden in Windows by default or made hidden by a virus. If important documents, pictures, or videos are missing and not deleted, they might be hidden. It's essential to unhide files from the portable device as soon as possible.
Many people have experienced the frustration of losing all their files on a USB drive, memory SD card, or other storage device, only to discover that the files had been hidden by a virus or malware, making them invisible. To recover these files, you can use hidden file recovery solutions that allow you to view, check, and show hidden files on various types of USB drives. These solutions can help you regain access to your lost data.
Fortunately, it is possible to recover virus-infected files from USB drives, hard drives, or memory cards. Here, you will learn how to fix a blank SD card and show hidden files on a memory card or USB drive using three effective ways.
Solution 1. Recover Hidden Files on a USB Using Software
If neither the Control Panel nor the CMD help shows hidden files, Qiling file recovery software can be a helpful solution. This professional recovery software can recover hidden files from various storage devices, including pen drives, hard drives, USB flash drives, memory cards, and external hard drives, among others.
Recover Hidden Files with Qiling
- recover any data that has been showing up in the result during the process of the scan.
- You can pause or resume a data recovery scanning process at any time to fit your schedule, allowing you to customize the timing of your data recovery.
- In situations where data is suddenly deleted, formatted, or corrupted due to hard drive issues, virus attacks, or system crashes, data recovery support can be crucial. This assistance helps recover lost data, even after seemingly irreversible events, providing a safety net for individuals and businesses that rely on digital information.
By performing the 3-To recover hidden files, you'll need to disable the "Show hidden files, folders, and drives" option in File Explorer. Here's how: Go to File Explorer, click on the View tab, then click on Options.
Step 1. Select file types and click "Next" to start
Run Qiling virus file recovery software on your Windows PC, selecting the desired file types and clicking "Next" to initiate the recovery process.

Step 2. Select the virus infected drive to scan
To scan for lost or hidden files, select the disk that was attacked by the virus. Note that scanning for lost or hidden files can be a time-consuming process, and it's recommended to run a virus scan on the entire disk to ensure all affected areas are identified. This step is crucial in recovering any files that may have been deleted, hidden, or encrypted by the virus.
- If the HDD was affected by a virus, it's best to install software on a separate volume or external USB drive to prevent overwriting of existing data.
- If the infected device is an external hard drive, flash drive, or memory card, the software can be installed on the local drive of the computer without affecting the device.

Step 3. Check all scanned results
Deep Data Recovery will immediately start a scan process to find deleted or hidden files on a virus-infected hard drive. To quickly locate wanted files, users can utilize the Filter or type grouping feature to display only specific types of files, such as pictures, videos, documents, or emails.

Step 4. Preview and recover deleted/hidden files
After the scanning process is complete, you can preview the recovered files. Select the files you want to recover and click the "Recover" button. It's essential to save the restored files to a different, secure location on your computer or storage device, avoiding the original lost location.
Solution 2. Show Hidden Files on USB Using Windows File Option
Step 1. To open Windows Explorer in Windows 10/8/7, press the Windows key + E on your keyboard.
Step 2. In the Folder Options or File Explorer Options window, click the View tab, and under Hidden files and folders, select the Show hidden files, folders, and drives option.
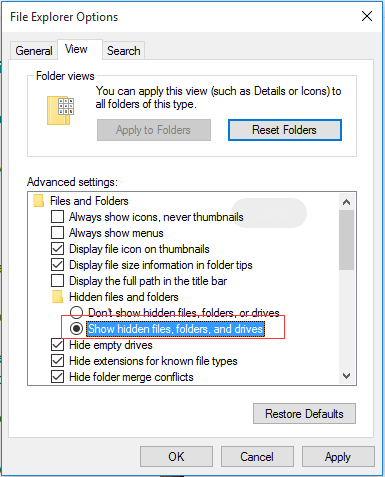
Step 3. To access the files on the USB drive, click Apply, then OK, and the files will be visible.
Solution 3. Show Hidden Files on a USB Using CMD
To show hidden files on external hard disks, USB drives, memory cards, or other storage devices using the Command Prompt (CMD), you can use the attrib command. The full attrib command for hidden files is: `attrib -h -r -s /d "drive letter":\*.*` where "drive letter" is the letter of the drive you want to show hidden files on (e.
To unhide files using CMD, follow these three steps:
Step 1. Properly connect the USB drive to your computer.
Step 2. Press the Windows key + X on your keyboard. This will bring up a menu.
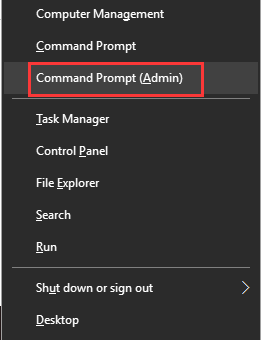
Step 3. To disable write protection on a device, open the Command Prompt window, enter the command `attrib -h -r -s /s /d G:\*.*` (replace G: with the drive letter for your device), and press Enter.
When you're done, plug in your USB flash drive, hard drive, or memory card and check if you can see all the hidden files on it.
Show Hidden Files with CMD Alternative Tools
Manual execution of the command line is not suitable for everyone, especially computer professionals, as incorrect commands can cause more harm than good. For security and usability, it's recommended to use an automatic command line alternative, such as Qiling CleanGenius, which allows users to check and fix file system errors, enable/disable write protection, and update their system with a single click, eliminating the need to type intricate command lines.
To show hidden files, follow these simple steps with this 1-click-fix software:
Step 1. DOWNLOAD Qiling CleanGenius for Free.
Step 2. Start Qiling CleanGenius, choose "Optimization" on the left panel. Next, click "File Showing" on the right panel.
Step 3. Select the hard drive and click "Execute".
Step 4. After the operation completes, click the here link to check the hidden files.
If you can't find the files you were looking for, you can try recovering hidden files on a USB flash drive and memory card using Qiling data recovery software.
Related Articles
- Free Fix Hard Drive Partition Shows 0 Bytes Error in Windows 11/10/8/7
- How to Fix WD My Passport Access Denied in Windows 10 and Windows 11
- Fix 'CHKDSK Is Not Available for RAW Drive/USB/SD Card' Error
- Fix 'Card Cannot Be Accessed' Error in Canon Without Losing Data
- How to Recover Deleted Large Video Files | Reliable Video Recovery Software
Losing large video files can be a disaster, especially when they contain valuable and time-consuming data. Fortunately, there are methods to recover deleted large video files, and this article outlines them. Whether you use a PC, Android, or laptop, you can easily retrieve your lost videos using these solutions. - 2 Best Ways to Recover Deleted Minecraft Worlds in Windows 10
Minecraft data recovery can be easily achieved by either running Minecraft game data recovery software or recovering deleted Minecraft worlds from the local folder, both of which work well in restoring lost game data.