How to Fix WD My Passport Access Denied in Windows 10 and Windows 11
WD My Passport access denied
"It seems that I can no longer access my files on WD My Passport external hard drive. I get the error message of access denied. The detailed information is in the screenshot. How to rectify the problem and get into the drive without losing data?"
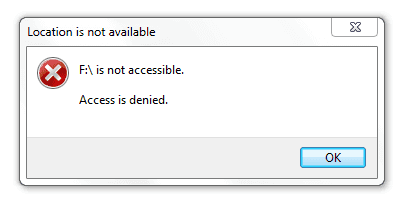
If you're unable to access your WD My Passport external hard drive due to an "access denied" error, it's likely because you don't have permission to access the drive. This is often the case when you connect the drive to a new computer that requires permission to access data or files on the drive.
| Workable Solutions | Step-by-step Troubleshooting |
|---|---|
| Fix 1. Remove access denied | Right-click on the WD drive and choose Properties > Security > Advanced...Full steps |
| To fix the issue of not being able to grant permission, we can try the following: update the app to the latest version, restart the device, and ensure that the app has the necessary permissions to access the required features. If the problem persists, we can also try clearing the app's cache and data, or reinstalling the app. Additionally, we can check the app's settings to see if there are any specific permissions or settings that need to be enabled or configured. | 1. Why add "Authenticated User" failed 2. How to remove access denied on Ultra 1TB HDD 3. Recover data from access denied WD drive...Full steps |
How to fix WD My Passport access denied Windows 11/10/8/7
When you encounter an access denied error, it indicates that you're unable to access the drive and view its contents. This situation requires immediate attention to resolve the issue and regain access to the drive.
To remove access denied on your My Passport, follow these steps:
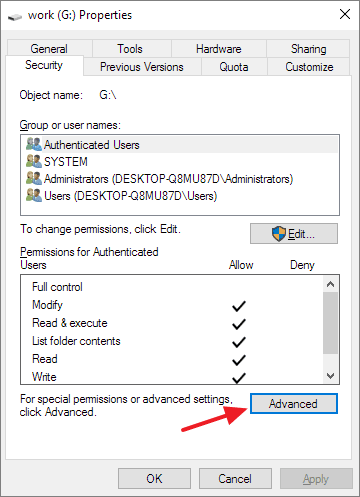
Step 1. To access the WD My Passport external hard drive on your PC, first connect the drive to your computer. Then, right-click on the drive's icon in File Explorer or This PC and select "Properties".
Step 2. Click the "Security" tab.
Step 3. To access additional settings, click the "Advanced" button at the bottom of the tab.
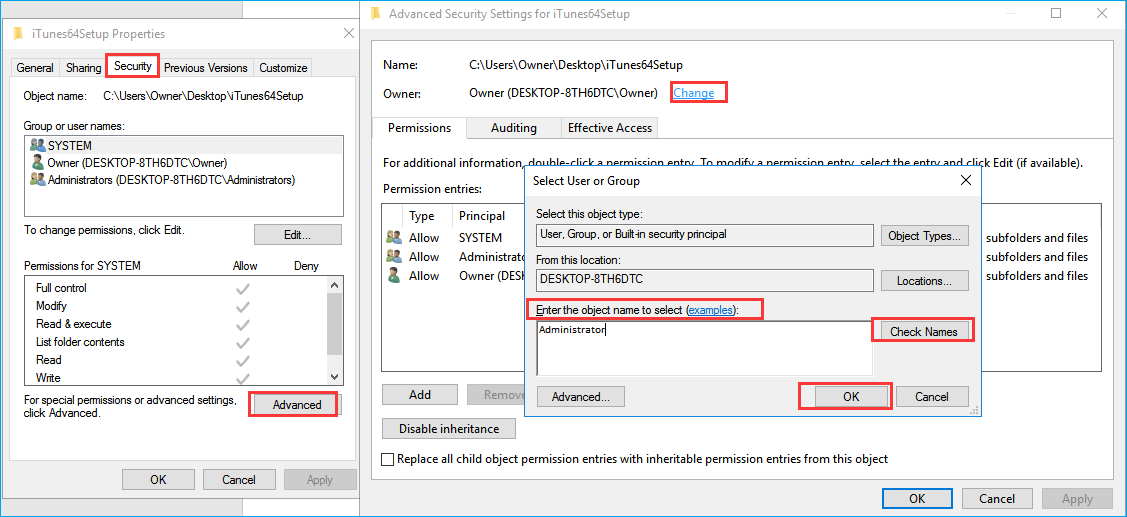
Step 4. Click the "Change permissions" button.

Step 5. To add a new permission, click on an existing permission entry to edit it. Add a new user named "Authenticated User" and click "OK". Then, from the permission section, give "Full Control" to the newly added user.
Video Tutorial: Fix WD Access Denied Error
FAQs - How do I get rid of not being able to grant permission
The solution provided should have resolved the access denied issue as expected. However, if you're still experiencing problems, some common issues that may arise from the access denied error include common examples, and answers can be found accordingly.
1. Add "Authenticated User" didn't remove access denied error, why?
To access an encrypted hard drive, ensure that you're not using a password to encrypt it. If that's not the case, you can simply use the password to gain access. If hard drive encryption isn't the issue, consider trying other workarounds to resolve the problem.
- In the Properties window, add a user named "Everyone" with full control in the Security tab.
- If your hard drive is read-only, try to clear the read-only flag. This may involve fixing the hard drive itself, which can be a complex process. It's recommended to seek professional help from a data recovery specialist or a computer technician if you're not familiar with the process.
2. How do I fix folder access denied error on WD My Passport Ultra 1 TB external HDD?
To resolve the "You need permission to perform this action" error when trying to open a folder on a hard drive, take ownership of the folder by right-clicking on it, selecting Properties, then Security, and finally clicking on "Edit" and adding your username to the list of owners. This will allow you to access and manage the folder's contents without any permission issues.
- Right-click on the folder and then click "Properties".
- Switch to the "Security" tab and then "Advanced".
- Click "Change" in the Owner section.
- To click your user name in the name list, you would need to open the list of names and select your own username. Then, click the "OK" button to confirm.
- Save all changes to apply permission and security changes.
3. How to recover data from WD My Passport access denied
The "location not available, access denied" error can be caused by a lack of permission, but it can also be due to a problem with the hard drive itself, making it inaccessible.
Formatting a disk is often recommended as a solution to repair corrupted file system issues and it usually works. However, formatting will result in total data loss, so it's essential to consider data recovery before proceeding. If you're dealing with an inaccessible WD hard drive, you can recover your data using a reliable Deep Data Recovery.
Deep Data Recovery, a specialized hard drive recovery software, can help users access files and folders when a WD My Passport drive encounters an access denied error, safeguarding data when the drive is detected but won't open.
Step 1. Launch Deep Data Recovery, select the desired file types, and click "Next" to initiate the recovery process.

Step 2. Select the hard drive which becomes inaccessible on your PC. Click "Scan" to let Deep Data Recovery scan and find your hard drive data.

Step 3. After scanning, you can view and check the found files on the scanning result window. The window displays two folders, "Deleted Files" and "Other Lost Files", containing all recovered files. You can also use the "Filter" option to quickly locate specific file types. Once you've filtered the files, you can preview them and decide which ones to retrieve.

Step 4. Select the items you want to restore and click "Recover". Choose a secure location (a healthy physical drive on your PC or another external storage device) and click "OK" to start recovering all lost data from your inaccessible hard drive.
Related Articles
- Fix/Repair RAW SD Card in Proven Ways
- [Full Guide] 10TB/12TB Internal and External Hard Drives
- Repair and Format Corrupted Android SD Card Without Losing Data
- FIX: HDD/SSD Unknown Device in Device Manager Windows 10/8/7
- Does Formatting a USB Delete Everything? (What Really Happened)
Formatting a USB flash drive or memory stick erases all data on the device, making it impossible to recover files. However, using a data recovery software like Deep Data Recovery can potentially restore files that were deleted or formatted from the device. - Get Your Answer: Does Formatting A Laptop Remove Viruses?
Formatting a laptop or PC does not directly remove viruses, as it only erases personal data and does not affect malware. To remove viruses, a more targeted approach is needed, such as using antivirus software or a virus removal tool.