Fix Windows Update Error 0x80240034
Windows update error 0x80240034 Windows update error 0x80240034 occurs when users try to update their Windows 10/11, preventing them from updating their system. This error is thrown when clicking the "check for updates" button, and it can be resolved using the following six easiest ways: the methods below.
| Workable Solutions | Step-by-step Troubleshooting |
|---|---|
| 1. Run Update Troubleshooter | Open "Settings". You can open them by going to Start and searching for Settings...Full steps |
| 2. Run SFC Command | Press Windows + R Key to open Run Window, type CMD inside it, and hit the...Full steps |
| 3. Run DISM Command | Enter the command DISM.exe /Online /Cleanup-image /Restorehealth...Full steps |
| 4. Download the Update Manually | Open any internet browser from your computer - for example, Chrome...Full steps |
| Other Useful Solutions | Reset Windows Updates Components > Run a Full System Scan...Full steps |
Windows Update Error 0x80240034
Microsoft notes that the issue often stems from update glitches or damaged system files, but offers solutions to resolve the problem and allow Windows updates to proceed. Additionally, the article provides guidance on recovering lost data that may have been compromised during the update process.

6 Ways to Fix Windows Update Error 0x80240034
Windows update error 0x80240034 can be a frustrating issue, but it's relatively easy to fix. The error can occur during Windows updates and may seem complex, but the solution is straightforward. To resolve the issue, you can try restarting your computer, checking for any corrupted system files, and ensuring that your Windows update service is running properly. Additionally, you can try disabling any conflicting third-party antivirus software or Windows Defender, and then re-enable it after the update.
Fix 1. Use Windows Update Troubleshooter
This error can be caused by update glitches in Windows, so running the Windows update troubleshooter is a good first step to resolve the issue.
Windows update troubleshooter is a built-in utility that doesn't require any installation to run. To use it, simply follow the steps:
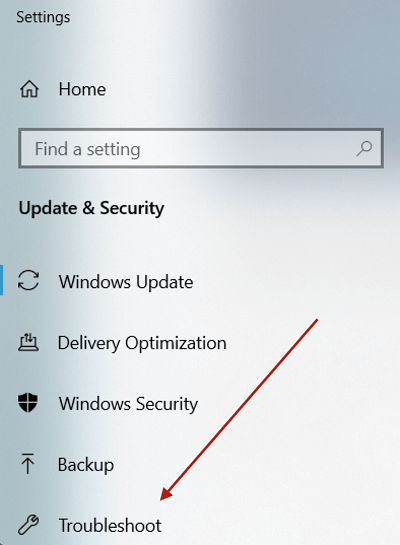
Step 1. To open the Settings app, go to the Start menu and search for "Settings", then press Enter to launch it.
Step 2. To resolve the issue, go to the "Update & Security" section and click on "Troubleshoot".
Step 3. Run the Troubleshooter.
To troubleshoot Windows Update issues, open the Troubleshoot Window, click on Windows Update, and then click the button to run the Windows Update Troubleshooter.
Step 4. To troubleshoot the issue, proceed with the default steps in the Troubleshooter, follow the on-screen instructions, and restart your computer once it's completed. Then, check if the error persists.
Fix 2. Run SFC Command to Fix Windows Update Error 0x80240034
Windows updates may encounter issues due to file system or registry errors, but running the SFC command can resolve Windows update error 0x80240034 by checking and replacing corrupted system files.
To run the SFC command and fix Windows update error 0x80240034, follow these steps: Run the Command Prompt as an administrator, type the command "sfc /scannow" and press Enter, then wait for the scan to complete and restart your computer. If the issue persists, type "sfc /scannow /offwindir" and press Enter, then restart your computer.
Step 1. Press the Windows key + R to open the Run window, type CMD and press Enter to open the Command Prompt.
Step 2. In the Command Prompt, type the sfc /scannow command and press the Enter key.
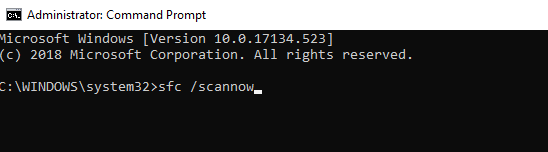
Step 3. After running the SFC command, the tool will scan and repair corrupted system files. Once the process is complete, restart your computer and attempt to update Windows again.
Fix 3. Run DISM Command to Fix Error 0x80240034
The DISM (Deployment Image Servicing and Management) utility command in Windows helps manage, service, and repair Windows images. Running the DISM command from the Command Prompt can also aid in repairing the Windows image and resolving Windows update error 0x80240034.
Follow the below steps to run the DISM command:
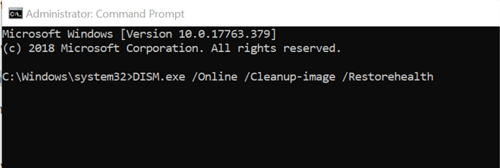
Step 1. To open the Command Prompt, press the Windows key + R on your keyboard to open the Run window, type 'CMD' inside it, and then press the Enter key. This will open the Command Prompt window, where you can execute various commands and perform system tasks.
Step 2. Enter the command DISM.exe /Online /Cleanup-image /Restorehealth
The DISM service will run and clean your Windows image after running the command, and you can check to update to see if it fixes the Windows update error 0x80240034.
Step 3. If DISM can't find the Windows image, run the command: DISM.exe /Online /Cleanup-Image /RestoreHealth /Source:C:/Repair/Source/Windows /LimitAccess. This command tells DISM to look for the Windows image on the specified source location and perform the repair.
Make sure you have your Windows installation media in USB or DVD attached to your computer before running this command. Change C:/Repair/Source/Windows with your Windows installation media path.
Fix 4. Download the Update Manually
If you're encountering Windows update error 0x80240034 when attempting to update Windows through the Windows Update settings, and the above troubleshooting steps haven't resolved the issue, you can try downloading the Windows update manually.
To install the Windows update manually, download it from Microsoft's official website. Follow these steps: visit the Microsoft Update Catalog Website, and download the update. Once downloaded, you can install it.
Step 1. Open any internet browser from your computer, such as Chrome, Firefox, Safari, etc.
Step 2. Open the website Microsoft Update Catalog
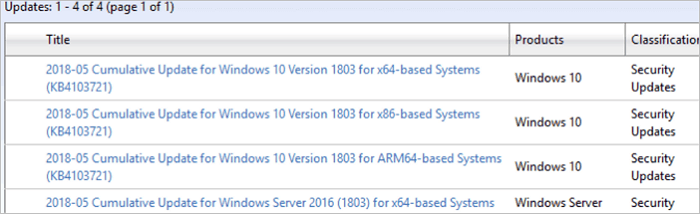
Step 3. To update your software manually, go to the website and search for the update code. Once you find it, click on it and follow the prompts to download and install it.
Step 4. Locate and update from search results.
The update you're referring to might be for a specific architecture of your system, such as x86 or x64. To ensure you're looking at the correct update, double-check the architecture of your system and match it with the update you're considering. This is crucial to avoid compatibility issues or installing an update that may not work with your system's architecture.
Step 5. The update can be downloaded by clicking on the download button in front of them.
Step 6. Execute the downloaded setup of the update and proceed with general settings.
Step 7. Restart your computer.
Once you've successfully installed the update, restart your computer to see if the changes have taken effect.
Fix 5. Reset Windows Updates Components
To fix Windows update error 0x80240034, you can reset the Windows update components, which are responsible for checking and automatically updating your Windows operating system. To do this, follow these steps: the steps below.
Step 1. To open the Command Prompt in Windows, press the Windows key + R to open the Run dialog box, type "CMD" inside it, and then press the Enter key. This will open a new Command Prompt window where you can execute various commands and perform tasks.
Step 2. Execute the commands mentioned below one by one.
- net stop wuauserv
- net stop cryptSvc
- net stop bits
- ren C:\Windows\SoftwareDistribution SoftwareDistribution.old
- ren C:\Windows\System32\catroot2 Catroot2.old
Step 3. After all the commands are executed, restart your computer.
Following the steps outlined above, you can reset Windows update components, which should resolve the issue. After completing these steps, you can check if the problem has been fixed for you.
Fix 6. Run a Full System Scan
Most Windows users are able to successfully fix the Windows update error 0x80240034 by following the suggested methods. However, if all else fails, it's possible that the system may be affected by malware and viruses, which can prevent the system from updating itself, ultimately resulting in the Windows update error 0x80240034.
To remove malware and viruses from your computer, use your Antivirus software to run a full system scan. This process can be time-consuming, depending on the data on your computer, so it's best to do it when you have no critical work to attend to. Once the scan is complete, your Antivirus should identify and remove any malicious threats, helping to keep your computer safe and secure.
How to Restore Data After Windows 11/10 Update
Installing Windows updates can be a gamble, with some users experiencing data loss after the process. Fortunately, if you've lost files during a Windows 11/10 update, you can recover them using Qiling free data recovery software.
Windows data recovery software helps restore data from Windows 11/10/8/7 efficiently, regardless of the reason for data loss, and can recover data from various loss scenarios.
- Recover lost data that you permanently deleted.
- Recover your lost partitions without any hassle.
- Quickly recover data that you lost during Windows updates.
- Recover data from any external media, e.g. SD card.
It is highly recommended to download and use this software to restore data lost due to the Windows update.
Step 1. Select file types to start
To recover deleted files, launch Deep Data Recovery, select the desired file types, and click "Next".

Step 2. Select a drive and start scanning
Hover over the partition where you lost data, then click "Scan".

Step 3. Check and preview scanned files
To find the files you need, use the file format filter on the left or upper right corner to narrow the scan results, then click the "Preview" button or double-click a file to preview its content if desired.

Step 4. Recover lost data to a secure location
To recover lost data, select the file, click the checkbox next to it, and then click "Recover". It's best to save the recovered data to a different location to avoid overwriting the original lost data.
Conclusion
Windows update error 0x80240034 occurs when trying to update Windows using the Windows Update menu, typically caused by file system failures, file registry issues, Windows update glitches, or malware. This error can be resolved using six easy methods, but if these attempts fail, manually updating Windows using the Windows Update Catalog is the best approach.
During a Windows update, there is a risk of losing data, but the recommended solution is to use Deep Data Recovery to restore lost data.
Related Articles
- The Add-In Template Is Not Valid in Word? 4 Fixes Here!
- Microsoft Partition Recovery Tool Free Download (2022): How to Get It and Apply
- Free CF Card Recovery Software to Recover Data in Windows/Mac
- Why Does My Computer Keep Freezing When Playing Games?
- How to Fix Folders Turned into Shortcuts
If your folders suddenly turned into shortcuts on your PC, USB pen drive, or portable storage devices, there are easy ways to fix them. Alternatively, if your saved files are lost, you can use Qiling file recovery software to restore them in just 3 steps. - [Solved] Double Click Won't Open Files Windows 11/10/8/7
If you're experiencing issues with opening folders by double-clicking in Windows 10, 8, 7, don't worry. You can use a reliable data recovery tool to recover files or folders if the desktop folders won't open or folder not opening issue persists. Alternatively, try the effective tips provided to fix the folder not opening on double click issue.