How to Create an Encrypted Virtual Drive on Windows
An encrypted virtual drive is a single file on your hard disk that, unlocked with a password, appears in Windows as a normal drive letter. Everything you save inside it is encrypted on the fly, and when you unmount it the data disappears from view.
This guide explains what an encrypted virtual drive is, why it is useful, and how to create and use one with Qiling Safe Disk.
PAGE CONTENT
- What Is an Encrypted Virtual Drive?
- Why Use an Encrypted Virtual Drive?
- What You Need Before You Start
- Create an Encrypted Virtual Drive with Safe Disk
- Mount, Use, and Unmount the Drive
- FAQs About Encrypted Virtual Drives
- Back Up Windows Before You Change Settings
What Is an Encrypted Virtual Drive?
A virtual drive is not a physical disk. It is a file stored on an existing hard drive, and when the right software mounts it, Windows treats it as a new drive letter such as Z: or X:.
An encrypted virtual drive adds password protection. The file on disk is stored as ciphertext, and the contents only become readable after you enter the correct password. Without the password, the file is indistinguishable from random data.
- The container file. Everything lives in one file, usually with an .fvd suffix in Safe Disk. You can copy it, back it up, or move it like any other file.
- On-the-fly encryption. Files are encrypted when written and decrypted when read, automatically. You work in the drive exactly as you would in any folder.
- A drive letter when mounted. Once unlocked, the container shows up in File Explorer with its own letter, so drag-and-drop and save-as work normally.
- Invisible when unmounted. Dismount the drive and there is no drive letter and no obvious sign of what is inside the container file.
Why Use an Encrypted Virtual Drive?
The main reason is separation: you keep sensitive files in one locked place instead of scattering them across the system.
- Protect confidential documents. Financial records, client files, and contracts stay encrypted even if someone copies the container.
- Hide personal data. Photos, messages, and notes are invisible until you mount the drive.
- Secure portable storage. Put the container on a USB stick and the data is safe if the stick is lost.
- Protect against malware. An unmounted container cannot be read by ransomware or spyware.
- Share a PC safely. Other users of the same computer cannot open your files without the password.
Unlike locking individual files, a virtual drive lets you work with hundreds of files normally while encryption runs in the background.
What You Need Before You Start
Check these before creating the drive:
- Free disk space. The container file needs room equal to the size of the virtual drive you want. Safe Disk supports containers up to 2048 GB.
- A strong password. Use at least 12 characters with a mix of letters, numbers, and symbols. There is no recovery if you forget it.
- Qiling Safe Disk installed. Download it from the official site and install it on Windows 11, 10, 8, 8.1, 7, Vista, or XP.
- Know where to store the container. Choose a folder you can find easily, or a USB drive for portability.
You do not need to format any existing partition. The container is created inside a file, so your current drives are untouched.
Create an Encrypted Virtual Drive with Safe Disk
Qiling Safe Disk creates a password-protected container and mounts it as a virtual drive. Download and install it first.
Step 1. Open Qiling Safe Disk. The main window shows the list of image files, which is empty on first run.
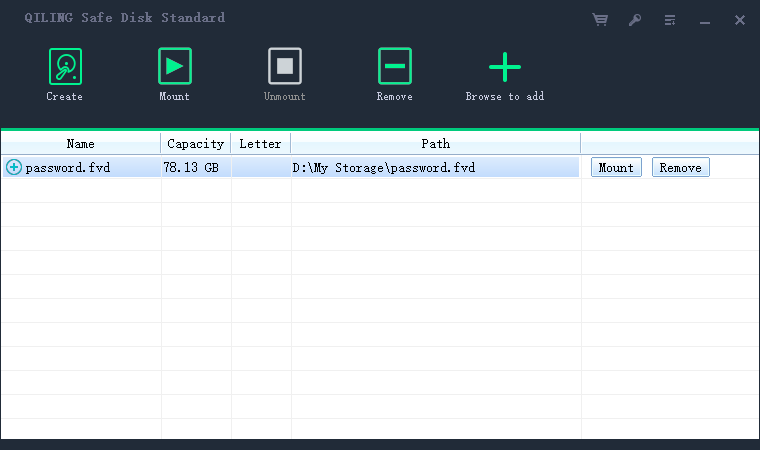
Step 2. Click the Create button to start a new encrypted container.
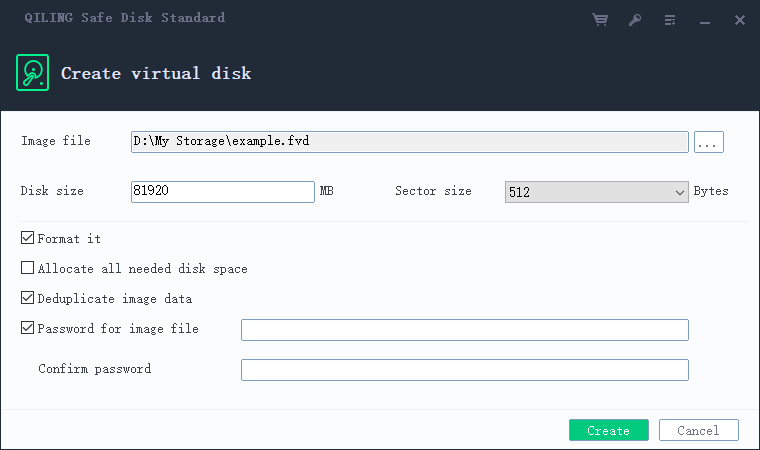
Step 3. Choose where to save the container file and give it a name. Set the virtual disk size, sector size (512 bytes is fine for most users), and tick the format option.
Step 4. Enter and confirm the password. This password unlocks the drive, so keep it safe. If you lose it, the data inside cannot be recovered.
Step 5. Click Create. Safe Disk builds the container file and formats it. The time depends on the size you chose.
Step 6. The new image appears in the list. It is now ready to be mounted.
Mount, Use, and Unmount the Drive
Creating the container is only half the job. You mount it to work with it, then unmount it to lock the data away.
Step 1. Select the image file in the Safe Disk list and click Mount.
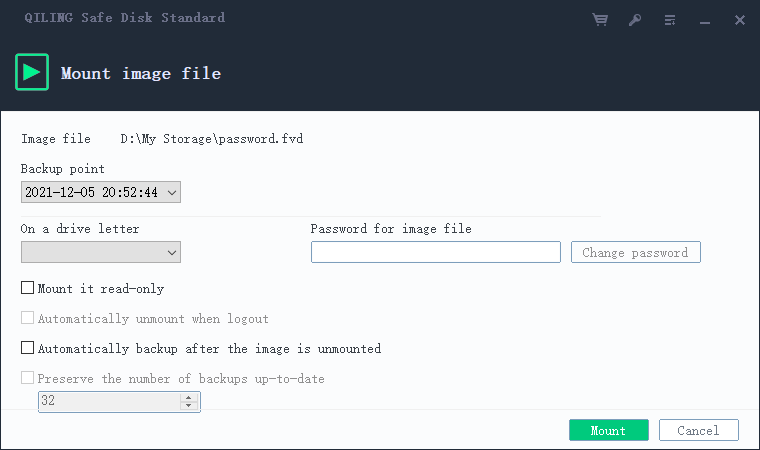
Step 2. Choose a drive letter, enter the password, and decide whether to mount as read-only. Read-only is useful when you only need to view files and want to prevent changes.
Step 3. Click Mount. The new drive appears in File Explorer. You can now copy, edit, and save files inside it exactly as on a normal disk.
Step 4. When you finish, return to Safe Disk, select the mounted image, and click Unmount. The drive letter disappears and the data is encrypted again.
- Auto-unmount on logoff. Tick this option so the drive locks automatically when you sign out of Windows.
- Auto-backup on unmount. Safe Disk can keep backup copies of the container, which helps if a file becomes corrupted.
- Read-only mount. Prevents accidental edits and blocks malware from modifying files inside the drive.
FAQs About Encrypted Virtual Drives
Can I use the drive on another computer?
Yes. Copy the container file to another PC that has Qiling Safe Disk installed, mount it with the password, and your files are available.
What happens if I forget the password?
The data cannot be recovered. Safe Disk uses strong encryption with no back door, so store the password somewhere safe before you create the drive.
Will encryption slow down my files?
Modern CPUs accelerate AES encryption in hardware, so the performance impact is usually under a few percent and barely noticeable.
Can ransomware encrypt files inside the drive?
Only if the drive is mounted. An unmounted container is just an encrypted file that ransomware cannot read or modify.
How large can the virtual drive be?
Qiling Safe Disk supports containers up to 2048 GB, limited only by the free space on the disk where you store the file.
Back Up Windows Before You Change Settings
Before installing software or changing storage settings, create a full Windows backup so you can roll back if anything goes wrong. Qiling Disk Master creates a system image you can restore from.
Step 1. Install and open Qiling Disk Master. Choose "System Backup" to include Windows and the boot partitions automatically.
Step 2. Pick a destination drive other than the Windows disk, then click "Proceed" and wait for the backup to finish.
Step 3. Keep the backup image safe. If a change breaks Windows, restore from this image to get everything back.
Conclusion
An encrypted virtual drive is one of the simplest ways to protect sensitive files. You create a single password-protected container, mount it as a drive letter, and work normally. When you unmount it, the data is locked away and invisible. Qiling Safe Disk handles the encryption automatically with AES, Blowfish, GOST, and 3DES support, containers up to 2048 GB, and options for read-only mounts and automatic backups. The only thing you must protect is the password, because without it the data cannot be recovered.
For more on protecting your data, see How to Encrypt a USB Flash Drive, VeraCrypt vs Qiling Safe Disk, How to Hide Files with Encryption, and How to Use Qiling Safe Disk.
Related Articles
- How to Encrypt Files Before Uploading to Cloud Storage
Upload the encrypted container to OneDrive or Google Drive and keep the contents private. - How to Encrypt a Folder with Password on Windows
Put a whole folder inside the encrypted container and protect it with its own password. - How to Mount an Encrypted Drive on Another Computer
Move the container to another PC and open it with Safe Disk, even without installing software. - How to Backup an Encrypted Drive or Container
Copy the container file to a separate drive so you never lose the encrypted virtual drive. - What is Disk Imaging
Back up the container file itself with a disk image so you never lose access.
Products
Articles & Tutorials
- Data Recovery
- Data Backup
- File Recovery
- File Backup
- System Backup and Restore
- Disk and Partition Clone
- Technical articles
- Mobile articles
- Disk Master Help
- Windows Data Recovery Tutorials
- Windows Secure Delete Tutorials
- Windows Partition Management Tutorials
- Windows File Backup and Restore Tutorials
- Windows System Backup and Restore Tutorials
- Windows Disk Backup and Restore Tutorials
- Windows Clone Tutorials