How to Encrypt Files Before Uploading to Cloud Storage
Cloud services like OneDrive, Google Drive, and Dropbox make files easy to access from anywhere, but they also put your data on someone else's server. The provider may scan files, share them with authorities, or suffer a breach. Encrypting files before you upload them keeps the contents private, even from the cloud provider itself.
This guide explains why cloud encryption matters, how to encrypt files with a Safe Disk container, and how to access them from any device.
PAGE CONTENT
- Why Encrypt Files Before Uploading to the Cloud
- Cloud-Provided Encryption vs Client-Side Encryption
- Why an Encrypted Container Works Best for Cloud
- Encrypt Files for Cloud with Qiling Safe Disk
- Access the Encrypted Files from Any Device
- FAQs About Cloud Encryption
- Back Up Windows Before You Change Settings
Why Encrypt Files Before Uploading to the Cloud
Uploading a file to the cloud means handing it to a third party. Even with a trusted provider, there are risks.
- Provider access. The cloud provider can read unencrypted files, and some scan them for advertising, policy enforcement, or legal requests.
- Data breaches. Cloud servers are high-value targets. A breach can expose every unencrypted file in your account.
- Account takeover. If someone steals your cloud password, they can download and read all your unencrypted files.
- Shared accounts. Family or team accounts may let other people browse your files.
- No control after upload. Once the file is on their server, you cannot control who accesses it or how long it is kept.
Client-side encryption solves all of this. You encrypt the file on your own computer, so the cloud provider only ever sees an unreadable blob.
Cloud-Provided Encryption vs Client-Side Encryption
Most cloud services offer some encryption, but not all encryption is equal.
- Encryption in transit. Files are encrypted while moving from your computer to the cloud. This protects against interception during upload.
- Encryption at rest. Files are encrypted on the provider's servers. This protects against physical theft of the drives.
- Provider holds the keys. With in-transit and at-rest encryption, the provider has the decryption keys and can read your files.
- Client-side encryption. You encrypt the files before uploading. Only you have the key. The provider cannot read the contents.
For true privacy, use client-side encryption. The cloud provider's encryption protects against some threats, but it does not protect your data from the provider itself.
Why an Encrypted Container Works Best for Cloud
An encrypted container is a single file that holds many files inside. It is ideal for cloud storage.
- One upload. Instead of encrypting and uploading dozens of files, you upload one container file.
- Encrypted filenames. The container hides not just the file contents but also the filenames and folder structure.
- No metadata leakage. The cloud provider sees only the container file, not what is inside it.
- Easy to move. The container works with any cloud service because it is just a regular file.
- Sync friendly. When you edit a file inside the container and unmount it, only the container file changes, making sync simple.
Avoid encrypting files one by one with ZIP or individual tools. A container is more convenient and keeps everything organized.
Encrypt Files for Cloud with Qiling Safe Disk
Qiling Safe Disk creates an encrypted container. You put the files you want to upload inside it, then upload the container. Download Safe Disk first.
Step 1. Open Qiling Safe Disk and click Create to make a new container.
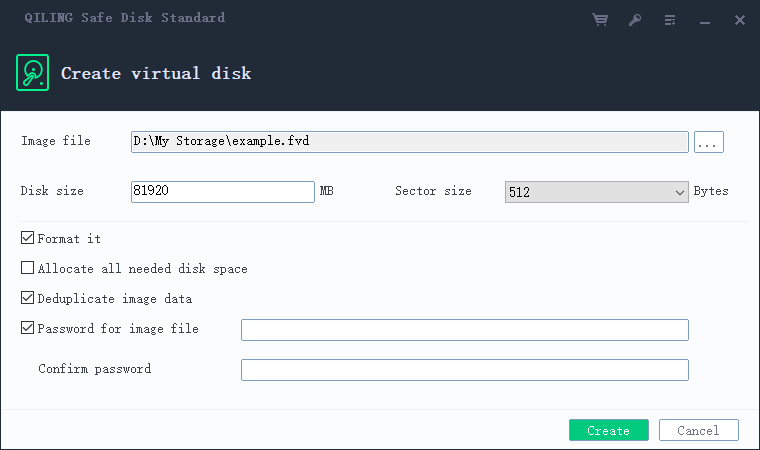
Step 2. Choose a location on your local disk, set a size large enough for your files, and select AES-256 encryption.
Step 3. Set a strong password that you do not use for the cloud account. The password unlocks the container, not the cloud.
Step 4. After creating the container, select it and click Mount. Enter the password and choose a drive letter.
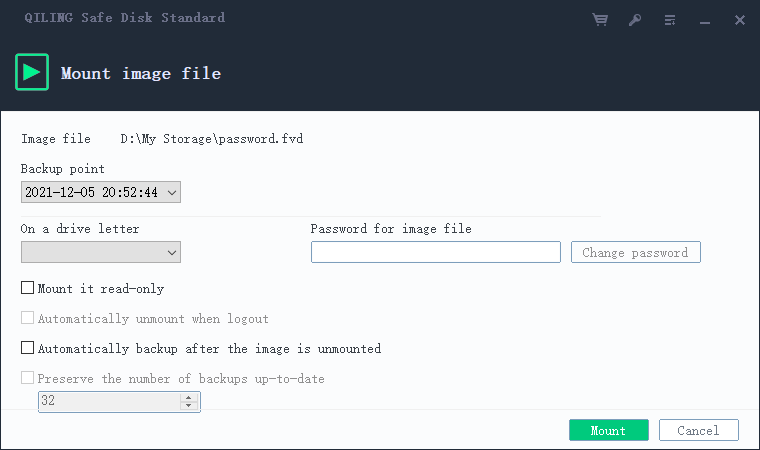
Step 5. Copy the files you want to protect into the mounted drive. Every file is encrypted automatically.
Step 6. Click Unmount to lock the container. The drive letter disappears, and the container file is ready to upload.
Step 7. Upload the .fvd container file to your cloud storage service, just like any other file.
Access the Encrypted Files from Any Device
To open the encrypted files on another device, download the container and mount it.
- Download the container. Open your cloud storage app or website and download the .fvd file to the local disk.
- Install Safe Disk. The device needs Qiling Safe Disk installed or the portable version on a USB stick.
- Add and mount. Open Safe Disk, click Add Old Image, browse to the downloaded container, and enter the password.
- Work with files. The container appears as a drive letter. Open, edit, and save files normally.
- Unmount and re-upload. When done, unmount the container and upload the updated file back to the cloud.
If you use multiple devices, be careful not to edit the same container on two devices at once. Cloud sync can merge changes incorrectly and corrupt the container. Work on one device at a time, and let sync finish before opening it elsewhere.
FAQs About Cloud Encryption
Can the cloud provider read my encrypted container?
No. The container is encrypted with your password. The provider only sees the encrypted file and cannot open it without the password.
Should I use the same password for the cloud and the container?
No. Use a different password for each. If your cloud account is compromised, the attacker still cannot open the container.
Can I edit files inside the container while it is in the cloud?
No. You must download the container, mount it locally, edit the files, unmount, and re-upload. You cannot edit directly in the cloud.
What if I lose the container password?
The files cannot be recovered. Store the password in a password manager and keep a backup of the container on a local drive.
Is client-side encryption slow?
Not noticeably. AES-256 is hardware-accelerated on modern CPUs. You only notice the time to mount and unmount the container.
Back Up Windows Before You Change Settings
Before installing encryption software or changing cloud settings, create a full Windows backup. Qiling Disk Master creates a system image you can restore from.
Step 1. Open Qiling Disk Master and select "System Backup" to include Windows and the boot partitions.
Step 2. Save the image to a drive other than the Windows disk and start the backup.
Step 3. If a change causes issues, restore from the image to return Windows to its working state.
Conclusion
Cloud storage is convenient but not private unless you encrypt files before uploading. Cloud providers offer encryption in transit and at rest, but they hold the keys and can read your data. Client-side encryption with a Safe Disk container puts the key in your hands. Create a container, put your files inside, unmount it, and upload the single encrypted file to any cloud service. The provider sees only an unreadable blob, and only you can open it with your password. Use a separate password for the container and the cloud account, keep a local backup, and work on one device at a time to avoid sync conflicts. With client-side encryption, you get the convenience of the cloud without giving up your privacy.
For more on encryption and cloud safety, see How to Create an Encrypted Virtual Drive, How to Share Encrypted Files Securely, How to Backup an Encrypted Drive or Container, and How to Use Qiling Safe Disk.
Related Articles
- How to Mount an Encrypted Drive on Another Computer
Download the cloud container on another PC and mount it with Safe Disk and your password. - How to Hide Files with Encryption
Hide the encrypted container file in the cloud so it is both out of sight and unreadable. - Best Encryption Algorithm for Files: AES, Blowfish, GOST, 3DES
Pick a strong algorithm for the container before uploading it to cloud storage. - Is Encryption Enough to Protect Your Data?
See why encrypting for the cloud is one layer of a complete protection plan. - What is Disk Imaging
Back up the whole disk, including the local copy of your cloud containers.
Products
Articles & Tutorials
- Data Recovery
- Data Backup
- File Recovery
- File Backup
- System Backup and Restore
- Disk and Partition Clone
- Technical articles
- Mobile articles
- Disk Master Help
- Windows Data Recovery Tutorials
- Windows Secure Delete Tutorials
- Windows Partition Management Tutorials
- Windows File Backup and Restore Tutorials
- Windows System Backup and Restore Tutorials
- Windows Disk Backup and Restore Tutorials
- Windows Clone Tutorials