How to Use a RAM Disk for Gaming: Reduce Load Times and Stutter
Gamers often blame the GPU for slow load times and stutter, but the storage drive is just as important. Modern games stream large amounts of data from disk, and many of them build shader caches and mod caches on the fly. When those caches sit on a slow drive, the game waits on the disk, stutters during the first minutes of play, and takes longer to load. A RAM disk moves that fast-changing data into memory, where it is served almost instantly.
This guide explains why games stutter and load slowly, what a RAM disk can and cannot do for gaming, how much memory you need, and how to set one up with Qiling Disk Master. It also shows how to combine a RAM disk with a disk cache for the best gaming experience.
PAGE CONTENT
- Why Games Load Slowly and Stutter
- How a RAM Disk Helps Gaming
- How Much RAM You Need for a Game RAM Disk
- Create a RAM Disk for Gaming
- Move Shader and Mod Caches to the RAM Disk
- Combine with Fast Cache for Game Drives
- Best Practices and Limitations + FAQs
- Back Up Windows Before You Change Settings
Why Games Load Slowly and Stutter
A game's load time and smoothness depend on how fast it can pull data from storage. Two patterns cause most of the pain:
- Loading screens — the game reads large asset files from disk. On a slow HDD this is the biggest bottleneck.
- Shader compilation and caching — the first time you play, the game compiles shaders and writes them to a cache. If the cache uses a slow drive, you get stutter while the game rebuilds it.
- Mod and texture streaming — open-world games stream textures and assets as you move. A slow disk causes hitches.
Putting the game itself on an SSD helps, but shader and mod caches change constantly and benefit from even faster storage.
How a RAM Disk Helps Gaming
A RAM disk is a virtual drive in memory. It is many times faster than an SSD, with near-zero latency, which makes it perfect for the small, frequently written cache files games generate.
What a RAM disk does for gaming:
- Faster shader cache reads and writes — the game rebuilds its shader cache quickly, reducing first-run stutter.
- Snappier mod loading — mod managers and mod caches run faster when their data is in memory.
- Less SSD wear — constant shader and cache writes go to RAM instead of your SSD.
- Clean state each session — caches are wiped on reboot, so they never grow bloated or corrupt.
What a RAM disk does not do: it cannot hold a large modern game that is tens or hundreds of gigabytes. For the game files themselves, an SSD or a disk cache is the right tool. The RAM disk is for the caches and temporary data around the game.
- Note
- Do not install the whole game on a RAM disk. Only use it for shader, mod, and temporary caches, which are small and rebuilt automatically.
How Much RAM You Need for a Game RAM Disk
A RAM disk takes memory away from your games, so you must have headroom. Games themselves can use 8-16 GB of RAM.
- 16 GB total RAM — use a small 2 GB RAM disk for a single game's shader cache. Skip it if you play memory-hungry titles.
- 32 GB total RAM — use a 4-8 GB RAM disk for shader and mod caches. This is the sweet spot for gaming.
- 64 GB or more — use an 8-16 GB RAM disk and still keep plenty free for games.
Always leave at least half your RAM for Windows and your games. If you notice the game using the page file or dropping frames, shrink the RAM disk.
Create a RAM Disk for Gaming
Qiling Disk Master creates a RAM disk in a few clicks.
Step 1. Download and install Qiling Disk Master. The free edition includes the RAM disk feature.
Step 2. Open the Tools and Utilities page.
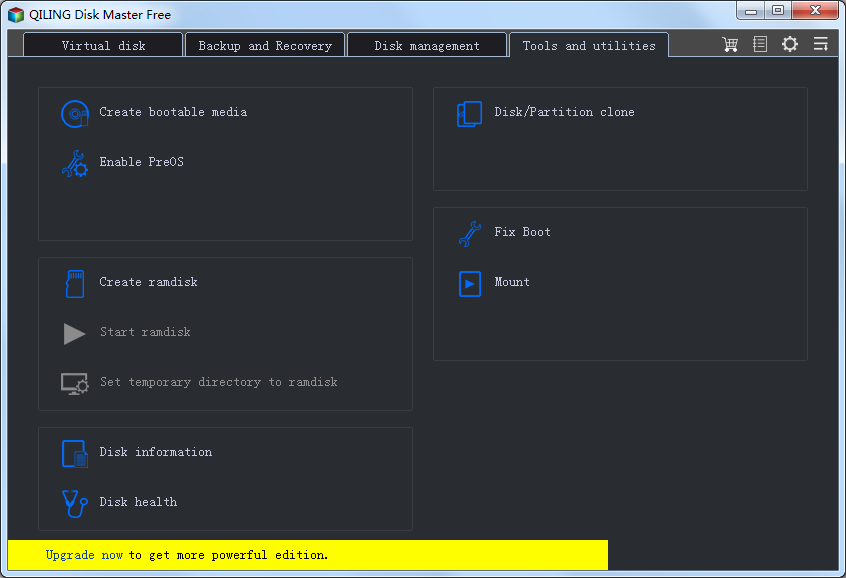
Step 3. Click "Create ramdisk".
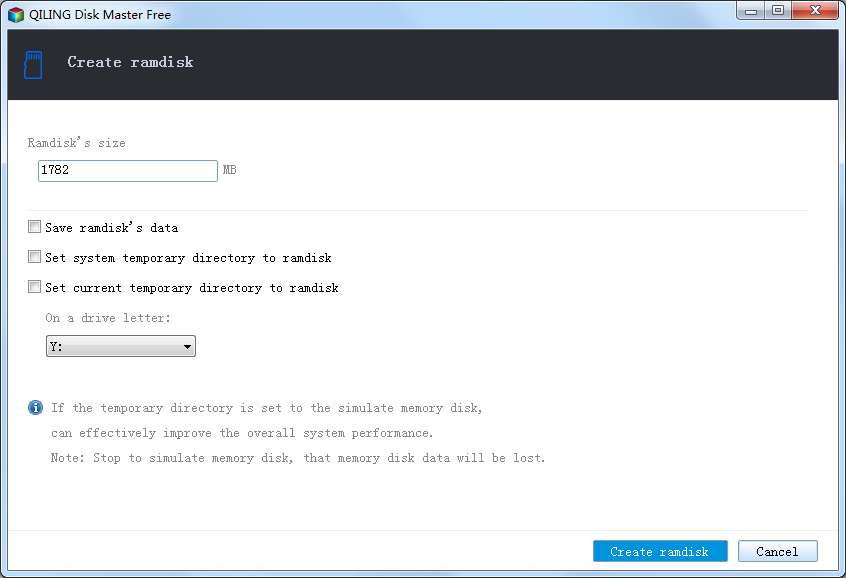
Step 4. Set the size, choose a drive letter such as R:, and select NTFS. Enable auto-mount at startup and click the Create ramdisk button.
Step 5. Create a cache folder. On the RAM disk, make a folder such as R:\GameCache for shader and mod caches.
For the full walkthrough, see How to Create a RAM Disk in Windows 11.
Move Shader and Mod Caches to the RAM Disk
Once the RAM disk exists, point your game caches at it. The exact method depends on the game, but these approaches cover most cases.
Where shader and cache data lives
Game caches are usually stored in one of these places:
- The game's own install folder, in a folder named Cache, ShaderCache, or similar.
- Your user profile, such as %LOCALAPPDATA% or Documents, in a game-specific folder.
- The GPU driver's shader cache directory.
Redirect a cache folder with a symbolic link
Many games do not offer a setting to change the cache location, so you can redirect the folder to the RAM disk with a directory junction.
Step 1. Move the game's existing cache folder to the RAM disk, for example to R:\GameCache\ShaderCache.
Step 2. Open Command Prompt as administrator.
Step 3. Create a junction so the game still finds its cache at the old path but the data lives on the RAM disk:
mklink /J "C:\Origin1\ShaderCache" "R:\GameCache\ShaderCache"
Step 4. Launch the game and confirm it writes to the cache. Because the RAM disk is wiped on reboot, recreate the folder and junction with a startup script if you want it every session.
- Note
- Only redirect cache folders, never the game's core files. Deleting a real game file through the RAM disk would break the install. Keep the original data on a real drive.
Combine with Fast Cache for Game Drives
The best gaming setup pairs a RAM disk for caches with a disk cache for the game drive itself.
- RAM disk — for shader caches, mod caches, and temporary game data. Extreme speed, wiped on reboot.
- Fast Cache — caches the frequently read blocks of the game's install drive, so loading screens and streaming are faster.
If your games are on a hard drive, use Qiling Fast Cache to cache that drive with a fast SSD or spare RAM. The combination means caches live in RAM and the game's hot files are served from a faster tier. To learn how, see Windows 11 Fast Cache: Speed Up HDD with RAM and SSD Cache.
Best Practices and Limitations + FAQs
- Keep the game on a real drive. Use the RAM disk only for caches and temp data.
- Leave half your RAM free. Games are memory-hungry; do not starve them.
- Recreate folders at startup. Add a script so cache folders and junctions exist after every reboot.
- Test the impact. Measure load times before and after to confirm the change helps.
Will a RAM disk make my FPS higher?
No. FPS depends on the CPU and GPU. A RAM disk reduces load times and stutter, not the frame rate itself.
Can I put my whole game on a RAM disk?
Only for very old, small games. Modern titles are far too large. Use the RAM disk for caches, and an SSD or disk cache for the game files.
Is it safe to redirect shader cache folders?
Yes, as long as you only redirect cache folders and keep the original game files on a real drive. If anything goes wrong, delete the junction and the game rebuilds its cache normally.
Will this reduce SSD wear?
Yes. Shader and cache files are written constantly while gaming; moving them to RAM spares your SSD those writes.
Do I need a fast CPU for this?
No. A RAM disk is a memory-based drive and does not depend on CPU speed. The main requirement is spare RAM.
Back Up Windows Before You Change Settings
A RAM disk is safe to create, but if you also redirect folders or change game settings, a backup protects your system. Qiling Disk Master creates a full Windows image you can restore from if anything goes wrong.
Part 1: Create a Full System Backup
Step 1. Install and open Qiling Disk Master. On the home screen, open "Backup and Recovery" and choose "System Backup". This option automatically includes Windows and the hidden boot partitions, so you do not have to select them one by one.

Step 2. Check the source. The disk where Windows is installed and its system partitions are already ticked for you. If you only need your personal documents, run a separate "File Backup" task instead.

Step 3. Click the destination box and choose where the image should be saved. Use an external HDD or SSD, a NAS, or any drive other than the one Windows is installed on, and make sure it has enough free space.

Step 4. Review the task summary and click "Proceed". Wait until the progress bar reaches 100%. Do not unplug the drive or turn off the PC while the backup is running.

Part 2: Restore Windows from the Backup
Step 1. Open Qiling Disk Master again, go to "Backup and Recovery", and select the recovery option. Your backup images are listed, so pick the one you created before the changes began.

Step 2. Choose the target disk or partition. Normally you restore to the original system disk. If the drive was replaced, select the new disk instead, and the restore rebuilds Windows together with its boot partitions.

Step 3. Preview the restore plan, click "Proceed", and confirm the warning. The PC restarts to finish the job, and Windows comes back exactly as it was on the day the image was created, with your files and programs intact.

- Note
- Keep the backup image on a separate drive, and refresh it before redirecting game folders or changing system paths.
Conclusion
A RAM disk is a smart way to reduce game load times and stutter without buying new hardware. By holding shader caches, mod caches, and temporary game data in memory, it serves that fast-changing data instantly and spares your SSD the writes. Create a 4-8 GB RAM disk with Qiling Disk Master, make a cache folder on it, and redirect your game's cache directories with a junction. Keep the game itself on a real drive, leave at least half your RAM free, and pair the setup with Qiling Fast Cache to accelerate the game's install drive. The result is shorter loads, less first-run stutter, and a longer-lasting SSD.
Protect your PC with Qiling Backup—create a system image before your next round of settings changes.
For more Windows 11 performance guides, see How to Create a RAM Disk in Windows 11, Windows 11 Fast Cache, SSD Cache vs RAM Disk, Use a RAM Disk for Video Editing, and Best RAM Disk Software for Windows 11.
Related Articles
- How to Create a RAM Disk in Windows 11: Step-by-Step Guide
Full walkthrough for creating and sizing a RAM disk with Qiling Disk Master. - Faster Gameplay with Fast Cache, Enhancing Your Gaming Experience
- SSD Cache vs RAM Disk: Which Speeds Up Windows 11 More?
- Windows 11 Guide: Features, Upgrade Tips and What to Know
- How to Run a Game Server on a RAM Disk in Windows 11
- Windows 11 Shader Cache: What It Does and When to Clear It
Products
Articles & Tutorials
- Data Recovery
- Data Backup
- File Recovery
- File Backup
- System Backup and Restore
- Disk and Partition Clone
- Technical articles
- Mobile articles
- Disk Master Help
- Windows Data Recovery Tutorials
- Windows Secure Delete Tutorials
- Windows Partition Management Tutorials
- Windows File Backup and Restore Tutorials
- Windows System Backup and Restore Tutorials
- Windows Disk Backup and Restore Tutorials
- Windows Clone Tutorials