How to Run a Game Server on a RAM Disk in Windows 11
A game server spends a surprising amount of time waiting on storage. Loading chunks, saving the world, writing logs, and reading plugin files all touch the disk, and on a mechanical drive those pauses are visible to every player connected. A RAM disk removes that waiting — but it also removes your save files at the next shutdown, so the setup only makes sense with a disciplined backup routine.
This guide covers what a RAM disk actually improves on a game server, a safe configuration that keeps logs and temporary data in memory, an aggressive configuration that also puts the world there, and the sync and backup rules that keep either one from ending in tears.
PAGE CONTENT
- What a RAM Disk Improves on a Game Server
- The Risk You Are Taking
- Setup A: Safe - Logs, Temp, and Caches in Memory
- Setup B: Advanced - The World Folder in Memory
- Step-by-Step: Create the RAM Disk
- Keep It Running: Sync, Backup, and Monitoring
- FAQs About Game Servers and RAM Disks
- Back Up Windows Before You Change Settings
What a RAM Disk Improves on a Game Server
Not every part of a game server is storage-bound. Once the world is loaded, most of the work is CPU and network: simulating entities, running plugin logic, and sending updates to players. A RAM disk does not help with any of that. What it does help with is the moments when the server touches files:
- Chunk and region loading, when players move into unexplored or unloaded areas.
- World saves, which happen on a timer and during shutdown, and which stutter the whole server on a slow disk.
- Log writing, which continues constantly and grows quickly on a busy server.
- Plugin and mod loading at startup, when hundreds of small files are read in sequence.
If your server runs from a hard drive, those operations are where the pauses come from. If it already runs from an NVMe SSD, the gain will be much smaller — measure before you invest memory.
The Risk You Are Taking
A RAM disk is volatile. Everything on it is destroyed by a shutdown, a restart, a power cut, or a crash, and game servers crash more often than most software. There is no recovery from a lost RAM disk: the data is simply gone.
Because of that, the choice comes down to what you are willing to rebuild:
- Logs and temporary files can live in RAM, because losing them costs you nothing but history. This is the low-risk option.
- The world folder can live in RAM, but only with automatic, frequent copies to real storage, and only if you accept that a crash between copies loses recent progress.
- Note
- Never run a server whose only copy of the world is on a RAM disk. If you take one thing from this guide, take that.
Setup A: Safe - Logs, Temp, and Caches in Memory
This configuration gives you most of the benefit with almost none of the risk, because nothing valuable ever lives in RAM.
- Log files. Point the server's log directory at the RAM disk. Logs are written constantly, are large, and are the single biggest source of unnecessary disk writes on a busy server. If you need a permanent record, have a scheduled task copy the log folder to real storage every hour.
- Java temporary files. Set the TMP and TEMP environment variables for the server process to the RAM disk, so archives and temporary data during startup stay in memory.
- Transient plugin data. Caches that plugins regenerate on their own, such as map renderers or web previews, are good candidates.
- Server jars and libraries. If your server loads many libraries at startup, keeping a copy on the RAM disk speeds launches without risking any data, since these files can always be downloaded again.
With this setup, the world folder stays on your SSD, backups keep working as before, and you still remove a large amount of constant small writes.
Setup B: Advanced - The World Folder in Memory
If you want the short save times and instant chunk loading that come from having the world in memory, you can go further, but only with a sync routine you trust.
- Copy the world to the RAM disk at startup, and let the server use it there.
- Sync it back to the SSD on a schedule, for example every five minutes, using a simple copy script or a tool such as robocopy with the mirror option.
- Sync on a clean shutdown as well, so the last save of the session reaches disk.
- Keep generation history on the SSD. Do not let the sync overwrite your only backup; keep dated copies or use your regular backup schedule.
- Size the RAM disk for the world plus headroom. A world that is 6 GB on disk needs at least 8 GB of RAM disk, and the sync needs temporary space too.
This is a reasonable choice for a private server with a handful of players, where a crash between syncs costs a few minutes of building. It is a poor choice for a large public server where a failure would roll back hours of progress for many people.
Step-by-Step: Create the RAM Disk
Step 1. Download and install Qiling Disk Master. The free edition includes the RAM disk feature.
Step 2. Open the Tools and Utilities page in the main window.
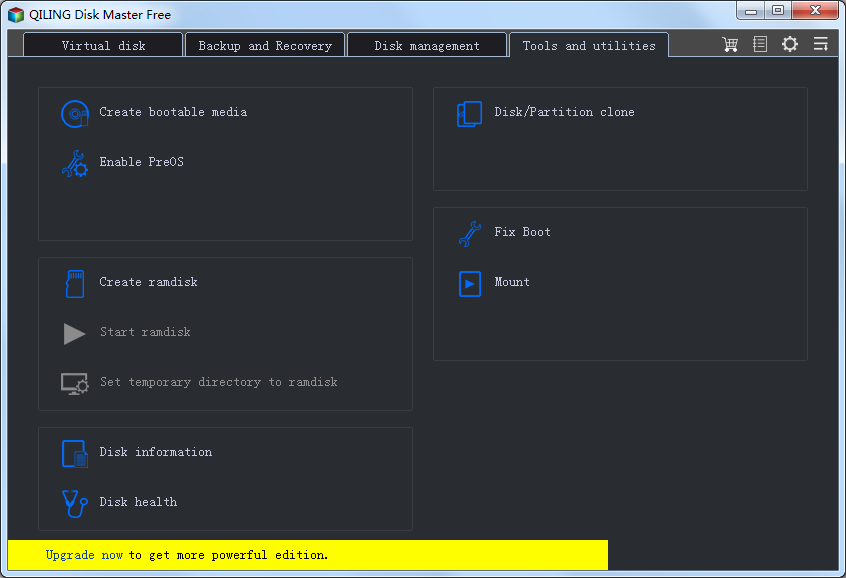
Step 3. Click Create ramdisk.
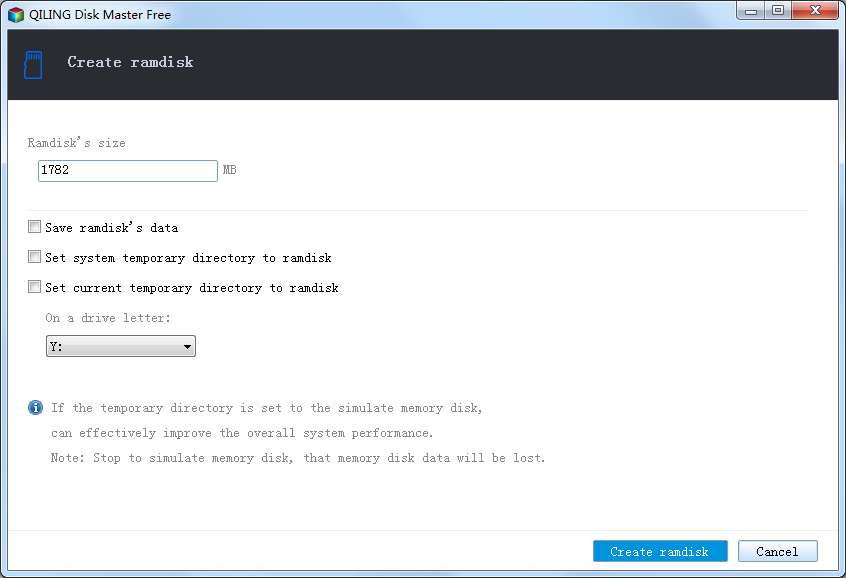
Step 4. Set the size. Leave at least 8 GB for Windows and the server process itself, then give the RAM disk whatever remains — 4 GB is enough for logs and temp files, while a world in memory needs considerably more.
Step 5. Choose a free drive letter such as R:, select NTFS, enable mounting at startup, and click Create.
Step 6. Create the folders your server needs, for example R:\world, R:\logs, and R:\temp, and update the server configuration to point at them.
Keep It Running: Sync, Backup, and Monitoring
A RAM disk server is only as reliable as the routine around it.
- Automate the sync. A scheduled copy every few minutes is far better than remembering to do it by hand.
- Back up the world on the SSD. Qiling Disk Master can image the drive that holds your server files, so a corrupted world or a failed plugin update is recoverable. See the backup section below.
- Watch memory. If the machine starts paging while the server is busy, the RAM disk is too large. Shrink it rather than letting Windows page to disk.
- Consider caching the server drive instead. If your world must stay on real storage, Qiling Fast Cache accelerates the drive that holds the server files by keeping hot blocks in spare RAM and on a spare SSD, with no risk of data loss — a good middle ground for a public server.
- Test the recovery path. Once, on purpose, stop the server and restore the world from the SSD to confirm your routine actually works.
FAQs About Game Servers and RAM Disks
Will a RAM disk reduce lag for players?
It reduces lag caused by disk access, such as chunk loading and world saves. Lag caused by CPU load, plugins, or slow player connections is unaffected.
How much RAM do I need for a server world on a RAM disk?
Size the RAM disk larger than the world folder, and leave at least 8 GB for Windows and the server. A 6 GB world with a small server needs a 16 GB machine at minimum, and 32 GB is more comfortable.
Is it safe for a public server?
Not for the world folder. For a public server, keep the world on SSD and use the RAM disk only for logs and temporary files, or cache the server drive instead.
What happens if the server crashes with the world in RAM?
You lose everything since the last sync. With a five-minute sync interval, that is up to five minutes of progress; without one, it is everything since startup.
Can I put the server's own installation in RAM?
Yes, and it is low risk because server jars and libraries can be downloaded again. Just keep the configuration files in your backup routine so you do not have to rebuild settings by hand.
Do I still need an SSD if I use a RAM disk?
Yes. The SSD is where your world and backups live. The RAM disk is a fast workspace on top of it, not a replacement for it.
Back Up Windows Before You Change Settings
Game server data is worth protecting, and so is the machine running it. Qiling Disk Master creates a full Windows image you can restore from if anything goes wrong.
Part 1: Create a Full System Backup
Step 1. Install and open Qiling Disk Master. On the home screen, open "Backup and Recovery" and choose "System Backup". This option automatically includes Windows and the hidden boot partitions, so you do not have to select them one by one.

Step 2. Check the source. The disk where Windows is installed and its system partitions are already ticked for you. If you only need your personal documents, run a separate "File Backup" task instead.

Step 3. Click the destination box and choose where the image should be saved. Use an external HDD or SSD, a NAS, or any drive other than the one Windows is installed on, and make sure it has enough free space.

Step 4. Review the task summary and click "Proceed". Wait until the progress bar reaches 100%. Do not unplug the drive or turn off the PC while the backup is running.

Part 2: Restore Windows from the Backup
Step 1. Open Qiling Disk Master again, go to "Backup and Recovery", and select the recovery option. Your backup images are listed, so pick the one you created before the changes began.

Step 2. Choose the target disk or partition. Normally you restore to the original system disk. If the drive was replaced, select the new disk instead, and the restore rebuilds Windows together with its boot partitions.

Step 3. Preview the restore plan, click "Proceed", and confirm the warning. The PC restarts to finish the job, and Windows comes back exactly as it was on the day the image was created, with your files and programs intact.

- Note
- Keep the backup image on a separate drive, and refresh it before moving server files or changing their paths.
Conclusion
A RAM disk can make a game server noticeably smoother — chunk loading, saves, and logging all get faster — but only if you separate what is disposable from what is precious. Put logs, temporary files, and startup libraries in memory and you cut disk writes with no real risk. Put the world there only with an automatic sync every few minutes, a clean-shutdown sync, and a tested restore routine, and never as the only copy. Create the drive with Qiling Disk Master, and if your world has to stay on real storage, let Qiling Fast Cache accelerate the server drive instead.
Protect your PC with Qiling Backup—create a system image before your next round of settings changes.
For more Windows 11 performance guides, see How to Create a RAM Disk in Windows 11, Is a RAM Disk Worth It?, RAM Disk for Gaming, Windows 11 Fast Cache, and Move the TEMP Folder to a RAM Disk.
Related Articles
- How to Make a Minecraft Server
Set up the server first, then decide what belongs in memory. - RAM Disk for Gaming: What Actually Helps
The client-side counterpart to this server-side setup. - Is a RAM Disk Worth It? An Honest Look
- How to Create a RAM Disk in Windows 11
- SSD Cache vs RAM Disk: Which Speeds Up Windows 11 More?
Products
Articles & Tutorials
- Data Recovery
- Data Backup
- File Recovery
- File Backup
- System Backup and Restore
- Disk and Partition Clone
- Technical articles
- Mobile articles
- Disk Master Help
- Windows Data Recovery Tutorials
- Windows Secure Delete Tutorials
- Windows Partition Management Tutorials
- Windows File Backup and Restore Tutorials
- Windows System Backup and Restore Tutorials
- Windows Disk Backup and Restore Tutorials
- Windows Clone Tutorials